Users Guide
When users access The OptimalCloud they are presented with the Welcome Page.
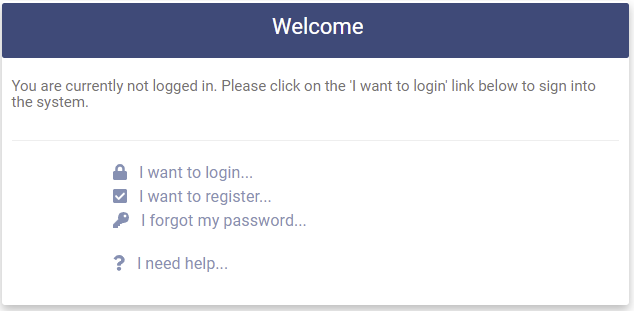
The following choices are available:
- I want to login - Click here if you have already registered an account in The OptimalCloud and want to login.
- I want to register - Click here to Register an account in The OptimalCloud. See the Register for an Account section.
- I forgot my password - Click here if you have forgotten your password and need to reset it. See the Forgot Password section.
- I need help - Click here to view the online documentation.
Click on one of the above choices to proceed.
Login
Clicking on the "I want to login" link will present the Login Page. Required fields have an "*" preceding them.
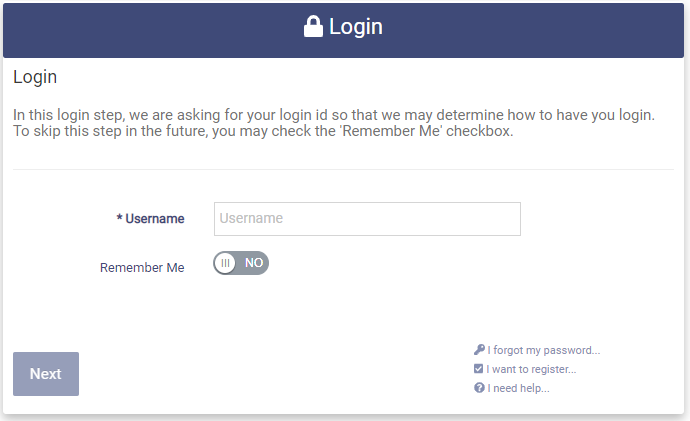
There are three options on the page if needed:
-
I want to register - Click here if you have not already registered an account in The Optimal Cloud. See the Register for an Account section.
-
I forgot my password - Click here if you have forgotten your password and need to reset it. See the Forgot Password section.
-
I need help - Click here to view the online documentation.
To Login:
Enter your Username - the email address that was specified during account registration.
In order to skip this step in the future, switch the Remember Me toggle to ON. The default setting is OFF.
Click the  button to proceed. The Password entry field is presented.
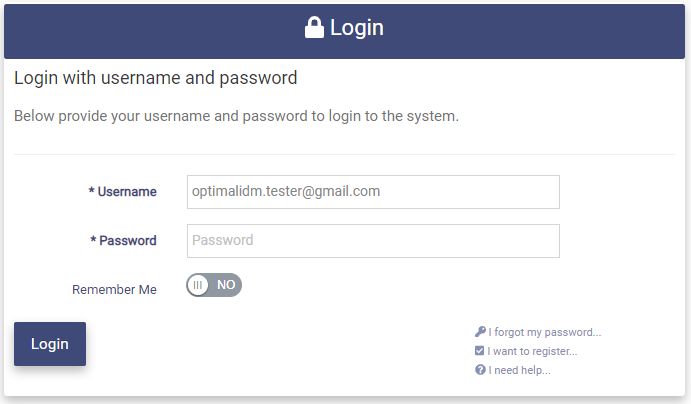
Enter the password that was specified during account registration for this account.
Click the  button to Login.
If the password is not correct, the following message will appear:

If the password is correct, you will be presented with the Home/Portal Page:
See the Home/Portal Page section for more information about the usage of this page.
Register for an Account
Clicking on the "I want to register" link will present the Account Registration Options page.
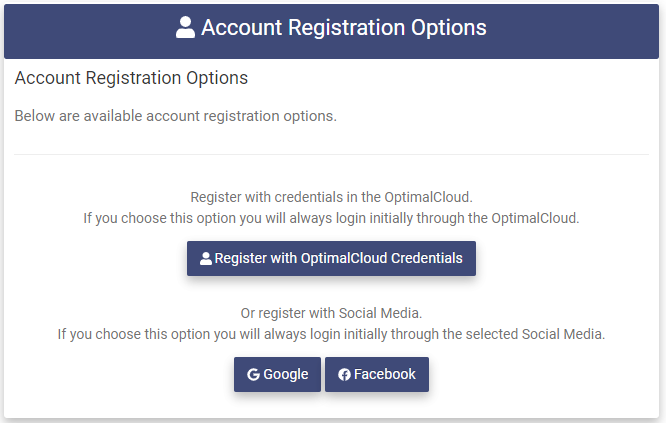
The following choices for account registration are available:
- Register with Local Account - Fill out your account information and create an account in the OptionalCloud. Click the
 button to proceed.
 - Register with Social Media Account - If your organization has enabled the Social Media Registration feature you may register your account using information from your Social Media Account. Please see the Social Media section for more information on this feature.
Register with Local Account
Clicking on the button will present the Account Registration Page.
The required fields have an "*" preceding them.
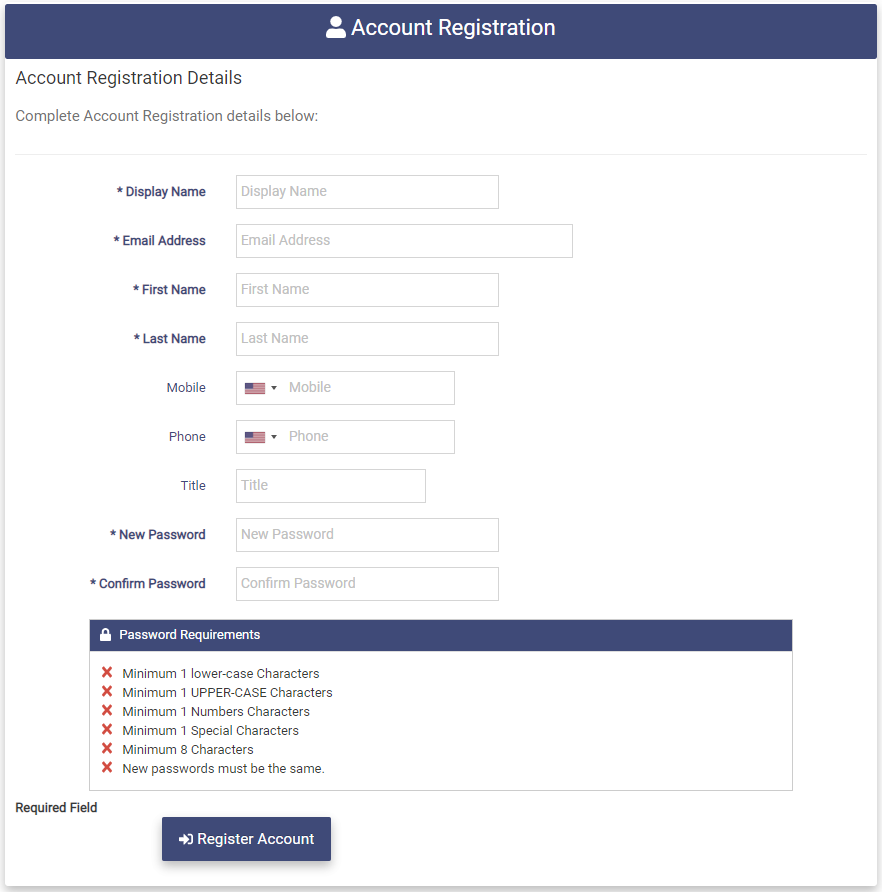
To Register your account enter the following fields:
-
Display Name - Users readable name used for Display
-
Email Address - Users email address. This will become the username for login. The email address will be checked for uniqueness. If the email address is not unique the following message will be displayed:

-
First Name - User's first name.
-
Last Name - User's last name.
-
Mobile - User's mobile phone number in (XXX) XXX - XXXX format. Use the Flag dropdown to indicate country code.
-
Phone - User's alternate phone number in (XXX) XXX - XXXX format. Use the Flag dropdown to indicate country code.
-
Title - User's title.
-
New Password - User's password. The password needs to meet all of the specifications listed in the Password Requirements box shown in the diagram above. If the password meets all of the requirements in the Password Requirements box the red "x"s will turn to green check marks as shown in the box below.
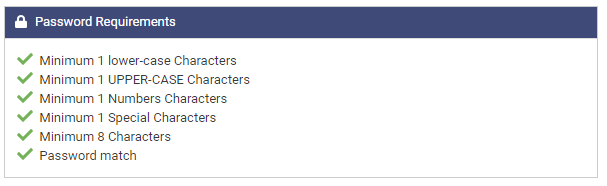
- Confirm Password - Enter User's Password again for confirmation. The Password match Requirement will change from a red "x" to a green check when the text entered in the Confirm Password field matches the text entered in the New Password field.
Click on the  button to register the account.
Following successful account registration you will receive the message below and an email will be sent to the email address specified during account registration.
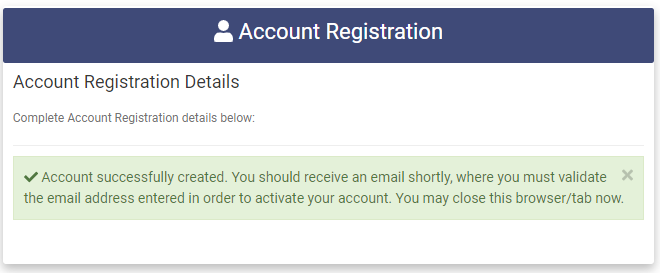
The email will contain the Complete Account Registration link.
Click on the Complete Account Registration link in the email to validate your email address and complete the account registration process. You will then be redirected to the Login Page.
Forgot Password
Clicking the "I forgot my password " link will present the Forgot Password Page.
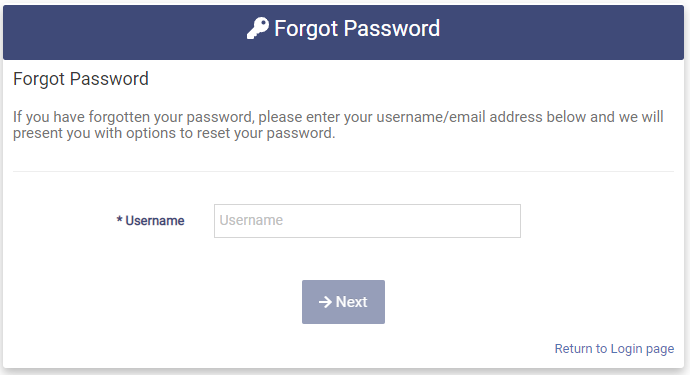
To Reset your password:
Enter your Username - the email address specified during account registration for this account.
Click the button to proceed.
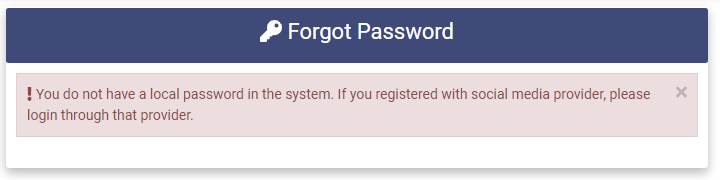
If you registered your account using Social Media, the following message will appear.
If your account is a Local account the following message is presented.
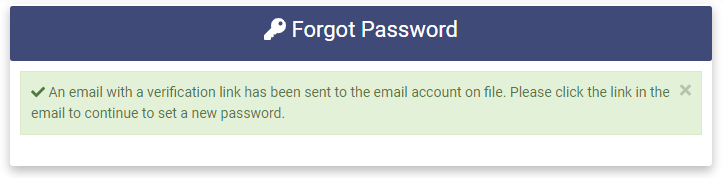
An email will be sent to the email address specified during account registration for this account. The email will contain the Reset Password link.
Please Note: The Reset Password link is only valid for one use and for the amount of time indicated in the email.
If the Reset Password link expires you will receive the following message.
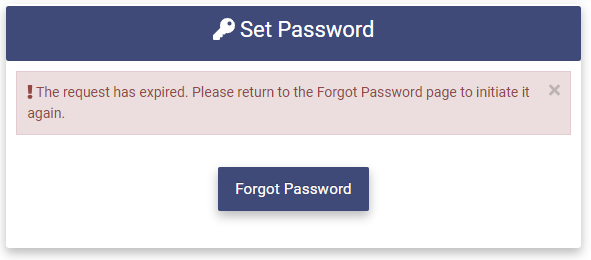
Click the  button to return to the Forgot Password page to begin again.
If the Reset Password link has not expired, click the Reset Password link and the Set Password Page will be presented.
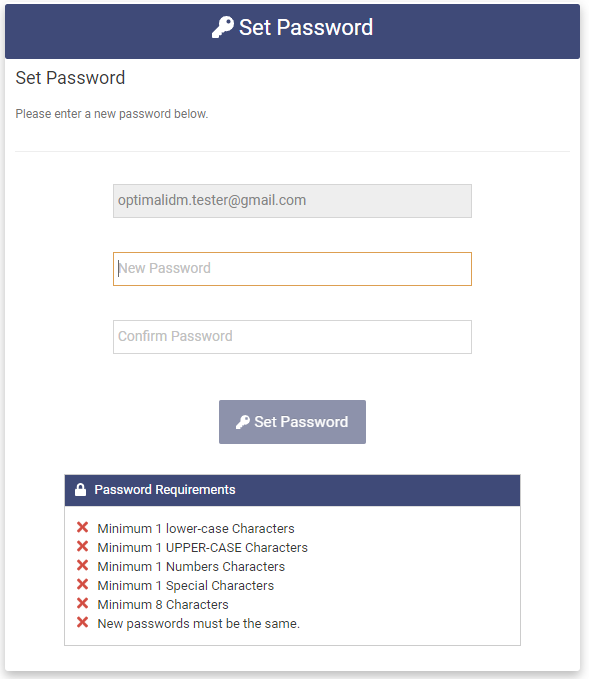
Your Username will be shown in the field that is gray.
Enter your new password in the New Password entry field following the Password Requirements as indicated in the Password Requirements box. The red "x"s will turn to green check marks when the password entered meets all of the Password Requirements.
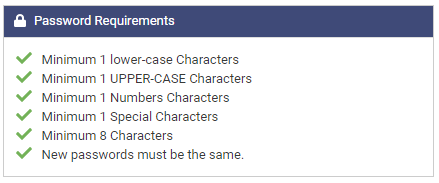
Enter your new password again in the Confirm Password field to confirm it. The red "x" in the Password Requirements box for the "New passwords must be the same" requirement will turn to a green check when the text in the Confirm Password field matches the text in the New Password field.
Click the  button to set your password.
The following message will appear upon successful completion.
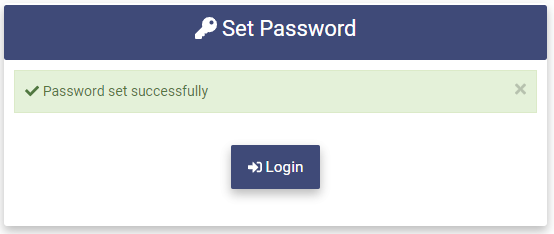
Click the button to proceed to the Login Page.
Site Banner
The Site Banner is presented at the top of each page.

The Site Banner provides the following functions:
 Clicking on the Home icon will return you to the Home/Portal page.
 Clicking on the Help icon will take you to the online documentation.
 Clicking on the down arrow of the Notifications icon will show your current notifications. The number indicates how many notification you have.
 Clicking on the down arrow for the Last Login icon will present a box containing the date, time and location of your last login. Clicking on the box will redirect you to the Login History Page.
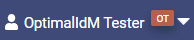 This section shows the name of the user that is logged in. Clicking on the down arrow presents the following choices:
- Change Password - Click here to change your password. Please see the Change Password section.
- My Profile - Click here to view or modify your profile information. Please see the My Profile section.
- Invite Users - Click here to invite another person to Register an account in the OptimalCloud.
- Support - Click here to send a message to the your organization's Support.
- Remove My Profile - Click here to remove your account in the OptimalCloud. Please see the Remove My Profile section.
- Sign Out - Click here to Sign Out of your current session in the OptimalCloud.
Press CTRL and click on the links in blue above to go to the selected sections.
Invite Users
Clicking the Invite Users link from the down arrow next to the username on the Site Banner will present the Invite Users Page.
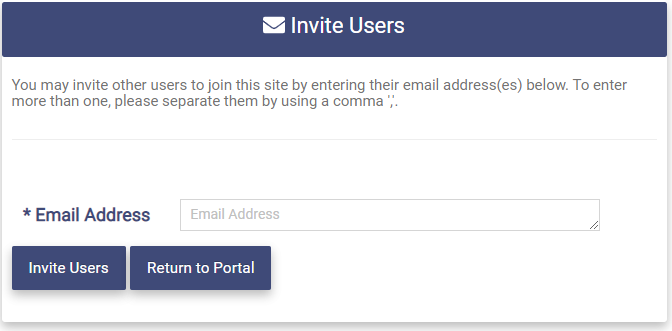
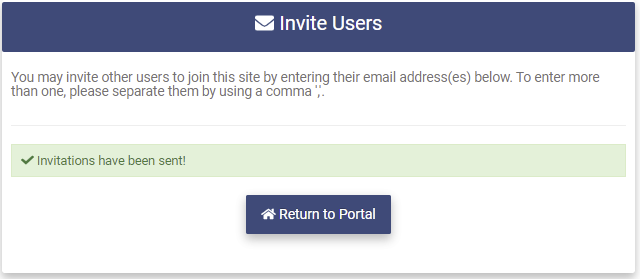
Enter the email address of the person you would like to invite to join this site. Multiple email addresses may be entered by separating them with a comma ",".
Clicking the  button will send an email to the specified email addresses. The email contains an invitation from you to join the site and a Register Here link to allow them to register an account in the OptimalCloud. The following message will be presented upon successful completion.
Support
Clicking the Support link from the down arrow next to the username on the Site Banner will present the Support page. This page allows you to submit an issue to your organization's Support.
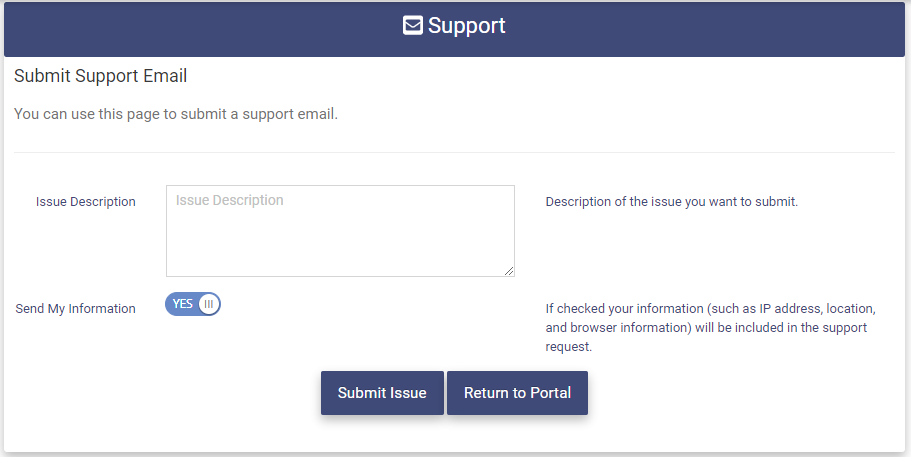
Fill in the Issue Description field with a detailed description of the issue you want to submit.
Switch the Send My Information toggle to OFF if you do not want your information (IP address, location, and browser information) included with this support submission. The default is ON.
Clicking the  button will send an email to your organization Support and the following message will be presented.

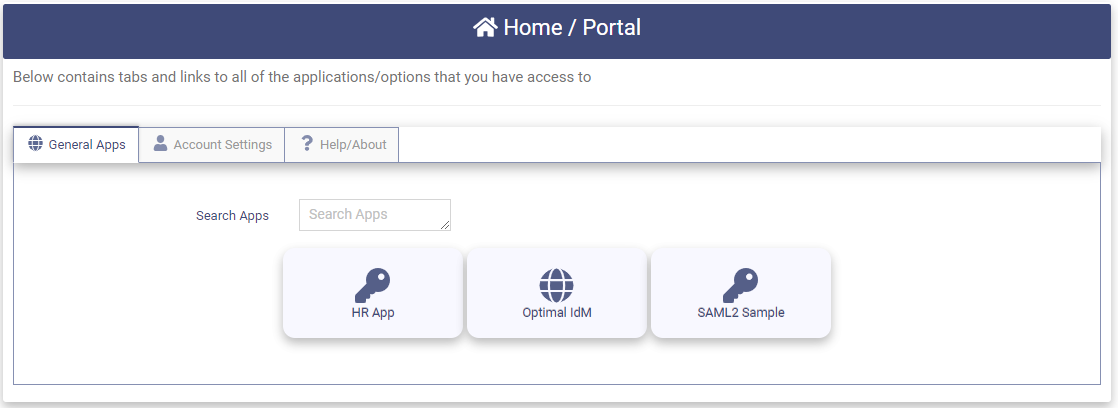
Home/Portal Page
Following a successful Login you will be presented with the Home/Portal Page.
The following Tabs are available:
- General Apps - This tab contains the applications that have been defined by your organization to be available to you. Click on the application icon to be redirected to the application.
The applications shown above are samples. They do not represent the applications that your organization will have enabled.
- Account Settings - This tab contains applications that allow you to manage your personal information.
- Help/About - This tab contains access to the online documentation, the Optimal IdM Privacy Policy and Optimal IdM Terms & Conditions.
Account Settings
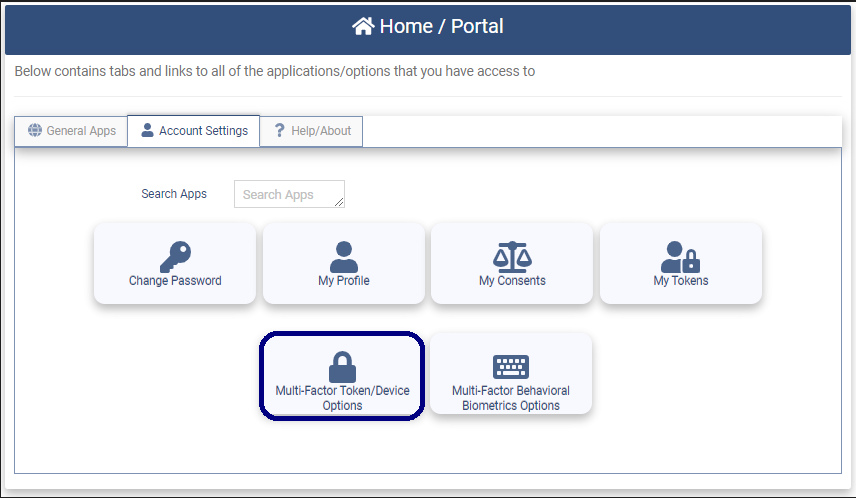
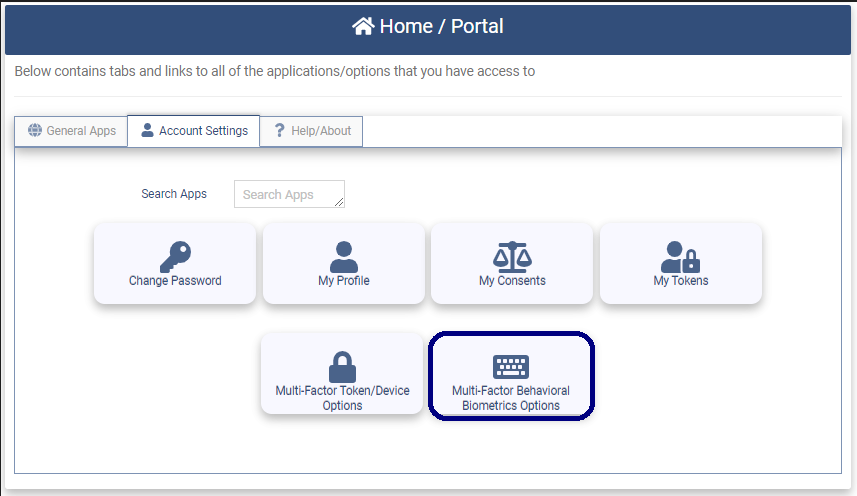
Clicking on the Account Settings Tab will present the applications shown in the diagram below.
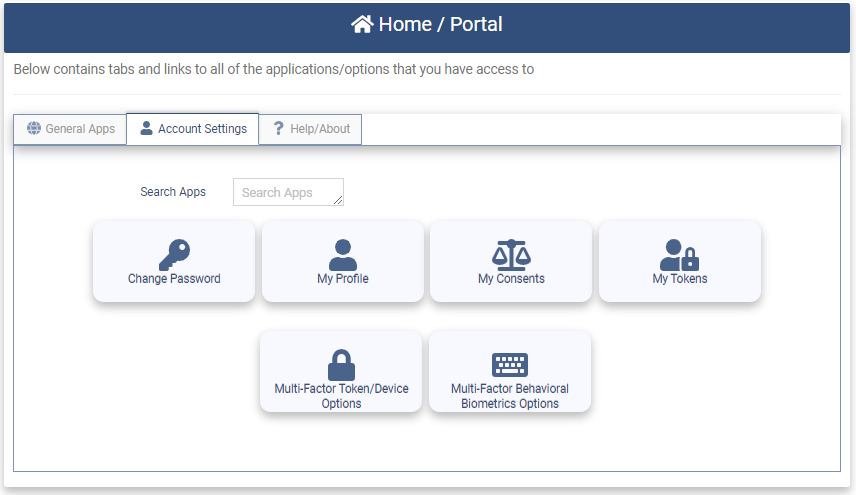
The following applications are available:
- Change Password - Click on this application to change your password.
- My Profile - Click on this application to view or modify your profile information.
- My Consents - Click on this application to view the Permissions that have been granted to OpenID Connect (OIC) applications. This application will be present if enabled for your organization.
- My Tokens - Click on this application to view the Tokens that have been issued to applications by the OptimalCloud. This application will be present if enabled for your organization.
- Multi-Factor Token/Device Options - Click on this application to configure a Device for the Multi-Factor Authentication options using PUSH or TOTP. See the Enroll in Token/Device MFA Options section for more information on this application.
- Multi-Factor Behavioral Biometrics Options - Click on the application to configure the Multi-Factor Behavioral Biometrics options. See the Enroll in Behavioral Biometrics MFA Options section for more information on this application. This option is only available if it has been enabled by your organization.
Change Password
Clicking on the Change Password application will present the Change Password page.
The required fields are preceded by an "*".
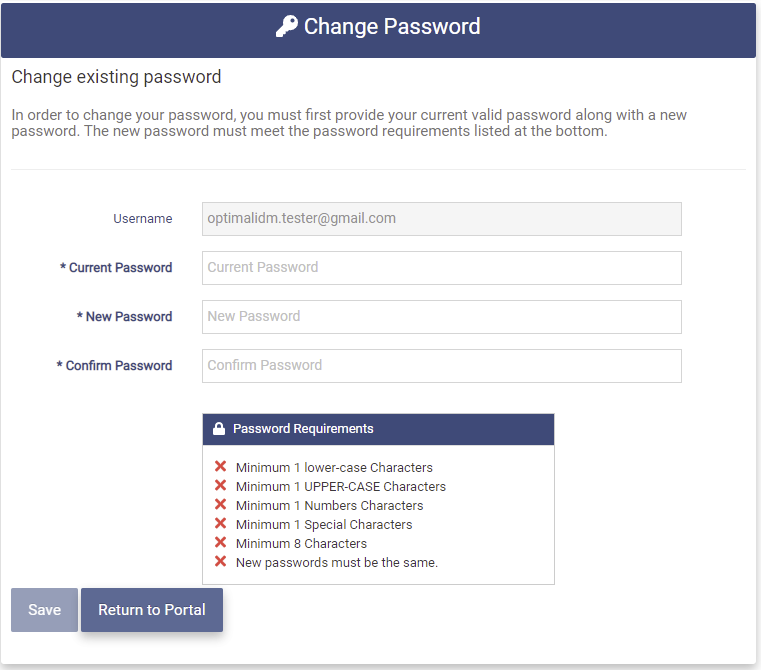
Your username (email address) will already be filled in. Enter the following fields:
-
Current Password - Your current password that you used to Login.
-
New Password - Your new password. The New Password cannot be the same as the Current Password. The password needs to meet all of the specifications listed in the Password Requirements box shown in the diagram above. If the password meets all of the requirements in the Password Requirements box the red "x"s will turn to green check marks as shown in the box below.
-
Confirm Password - Enter your password again for confirmation. The red "x" in the Password Requirements box for the "New passwords must be the same" requirement will turn to a green check when the text in the Confirm Password field matches the text in the New Password field.
Click the  button to change your password.
If the New Password entered is the same as the Current Password, the following error message will be presented.

If the Change Password Process is successful the success message shown below will be presented and an email will be sent to the email address for this account notifying the user that the password has been changed.

My Profile
Clicking on the My Profile application will present the My Profile page. There are four Tabs on the My Profile Page:
- Profile - View and modify the personal Information entered during account registration.
- Details - Details of when your personal information was modified.
- Address - View or enter your address.
- Social Media - View the methods the user has configured to login to their account.
Profile
The Profile Tab contains the personal information that was entered during account registration.
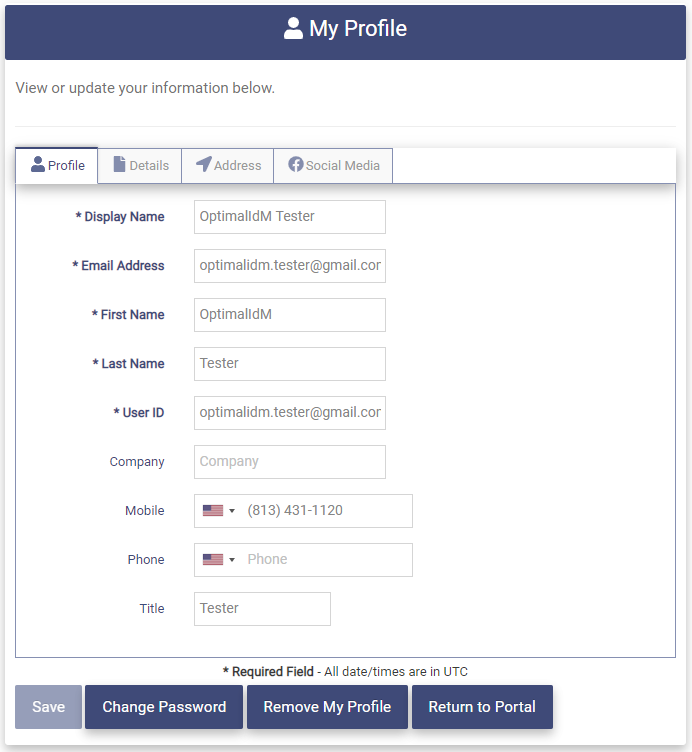
The following fields are available to be modified:
-
Display Name - Users readable name used for Display
-
First Name - User's first name.
- Last Name - User's last name.
- Mobile - User's mobile phone number in (XXX) XXX - XXXX format. Use the Flag dropdown to indicate country code where applicable.
- Phone - User's alternate phone number in (XXX) XXX - XXXX format. Use the Flag dropdown to indicate country code where applicable.
The fields that are preceded by an "*" cannot be left blank. The fields that are in gray cannot be modified.
Click the button to save your changes.
If the save is successful the following message will be presented.

Details
The Details Tab contains information about the last time your personal information or password was modified.
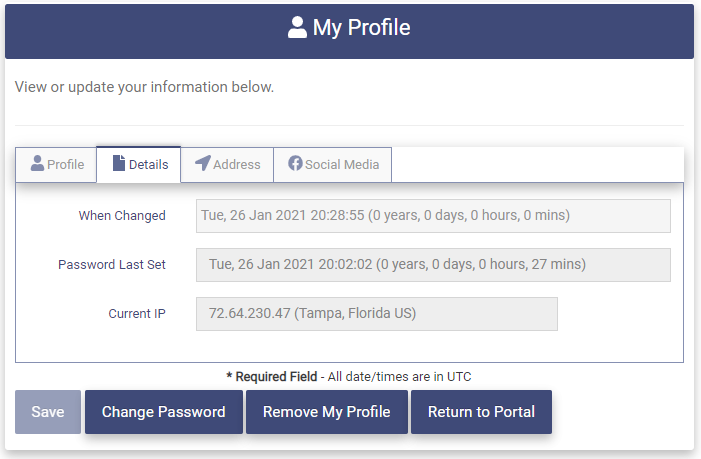
The following information is available:
- When Changed - The date and time that your personal information was last changed.
- Password Last Set - The date and time that your password was last changed.
- Current IP - The current location (IP Address) you are accessing your account from.
These fields are display only.
Address
The Address Tab allows you to view or enter your address. This information is optional.
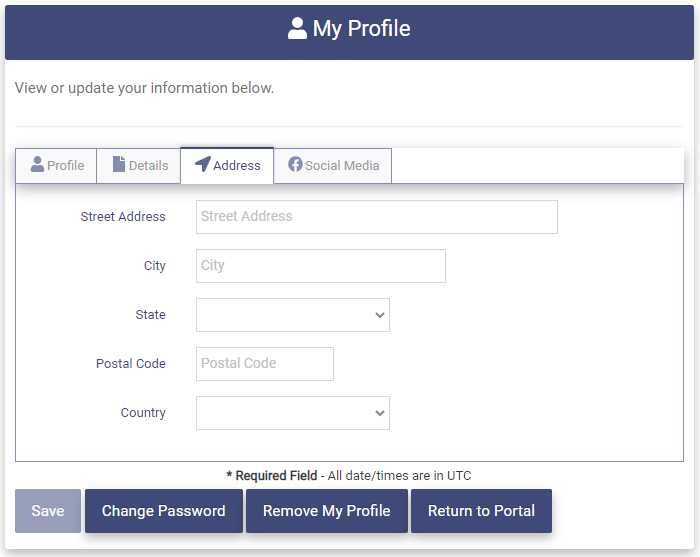
The following optional fields are available to be entered:
- Street Address - Your street address.
- City - The city you live in.
- State - The state you live in.
- Country - Use the dropdown to select the country you live.
Click the button to save your changes.
Social Media
The Social Media tab shows the methods that the user has configured to login to their account.
The page below shows that this user is configured to use username and password credentials to login. The available Social Media methods have not been configured.
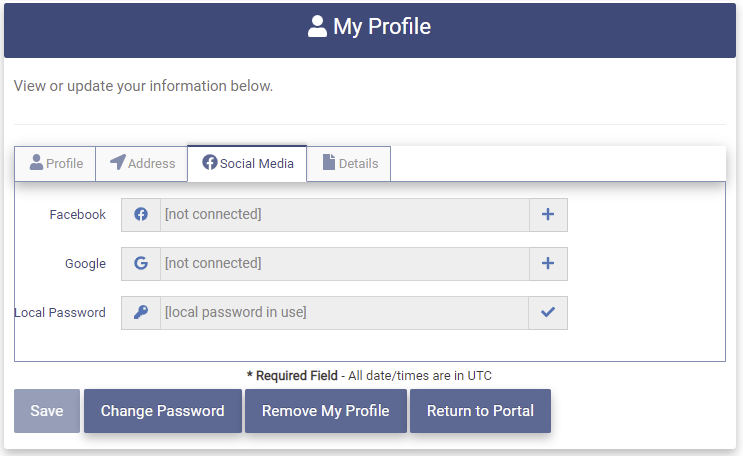
The user may configure a Social Media method by clicking on the  button next to the associated Social Media type. Facebook will be used for this example.
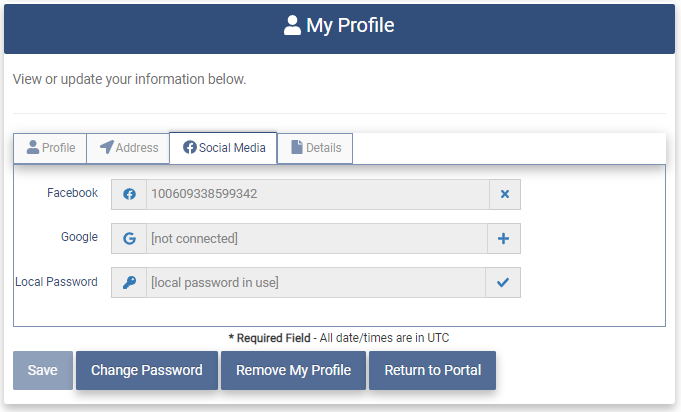
If the user is not currently logged in to Facebook, the user will be prompted for their Facebook username and password. Once the user has logged in to Facebook, the Social Media login will be configured.
If the user is currently logged in to Facebook the Social Media login will be configured.
The Social Media tab will then display the Facebook connection.
Click the button to save your changes.
Change Password
Clicking on the  button will present the Change Password Page to allow the user to change their existing password. For further instructions please see the Change Password section above.
Remove my Profile
Removing your Profile information will remove your account in the OptimalCloud.
Clicking on the  button at the bottom of the My Profile Page will present the remove profile message.

To remove your Profile you must type "YES" in the box and then click on the 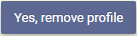 button.

When your Profile has been successfully removed, you will receive the following message.
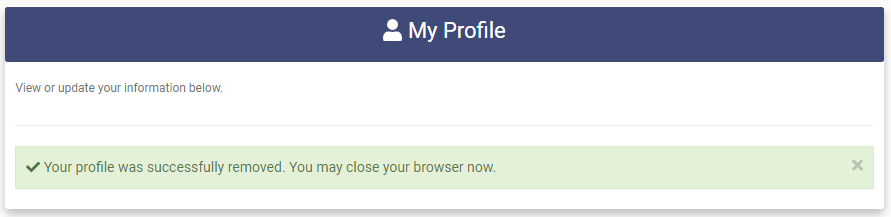
Your Profile information (OptimalCloud account) has been removed.
My Consents
This application will be present if enabled by your organization.
Clicking on the My Consents application will present the My Application Consents page.
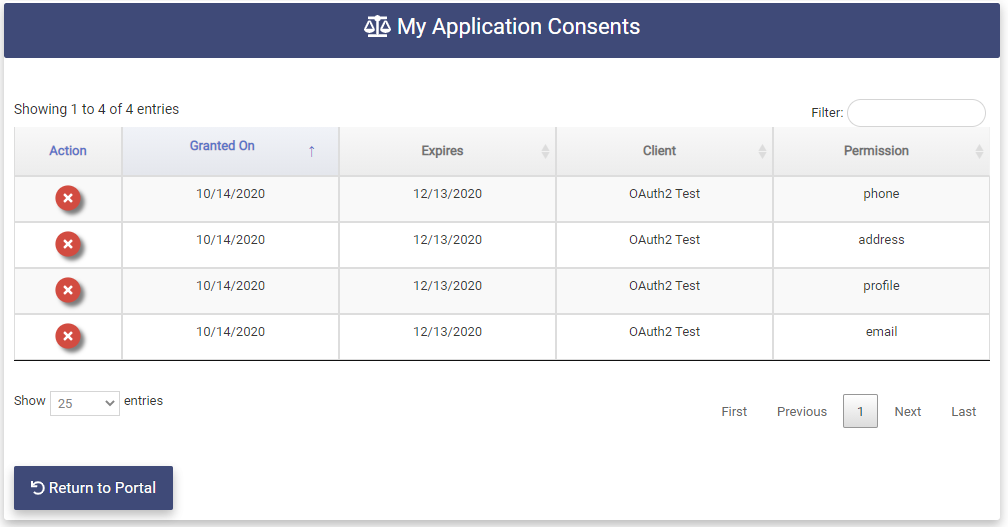
A Consent is the grant of a Permission. Some OpenID Connect (OIC) applications request Permissions (requests for user's information or to perform actions on behalf of the user). The user is required to grant consent for these Permissions. The grant is performed during the authentication process or can be configured to be automatic for each application. The consent is granted for a specified period of time. Once the period of time has expired the user will be prompted to grant consent for the Permissions again.
The My Application Consents table shows the Consents that you have granted. The table contains the following fields:
- Action - Clicking on the
 will delete the consent. It will no longer be shown in the My Application Consents table.
 - Granted On - The date the consent was granted.
- Expires - The date the consent will expire.
- Client - The application that the consent is granted to.
- Permission - The item of user's information or the action for which consent has been granted.
The consents in the table can be filtered by using the Filter field shown in the upper right part of the page.
The number of rows displayed in the table on the page can be modified by using the dropdown box shown in the lower left corner. If the number of rows of data is greater than the number of rows configured to be shown on the page, the additional rows can be viewed by using the page actions in the lower right corner of the page.
The following page actions are available:
- First - Click here to return to the First page of data.
- Previous - Click here to navigate to the previous page of data.
- Number box - The number in the box shows the current page number.
- Next - Click here to navigate to the Next page of data.
- Last - Click here to navigate to the Last page of data.
My Tokens
This application will be present if enabled by your organization.
Clicking on the My Tokens Tab will present the My Application Tokens Page.
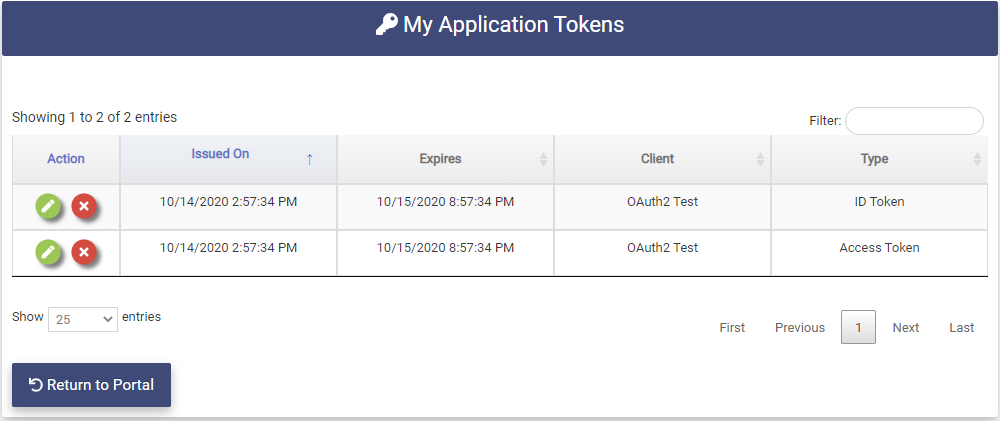
The My Application Tokens table contains the OpenID Connect (OIC) Tokens that been issued to an application by the OptimalCloud during the authentication process. The Tokens are issued for varied lengths of time based on the requirements of the application.
There are three types of Tokens:
-
Access Token - Authorizes the application to perform actions on behalf of the user.
-
ID Token - Contains the users Profile information and other custom items that have been defined as needed by the application.
-
Refresh Token - Similar to the Access Token but is issued for a greater length of time.
The table contains the following fields:
- Action - The Actions that are allowed for this Token (
 - View Token details, - Revoke Token).
 - Issued On - The Date and Time the Token was issued.
- Expires - The Date and Time the Token will expire.
- Client - The Application that the Token was issued to.
- Type - The type of the Token
The Tokens in the table can be filtered by using the Filter field shown in the upper right part of the page.
The number of rows displayed in the table on the page can be modified by using the dropdown box shown in the lower left corner. If the number of rows of data is greater than the number of rows configured to be shown on the page, the additional rows can be viewed by using the page actions in the lower right corner of the page.
The following page actions are available:
- First - Click here to return to the First page of data.
- Previous - Click here to navigate to the previous page of data.
- Number box - The number in the box shows the current page number.
- Next - Click here to navigate to the Next page of data.
- Last - Click here to navigate to the Last page of data.
View
Clicking on the action will present the Token page.
The Token page provides further details about the selected Token.
The Token Page for an Access Token is shown below.

The details available are:
- Token Type - The type of the Token.
- Client ID - The unique identifier for the application that the Token was issued to.
- Token - The Token for the Access Token is encrypted and only readable by the OptimalCloud.
The Token Page for an ID Token is shown below.

The details available are:
- Token Type - The type of the Token.
- Client ID - The unique identifier for the application that the Token was issued to.
- Token - The encrypted Token only readable by the OptimalCloud.
- Decoded Token Header - The text version of the Token Header.
- Decoded Token - The text version of the information contained in the Token.
Revoke
Clicking on the action for a Token in the Token table will present the Revoke Token message.

To revoke the Token you must type "YES" and click on the 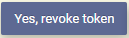 button.

The Token will be revoked and no longer appear in the My Application Tokens Table.
Multi-Factor Token/Device Options
The Multi-Factor Token/Device application allows the user to configure Device Authentication such as PUSH, TOTP, Security Key and Windows Hello. For more information on this topic go to the Multi-Factor Options section of this documentation.
Multi-Factor Behavioral Biometrics Options
The Multi-Factor Behavioral Biometrics Options application allows the user to set up the Behavioral Biometrics MFA option. This option uses the user's typing patterns to verify user identity. For more information on this topic go to the Multi-Factor Options section of this documentation.
Help/About
Clicking on the Help/About Tab will present the applications shown in the diagram below.
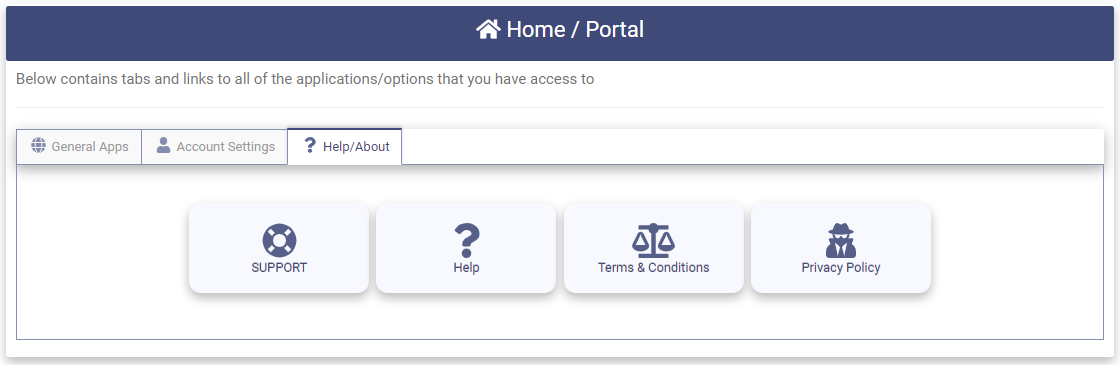
The following applications are available:
- Help - Click on this application to view the online documentation.
- Terms & Conditions - Click on this application to view the Terms & Conditions for your organization.
- Privacy Policy - Click on this application to view the Privacy Policy for your organization.