Administration
This section provides the Tenant Admin and Global Admin applications and tools for configuring and managing the Tenant.
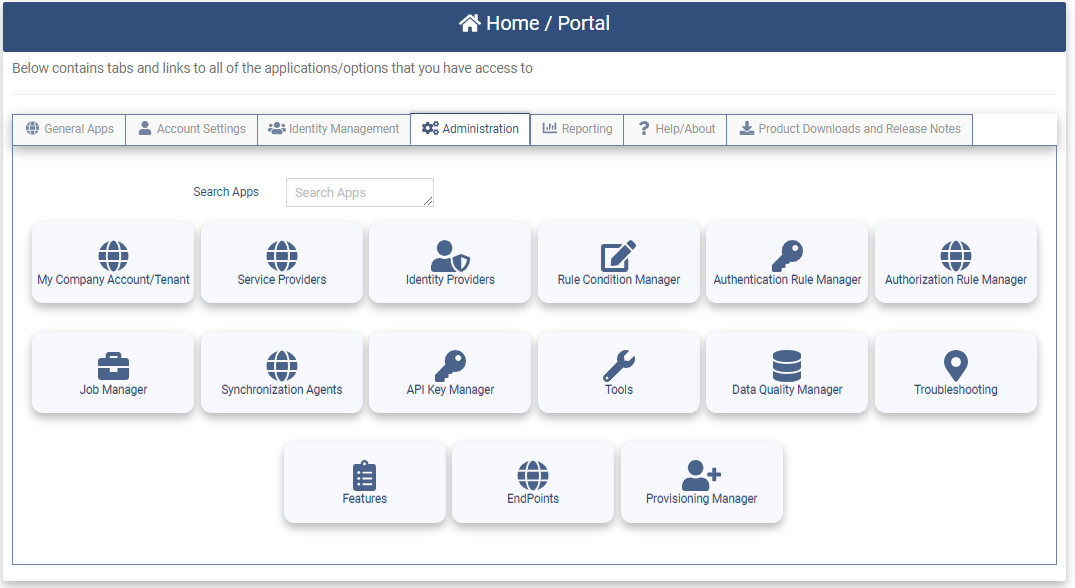
The Administration Tab contains the following applications:
- My CompanyAccount/Tenant - Configure the Tenant.
- Service Providers - Configure Service Providers (Federated Applications)
- Identity Providers - Configure Identity Providers (service that stores and manages digital identities)
- Condition Manager - Configure basic rules to be used in Authentication or Authorization
- Authentication Rule Manager - Configure Authentication Rules that determine what level of authentication is required to perform a specified action.
- Authorization Rule Manager - Configure Authorization Rules for the Tenant. Authorization Rules are global rules that are processed for all users attempting to login to the system.
- Job Manager - Provides the ability to create and run batch jobs such as importing data, exporting data and attestation.
- Synchronization Agents - Provides the ability to create an Agent to synchronize users and groups from Active Directory to the Optimal Cloud.
- API Key Manager - Provides the ability to create API keys that are used to interact with the OptimalCloud RESTAPI web services.
- Tools - Tools used in helping to diagnose Federation issues.
- Data Quality Manager - Provides the ability to create and run batch jobs to examine the data for common data quality issues.
- Troubleshoot Manager - Provides the Tenant Admin the ability to search the Audit logs to help in troubleshooting.
- Features - Provides a list of the features contained in The OptimalCloud.
- EndPoints - Provides the system level integration Endpoints.
- Provisioning Manager - Configure and Manage Provisioning Destinations.
My Company Account/Tenant
This section provides the Tenant Admin with instructions on setting up the configuration for the Tenant. Go to the My Company Account/Tenant Application on the Administration tab.
View the "HowTo Configure Your Tenant" video below or continue with the following steps.
Clicking on the My Company Account/Tenant application will present the Tenant Details page.
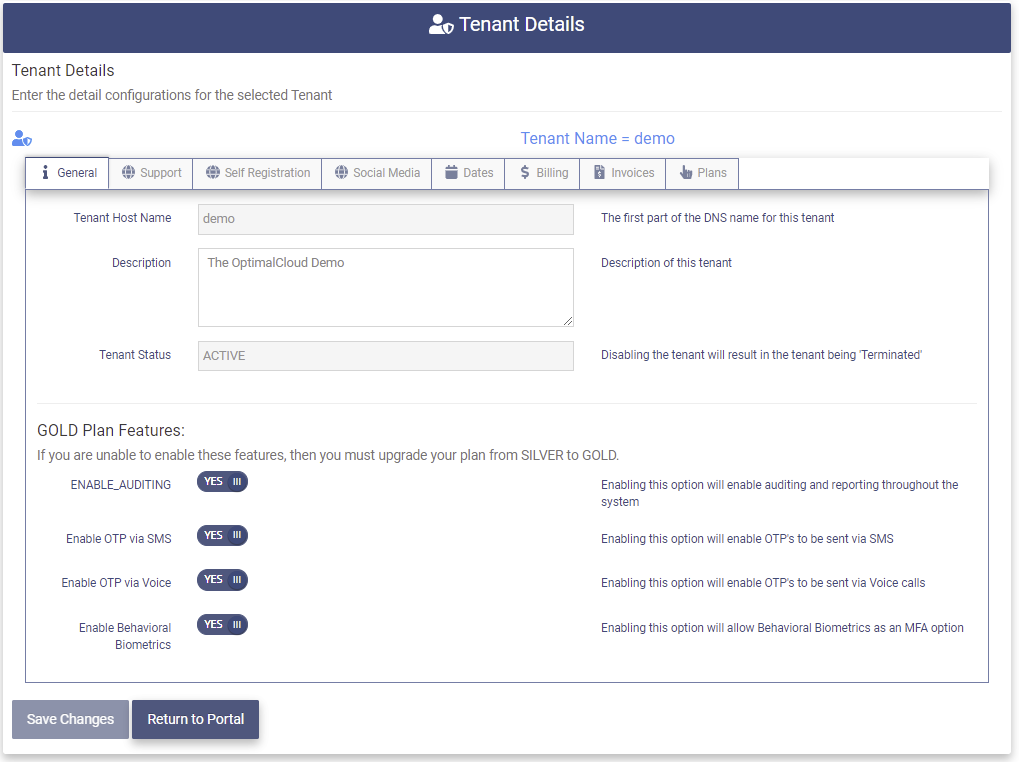
General
The General tab contains the following fields: (The fields in gray cannot be modified)
- Tenant Host Name - The Name of this tenant used as the first part of the DNS name for this tenant.
- Description - Description of this tenant.
-
Tenant Status - The Status of this Tenant
-
PENDING - Tenant has registered but has not yet clicked on the validation email to complete registration.
-
TRIAL - Tenant is in the trial period which is valid for 30 days.
-
ACTIVE - Tenant has been activated by entering a credit card. Regular billing begins.
-
EXPIRED - The credit card used for billing for this tenant has expired. Only the Tenant Admin will have access to view/update the tenant object.
-
TERMINATED - The tenant has been terminated by the client.
-
GOLD Plan Features
These features are available if your tenant has been registered with the GOLD Plan. If you are not able to enable these features, you will need to upgrade to the GOLD plan. For a list of features available on the GOLD plan see the Plans tab.
- ENABLE_AUDITING - Enable auditing and reporting throughout the system. Auditing activity tracks all Logins and changes made by users. Audit activity can be found on Users, Groups, Organizations and Applications. Reports are visible on the Reports tab for users that are members of the OFIS-Reporting group.
- Enable OTP via SMS - Enable the MFA option of having One-Time Passcodes sent via SMS. This option becomes available for all users that have entered a phone number.
- Enable OTP via Voice - Enable the MFA option of having One-Time Passcodes sent via Voice calls. This option becomes available for all users that have entered a phone number.
- Enable Behavioral Biometrics - Enable the MFA option of using Behavioral Biometrics. This option becomes available for all users who register their Biometric patterns.
Modify the fields as needed and click the  button to save the information.
Upon successful completion of the update the following message will be presented.

Support
The Support tab allows the Tenant Admin to set up the support options for the tenant.
Clicking on the Support tab will present the page below.
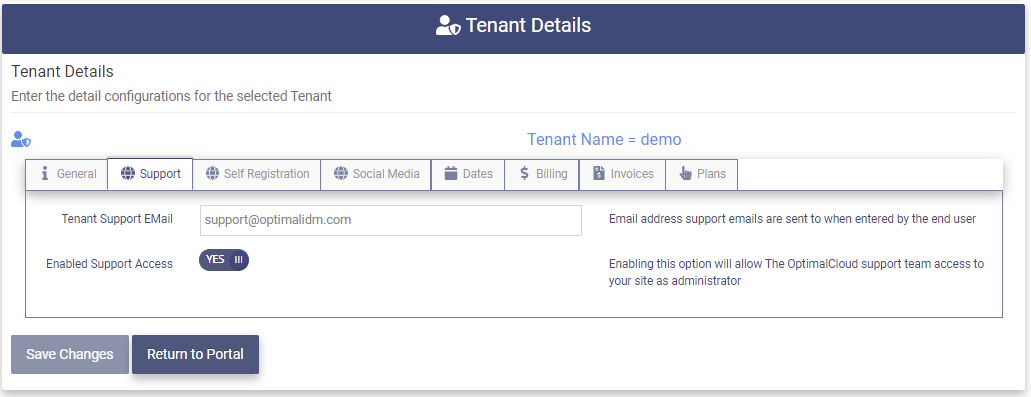
The Support tab contains the following fields:
- Tenant Support Email - The email address from your company that support emails will be sent to when a user enters a support incident.
- Enabled Support Access - Enabling this option will allow The OptimalCloud support team to access the tenant as administrators to help in support incidents.
Modify the fields as needed and click the button to save the information.
Upon successful completion of the update the following message will be presented.
Self Registration
The Self Registration tab allows the Tenant Admin to determine whether the users are able to self-register.
Clicking on the Self Registration tab will present the page below.
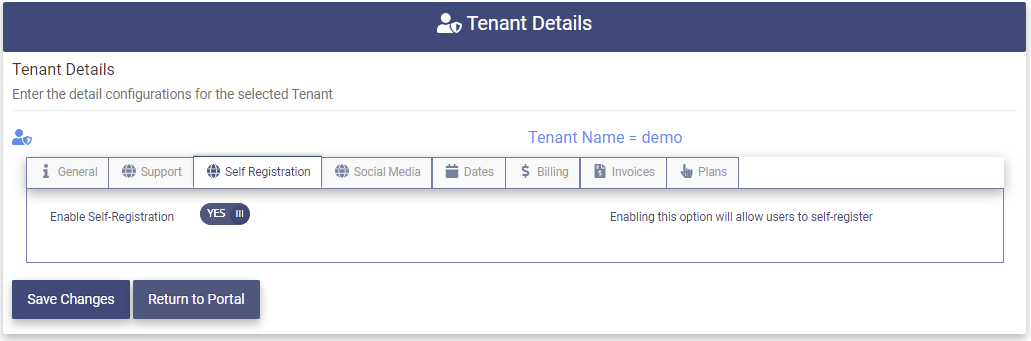
The Self Registration tab contains the following fields:
- Enable Self-Registration - Enabling this option will allow users to register their own accounts in The OptimalCloud. If this option is not enabled users will need to be created manually, by an import job or through a synchronization process.
Modify the field as needed and click the button to save the information.
Upon successful completion of the update the following message will be presented.
Social Media
The Social Media tab allows the Tenant Admin the ability to enable Social Media options for user registration and login.
Clicking on the Social Media tab will present the page below.
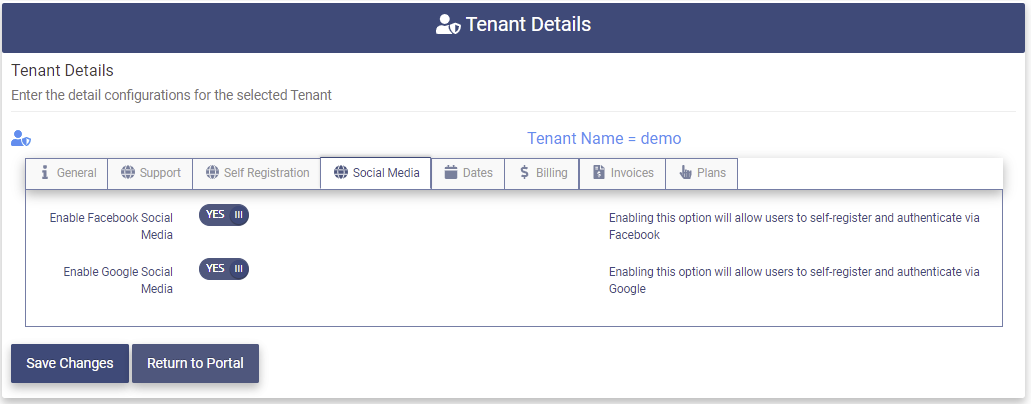
The Social Media tab contains the following fields;
- Enable Facebook Social Media - Enabling this option will allow users to self-register and authenticate via Facebook.
- Enable Google Social Media - Enabling the option will allow users to self-register and authenticate via Google.
Modify the fields as needed and click the button to save the information.
Upon successful completion of the update the following message will be presented.
Office 365
For customers who are Federating to Office 365 and have multiple Office 365 domains, each domain must be configured with a matching Issuer URI. This mapping will also need to be configured in Office 365. This mapping is not needed if you have only one Office 365 domain.
Clicking on the Office 365 tab will present the following page.
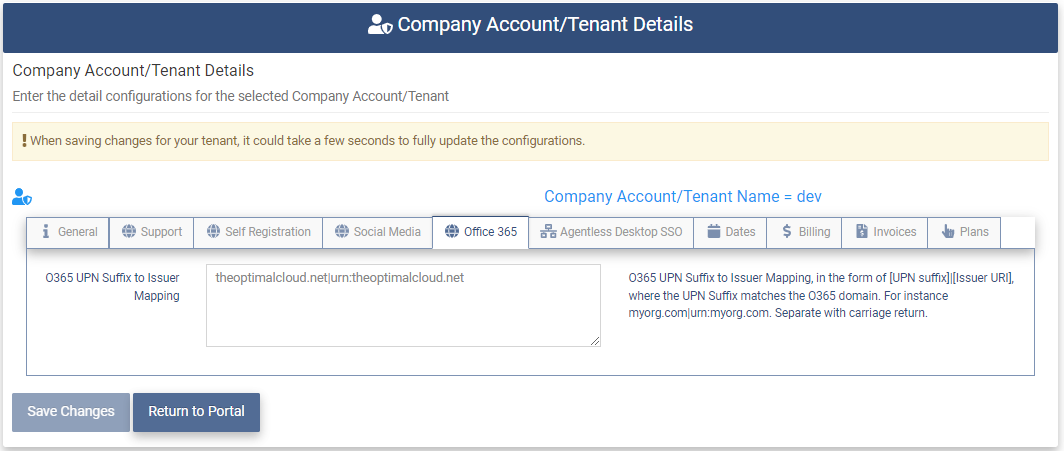
Enter the Office 365 domain to Issuer URI mapping in the following format. Enter a mapping for each domain on a separate line. Each Issuer URI must be unique.
[O365 domain]|[Issuer URI]
Click the button to save the changes.
Upon successful completion of the update the following message will be presented.
Agentless Desktop SSO
The OptimalCloud Agentless Desktop Single Sign-on (SSO) feature allows users that are identified as being on-premise (or via VPN) and connected to their local AD Forest, to sign-on using their Windows Desktop Credentials via Integrated Windows Authentication (IWA).
The Agentless Desktop SSO tab allows you to configure Agentless Desktop SSO for your Tenant.
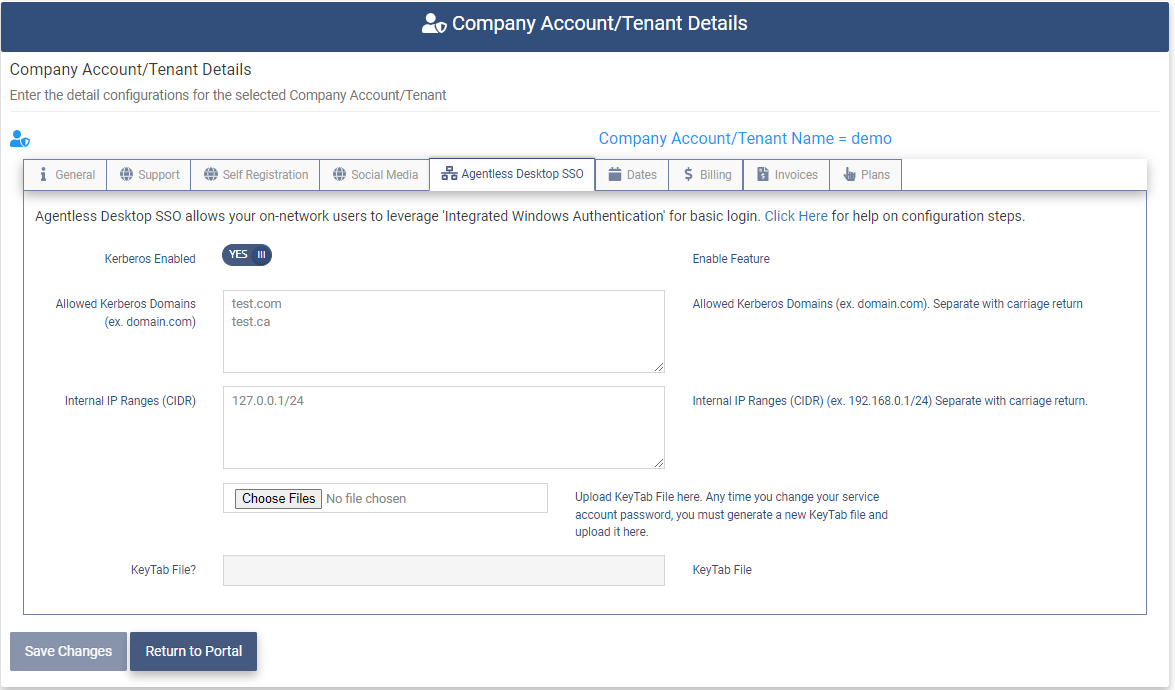
Set the following fields.
- Kerberos Enabled - Set this field to “YES” to enable Agentless Desktop SSO for the Tenant. This step must be done to allow Agentless Desktop SSO for the Tenant or for an Organization.
- Allowed Kerberos Domains - the list of domains in your local AD Forest that the OptimalCloud will accept Kerberos Tickets from (separated by a carriage return). (ex. contoso.com)
- Internal IP Ranges (CIDR) - the OptimalCloud will perform IWA for users in this list of CIDR IP Ranges. (ex. 192.168.0.1/24)
Click the  button and select the TheOptimalCloud.keytab file generated from the Generate a KeyTab File section in the Agentless Desktop SSO section of the documentation.
Click the button to save the changes.
Upon successful completion of the update the following message will be presented.
Dates
The Dates tab shows the important dates for the tenant.
Clicking on the Dates tab will present the page below.
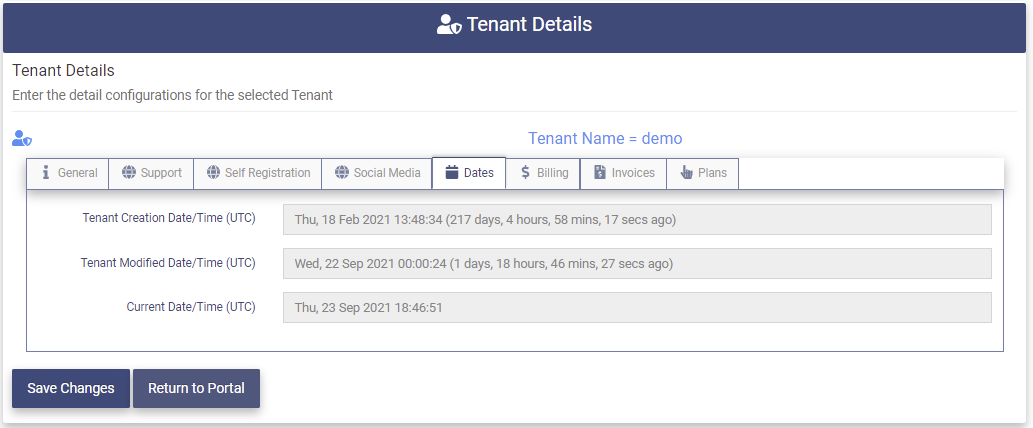
The Dates tab contains the following fields: (The fields are display only)
- Tenant Creation Date/Time (UTC) - The date and time in UTC that the tenant was created.
- Tenant Modified Dated/Time (UTC) - The date and time in UTC that the tenant configuration was last modified.
- Current Date/Time (UTC) - The current date and time in UTC.
Billing
The Billing tab allows the Tenant Admin to enter a credit card to start the official billing cycle.
Clicking on the Billing tab will present the page below.
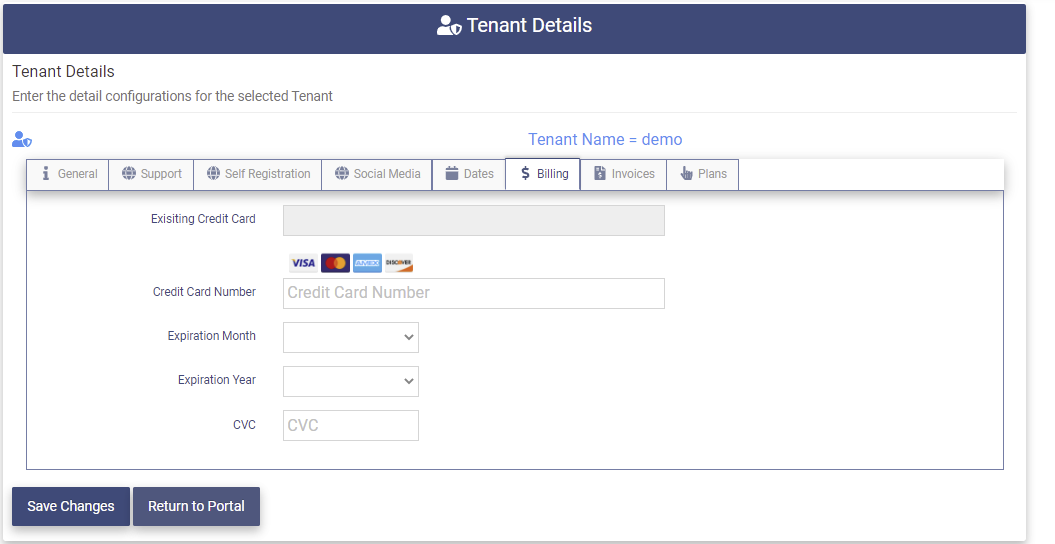
The Billing tab contains the following fields: (The Fields in gray cannot be modified.)
- Existing Credit Card - Displays the last 4 digits of the credit card entered.
- Credit Card Number - The credit card number to be used for invoicing.
- Expiration Month - The expiration month on the credit card.
- Expiration Year - The expiration year on the credit card.
- CVC - The anti-fraud security number to help verify that this is the correct credit card.
Enter the credit card information in the available fields.
Click the button to save the information.
The information in the entry fields will be cleared and the Existing Credit Card field will display the last four digits of the credit card entered.
Upon successful completion of the update the following message will be presented.
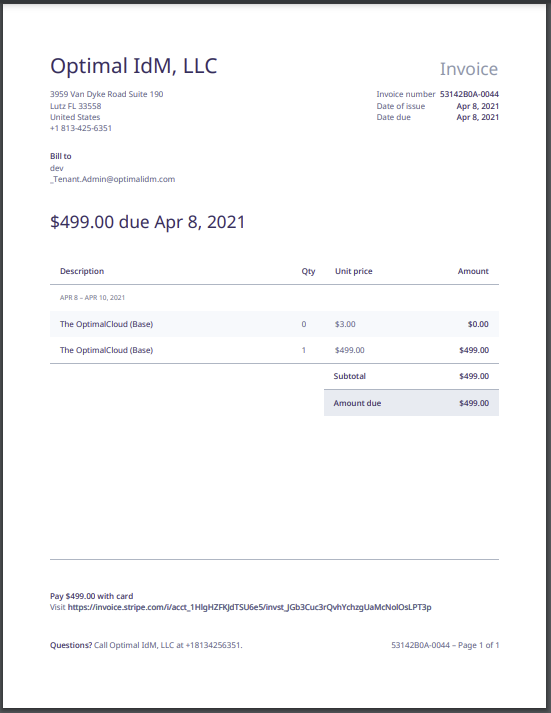
Invoices
The Invoices tab displays a table of the monthly invoices for this tenant.
For questions about the invoices call Optimal IdM, LLC at +1(813) 425- 6351.
Clicking on the Invoices tab will display the page below.
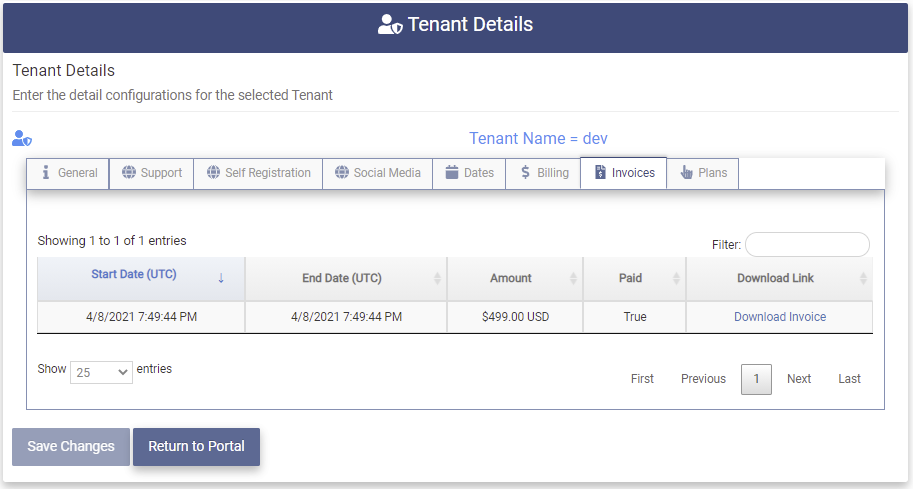
The Invoices table contains the following fields: (The fields are display only)
- Start Date (UTC) - The starting date and time (UTC) for this invoice.
- End Date (UTC) - The ending date and time (UTC) for this invoice.
- Amount - The total amount of the invoice in US Dollars.
- Paid - The status of the payment for the invoice (True, False)
- Download Link - The link to download the invoice as a pdf file.
Clicking on the Download Link will download the invoice to a file in your downloads directory with the file name "invoice.pdf". An example of the download file is show below.
Plans
The Plans tab displays the options for the service plans for The OptimalCloud and allows the Tenant Admin to select the plan for the Tenant.
Clicking on the Plans tab will display the page below.
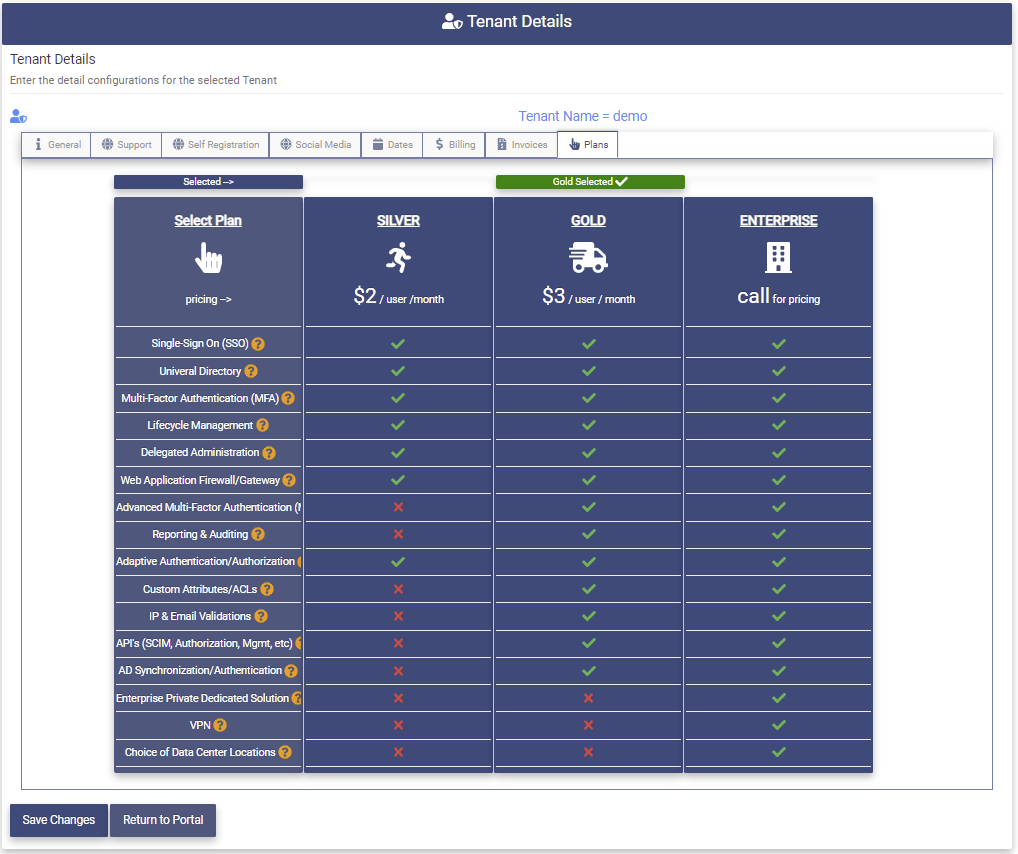
The features included in each plan are depicted in the table. Clicking on the  button next to a feature will bring up a description of that feature.
To select a plan click on the underlined name of the plan.
The Selected label will point to the plan that has been selected. The example above shows the GOLD plan has been selected. 
Click the button to save your changes.
Upon successful completion of the update the following message will be presented.
Features of the OptimalCloud
Click on the Features application to view the features of the OptimalCloud.
Top of Page Fields
The following fields and buttons are found at the top of the Identity Manager pages.

- Search Criteria - This field allows the data on the Identity Manger pages to be limited to those entries that contain the pattern entered. The default when accessing the Identity Manager pages is "*" which will return all of the entries that the administrator is allowed to view. The "***" can be used along with string patterns in a search.
 - Clicking on this button will process the search.
- Showing entries - This message informs the administrator how many entries of the total number of search results entries are being displayed on the current page. The initial search returns 250 entries or less that match the search criteria.
 - If the data that matches the search criteria is greater than 250 entries this button will appear next to the Search button. Clicking on this button will retrieve 250 or fewer more entries that match the search criteria. When all entries have been returned the "All objects in filter returned" message will appear.
- Filter - This field allows the results of the search to be further limited by the pattern entered.
Bottom of Page Fields
The following fields and buttons are found at the bottom of the Identity Manager pages.

- Show entries - This drop down allows the administrator to choose the number of entries from the search results that are displayed on the page at a time.
 - Clicking on this control will direct the administrator to the previous page of the search results.
 - The number is this box indicates the page number of the search results currently being displayed.
-
 - Clicking on this control will direct the administrator to the next page of the search results.
 -
 - Clicking on this button will export the search results to a local PDF file with the naming convention "Page Name - Date.pdf".
  - Clicking on this button will export the search results to a local CSV file with the naming convention "Page Name - Date.csv".
 - Clicking on this button will export the search results to a local Excel file with the naming convention "Page Name - Date.xlsx".
 - Clicking on this button will copy the search results to the Clipboard where it may be copied to another document.
 - Clicking on this button will print the search results.
Service Providers (SP)
The Service Providers application allows the Tenant Admin to create and manage Service Providers for the Tenant.
Clicking on the Services Providers Application will present the Service Providers page. The Service Providers page shows all the Service Providers (SP) that have been configured for the Tenant.
Service Providers are Federated applications that use the standard protocols; WSFED, SAML2, OAUTH/OIC.
To have the Service Provider shown in the Portal, the Service Provider must be linked to an application created in the Application Manager on the Indemnity Management tab.
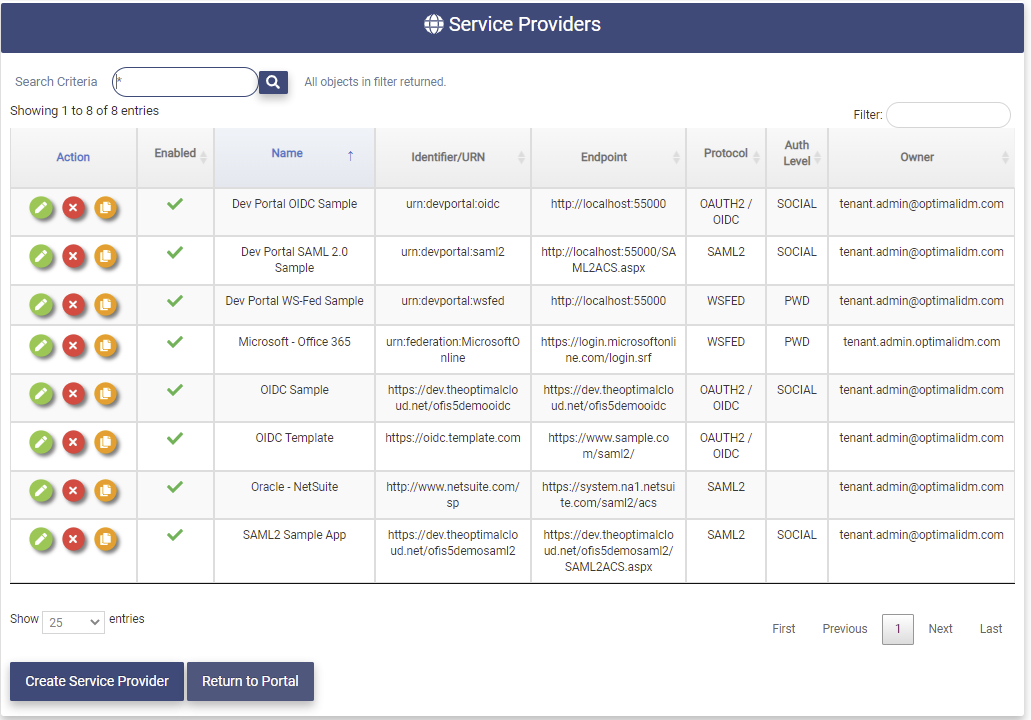
The Service Providers page contains the following fields for each Service Provider in the Tenant:
- Action - Clicking on these buttons perform actions on the associated Service Provider.
 - Modify or View Service Provider configuration.
 - Remove Service Provider configuration.
 - Copy Service Provider configuration. This function is useful for creating a Service Provider with a similar configuration as an existing Service Provider. The IdP Identifier/URN must be changed to be unique.
- Enabled Flag -
 : Enabled,
  : Disabled. If the SP configuration is disabled it cannot be accessed.
 - Name - Name of the Service Provider.
- Identifier/URN - The unique identifier for the Service Provider.
- Endpoint - The Signon Endpoint for the Service Provider.
- Protocol - The protocol used by the Service Provider.
- Auth Level - The Authentication Level needed to access the Service Provider.
- Owner - The Email Address of the contact for the Service Provider.
Create a Service Provider
This section allows the Tenant Admin to create new Service Providers for the Tenant.
Clicking on the  button will present the Service Provider Details page with the New Federated Application Wizard. The Wizard will guide you through the creation of your new Service Provider.
Step one in the process is to choose the Entry Type method to be used to create the Service Provider.
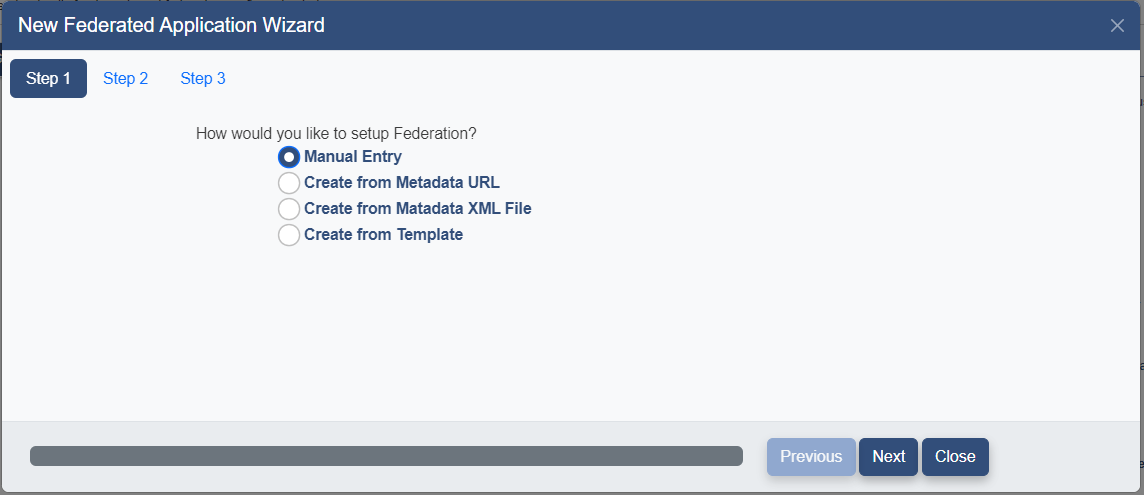
Select the method to be used to create the SP. The following options are available:
-
Manual Entry - Fill in the all data fields manually
-
Create from Metadata URL - Specify a link to Metadata containing the configuration
-
Create from Metadata XML File - Specify a local Metadata file containing the configuration
-
Create from Template - Choose from templates containing configuration data for common SPs.
Choose the appropriate option and click the  button to proceed.
The Manual Setup method must be used to create an SP using the OAuth/OpenIDConnect protocol if there is not already a Template for the application.
The SP Wizard Details page will be presented.
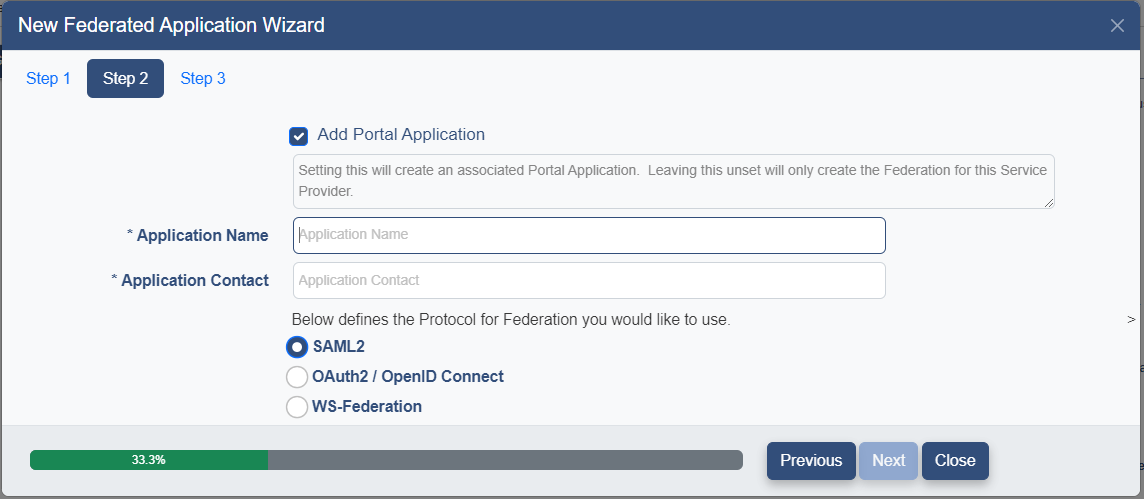
Fill in the following fields and click the button.
- Add Portal Application - check this field if you would like to create an Application to be shown in the Portal at the same time. The application will be created with the same name as the Service Provider and as Hidden. To specify how and where the application should be shown see the Add Portal Display section below.
- Application Name - Name to be displayed
- Application Contact - Email Address of the person to be contacted about this SP
- Protocol - Select the protocol to be use for this SP ( WS-Federation, SAML2, Oauth2/OpenID Connect)
Proceed to the section below based on the Setup method chosen.
Create via Manual Entry
Follow the instructions below or view one of the videos for an example of this process.
How to Manually add a SAML2 Service Provider or How to Manually add an OIDC Service Provider.
If the Manual Entry method is chosen the following page will be presented.
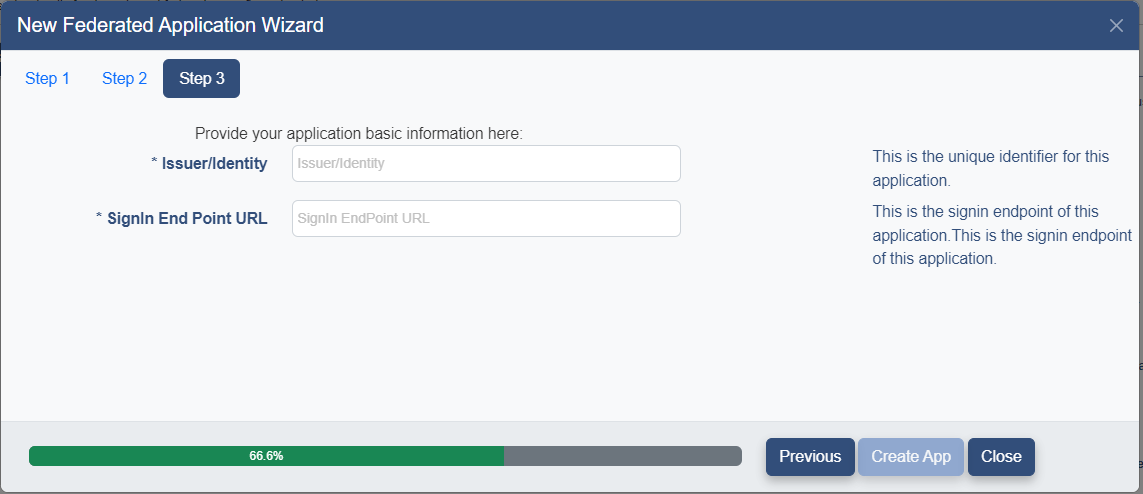
Enter the following fields and click on the  button.
- Issuer/Identity - The unique identifier for this Service Provider
- Signin End Point URL - The Signin EndPoint for this Service Provider.
The Service Provider Details Page will be presented with the Issuer/Identity and Signin Endpoint filled in.
Please continue to the Service Provider Details section.
Create via Metadata URL
Follow the instruction below or view the video below for an example of this process.
If the Create from Metadata URL method is chosen the following page will be presented.
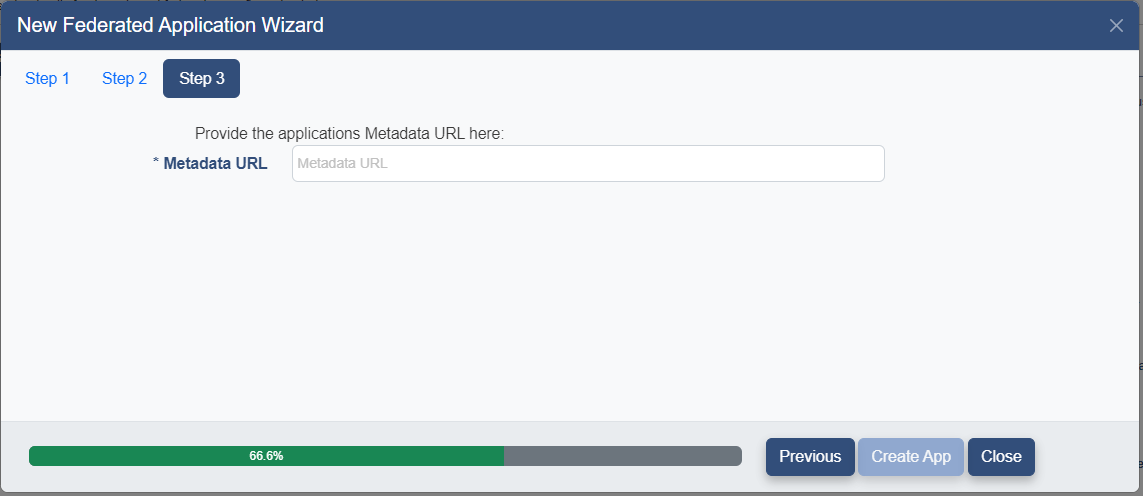
Enter the Metadata URL for this SP and click the button.
If the URL points to valid metadata for the protocol specified the metadata will be processed. The data in the metadata will be used to populate the configuration of the service provider.
The Service Prover Details page will be presented with the fields filled with data from the metadata.
Please proceed to the Service Provider Details section.
Create via Metadata XML File
If the Create from Metadata XML File option has been chosen the following page will be presented.

Click the button and select the local Metadata XML file containing the configuration for this SP.
Click the button.
If the metadata file contains valid metadata for the protocol chosen the metadata file will be processed. The data in the metadata file will be used to populate the configuration of the service provider.
The Service Prover Details page will be presented with the fields filled with data from the metadata.
Please proceed to the Service Provider Details section.
Create via Template
If the Create via Template option has been the Templates page will be presented.
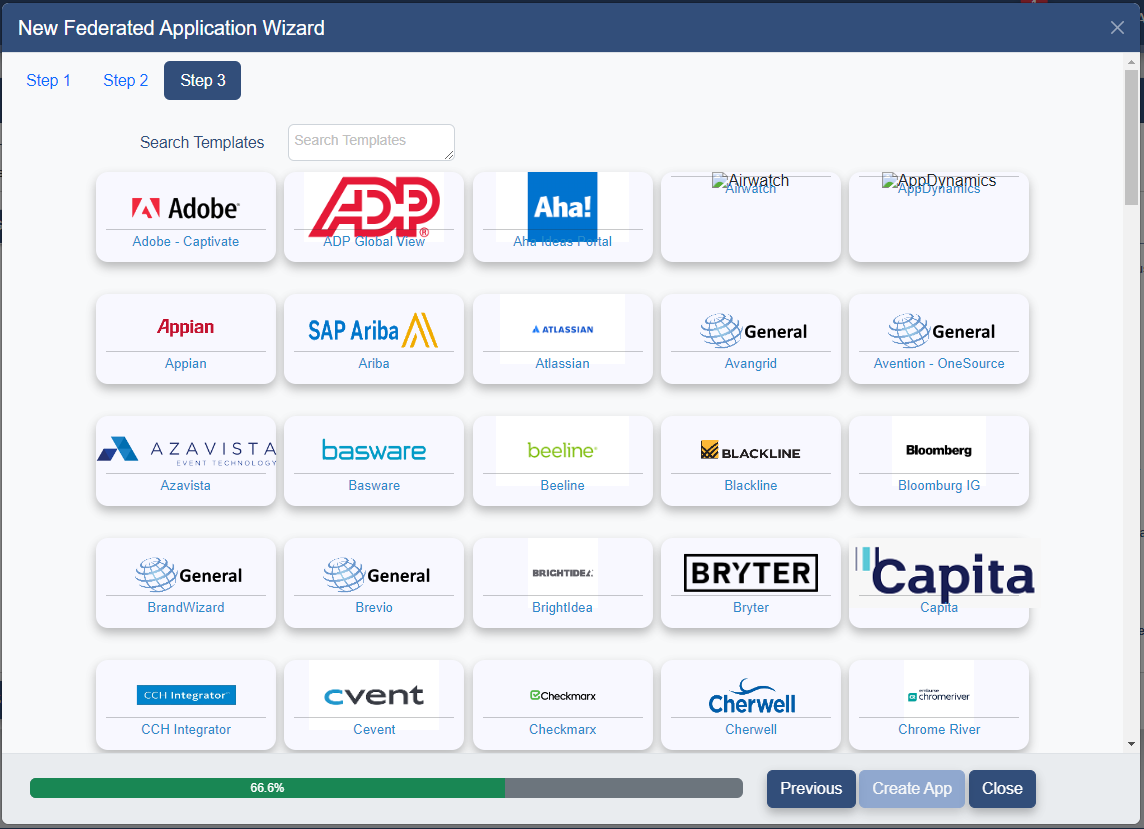
If the template for the SP being created is not visible, scroll down or use the Search Templates field to find the correct template.
Click on the desired template and the following page will be presented with the selected template displayed.
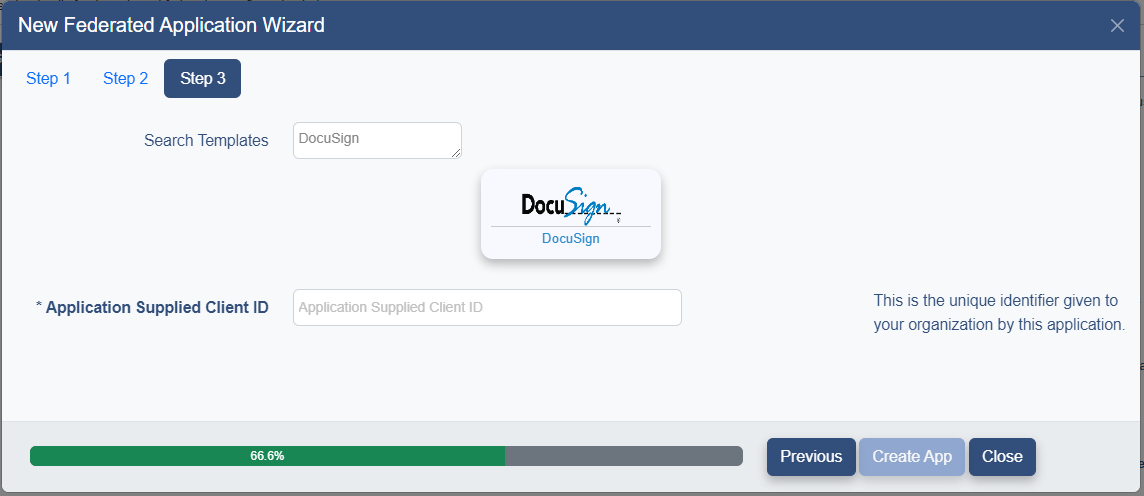
Some Service Providers require a Client ID. This should be provided to you by the application. Fill in the Application Supplied Client ID field if needed.
Click the button and the template chosen will be used to configure the SP.
The Service Provider Details page will be presented with the fields filled in using the data from the template.
Please proceed to the Service Provider Details section.
Service Provider Details
The Service Provider Details page allows the entry and modification of the Federation Configuration for the Service Provider.
SP General
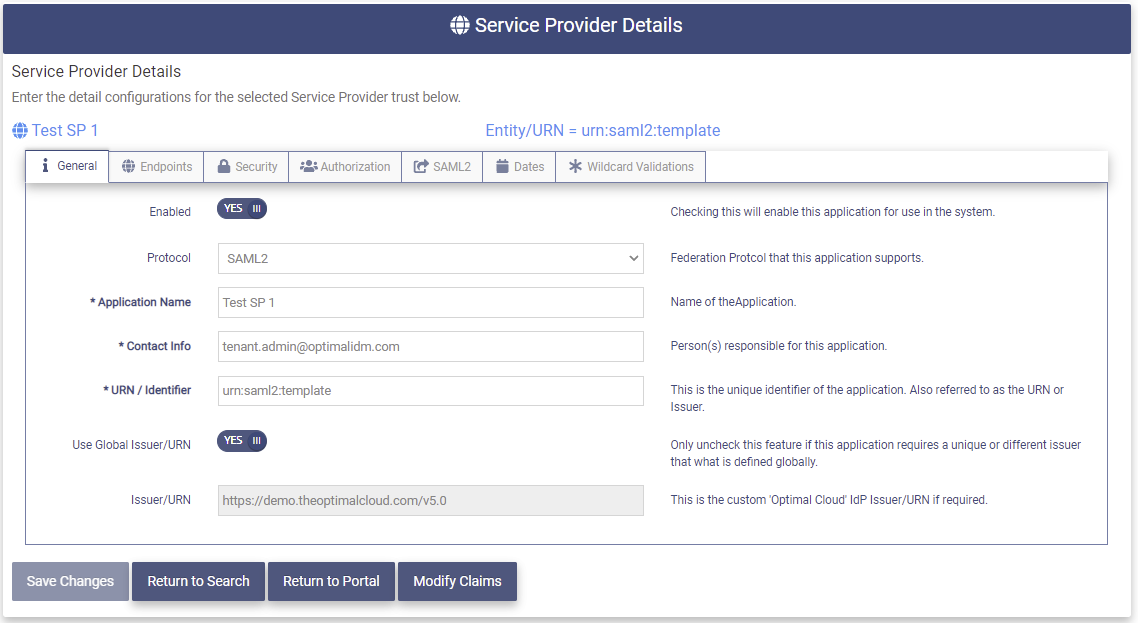
The General tab allows for the entry of the main configuration data for the Service Provider.
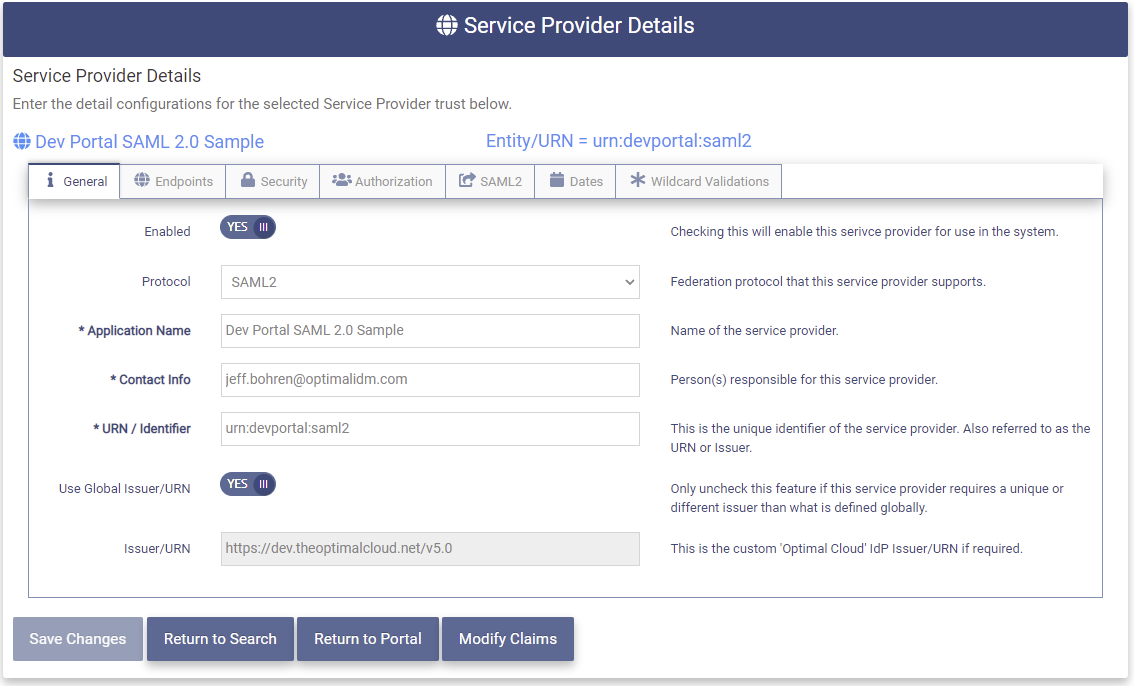
The Service Provider Details General tab contains the following fields:
- Enabled - This field shows whether the SP is Enabled. (YES/NO)
- Protocol - The protocol used by the SP
- Service Provider Name - The friendly display name entered earlier
- Contact Info - Email Address of the person to be contacted concerning this SP
- URN/Identifier - The unique identifier of the SP. Also referred to as the URN or Issuer.
- Use Global Issuer/URN Toggle - Set to YES if the SP will use the OptimalCloud Global Issuer URN in the Federation Response. Set to NO if the SP requires a different Issuer URN in the Federation Response.
- Issuer/URN - This field shows the OptimalCloud Global Issuer URN if above field is YES. If above field is NO this field allows entry of the custom 'Optimal Cloud' IdP Issuer/URN.
SP Endpoints
The Endpoints tab provides for the entry and modification of the endpoints associated with the Service Provider.
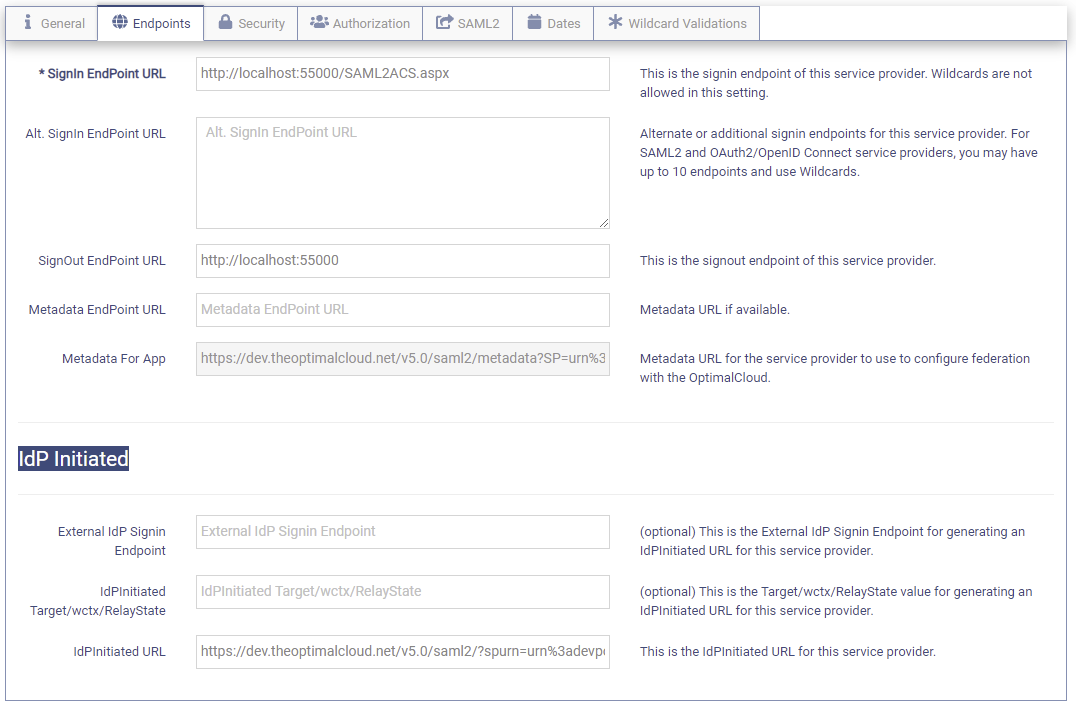
The Endpoints tab contains the following fields:
- Signin EndPoint URL - This is the Signin endpoint for this SP. Wildcards are not allowed in this setting.
- Alt. Signin EndPoint URL - Additional Signin endpoints for this SP. For SAML2 and OAuth2/OpenID Connect SP, you may have up to 10 endpoints and use Wildcards. Place one Signin URL on a line.
- Signout EndPoint URL - This is the Signout endpoint of this SP.
- Metadata EndPoint URL - This is the metadata URL provided during creation of the SP.
- Metadata For App - The Metadata file containing the configuration for how the SP will communicate with the OptimalCloud.
These fields are used if the SP is using IdPInitiated SSO.
IdPInitiated SSO is where the SSO is initiated at the IdP instead of at the SP.
-
External IdP Signin - The External IdP Signin Endpoint for generating an IdPInitiated URL for this SP. (Optional)
-
IdPInitiated Target/wctx/RelayState - The Target/wctx/RelayState value for generating an IdPInitiated URL for this SP. (Optional)
-
IdPInitiated URL - The URL that the users user to initiate SSO at the IdP when accessing this SP.
SP Security
The Security tab allows the entry of the security information for the SP.
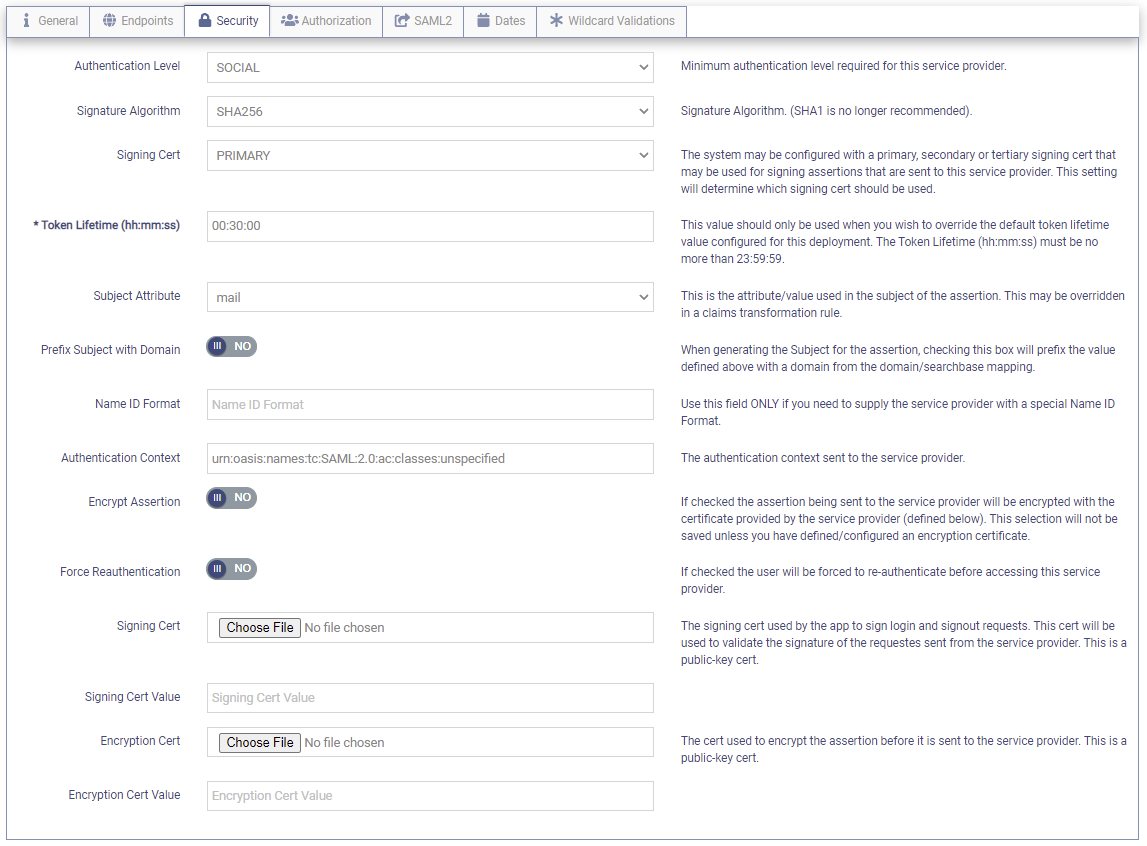
The Security tab contains the following fields;
-
Authentication Level - This dropdown is used to set the minimum Authentication Level required for the SP.
The dropdown contains the following choices:
-
SOCIAL - users will be required to authenticate by using their Social Media account
-
PWD - users will be required to authenticate by using their username and password credentials.
-
CERT - users will be required to authenticate by using a client certificate.
-
MFA - users will be required to authenticate first using their credentials and then an MFA option.
-
-
Signature Algorithm - The algorithm used to create the signature that is sent in the Response to the service provider.
-
Signing Cert - The certificate that is used to sign the Assertion that is sent to the service provider. There can be up to three certificates configured. The dropdown allows you to choose which of the three to use (Primary, Secondary, Tertiary)
-
Token Lifetime - The amount of time that the Token is valid. The Token Lifetime is entered in hh:mm:ss format and can be no greater that 23:59:59. The Token is an Assertion if the protocol is SAML2 or WS-Fed. If the protocol is Oauth/OpenIDConnect the Token can be an ID Token or an Access Token.
-
Subject Attribute - The attribute used as the subject of the assertion. It may be overridden in a claims transformation rule.
-
Prefix Subject with Domain - If "YES" the value of the attribute defined in the Subject Attribute field above is prefixed with a domain from the domain/searchbase mapping when generating the Subject for the Assertion.
-
Name ID Format - A Name ID Format is entered in this field when the SP requires a special Format.
-
Authentication Context - This field indicates the authentication level used by the OptimalCloud to authenticate the user.
-
Encrypt Assertion - If "YES" the assertion being sent to the Service Provider will be encrypted with the certificate provided by the Service Provider (defined below).
-
Force Reauthentication
-
Signing Cert - The signing cert used by the SP to sign Signin and Signout requests. This cert is used to validate the signature of the requests sent from the SP. This is a public-key cert. This cert is optional.
-
Signing Cert Value - This field will show the Base 64 Encoded public certificate value of the signing cert. The Thumbprint will be displayed on the right as shown below.

-
Encryption Cert - The certificate used to encrypt the assertion before it is sent to the service provider. This is a public-key cert. This cert is optional.
-
Encryption Cert Value - This field will show the Base 64 Encoded public certificate value of the encryption cert. The Thumbprint will be displayed on the right as shown below.

SP Authorization
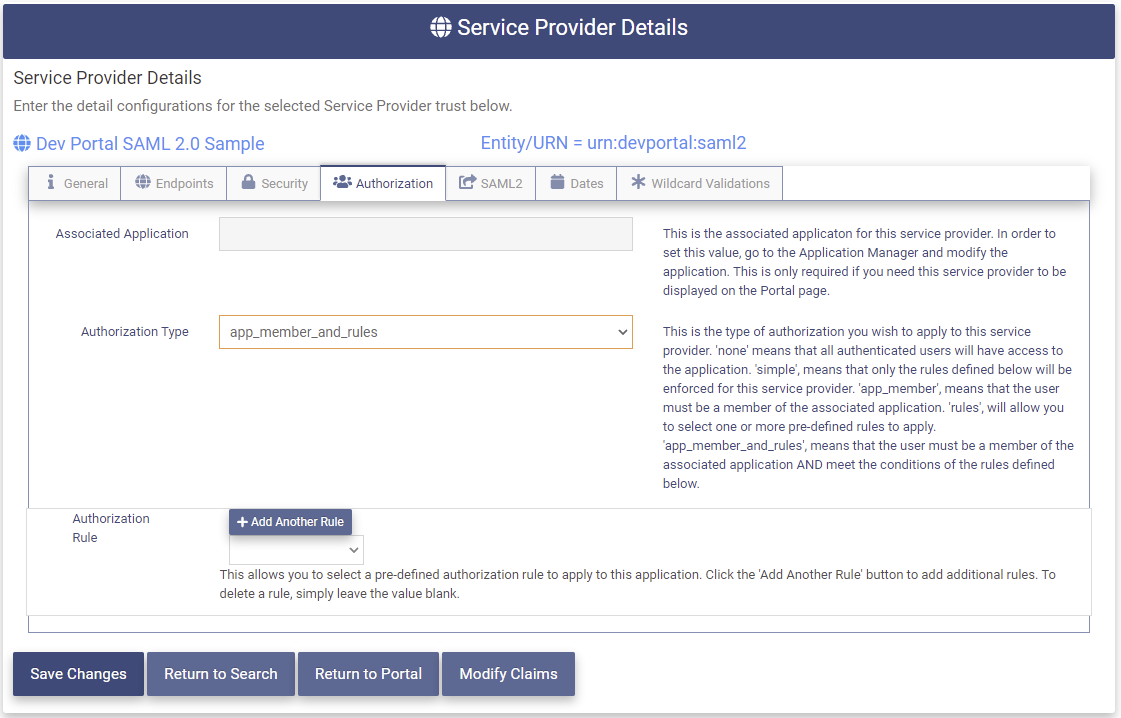
The Authorization tab contains the choices for allowing access to the SP.
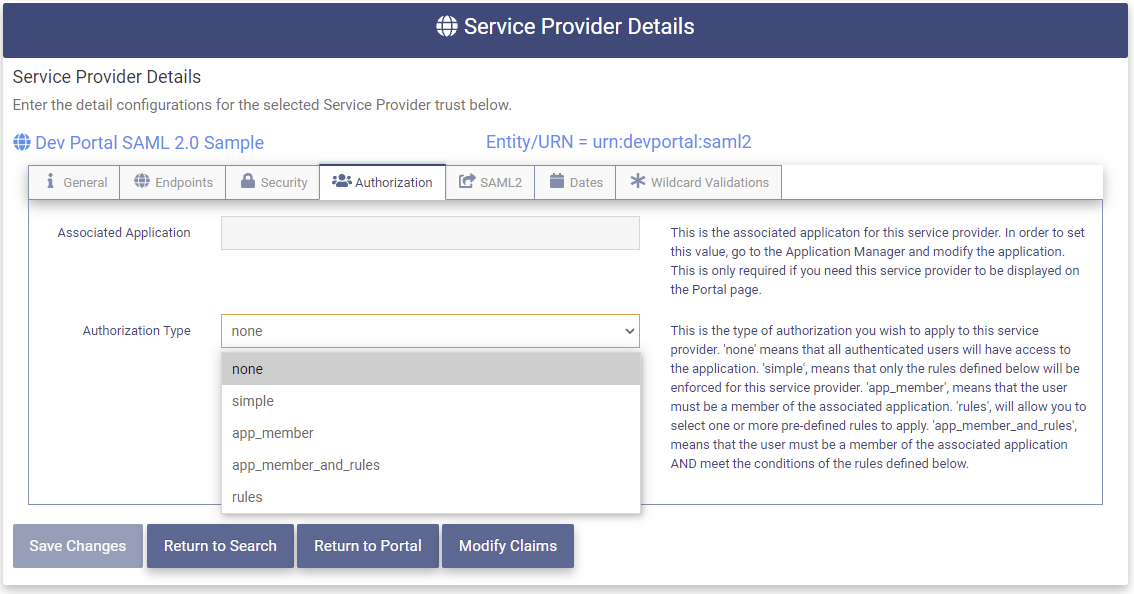
The SP Authorization page contains the following fields:
-
Associated Application - The url for the application that is linked to this SP to enable the SP to be shown in the Portal. To enable an SP to be shown in the Portal, an application must be created in the Application Manager under the Indemnity Management tab. The URN/Identifier for this SP is entered into the configuration for the application and the two become linked. This field is display only.
-
Authorization Type - This is the type of authorization that will be applied to this SP. The following options are available:
-
None - All authenticated users will have access to this SP.
-
Simple - Only the rules defined below will be enforced to allow users access to this SP.
-
app_member - Users must be a member of the Associated Application to have access to this SP.
-
rules - Select from one or more predefined rules that users must meet to have access to this SP.
-
app_member_and_rules - Users must be a member of the Associated Application AND meet the rules defined below to have access to this SP.
-
Simple Authorization
When the Authorization Choice is "simple" the following additional fields will be presented.
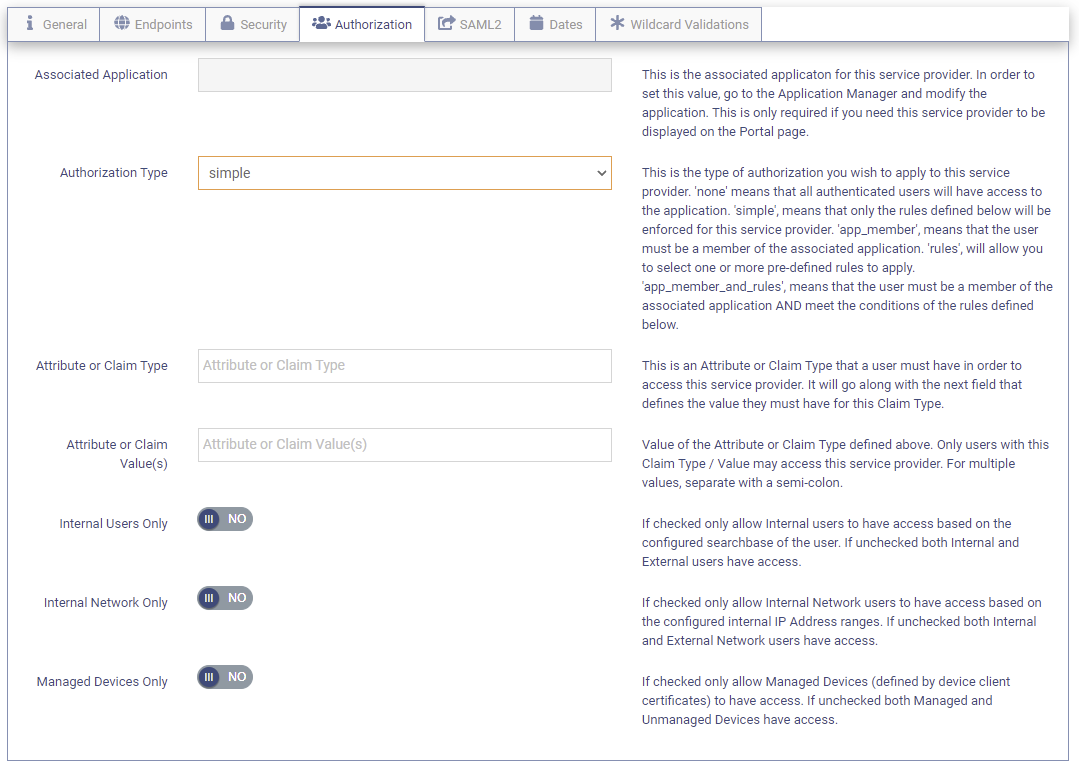
- Attribute or Claim Type - The attribute or Claim Type that the user must have in order to have access to this SP.
- Attribute or Claim Value(s) - The value(s) that the attribute or Claim Type specified in the field above must contain in order for the user to have access to this SP.
- Internal User's Only - If YES then only Internal Users will have access to this SP. If NO both Internal and External users will have access. An Internal user is based on the configuredsearch base of the user.
- Internal Network Only - If YES then only Internal Network Users will have access to this SP. If NO both Internal and External Network users will have access. Internal Network is based on configured IP addresses.
- Managed Devices Only - If YES then only Managed Devices are allowed to have access to this SP. If NO both Managed and Unmanaged Devices will have access. A Managed Device is defined by device client certificates.
Rules Authorization
When the Authorization Type choice is "rules" the Authorization Rule field is presented.
The dropdown will present a selection of rules that have been defined using the Authorization Rule Manager on the Administration tab. After one rule has been selected additional rules may be added by clicking the  button.
SP SAML2
If this Service Provider was configured to use the SAML2 protocol the The SAML2 tab will be present. This tab contains options for using the SAML2 protocol.
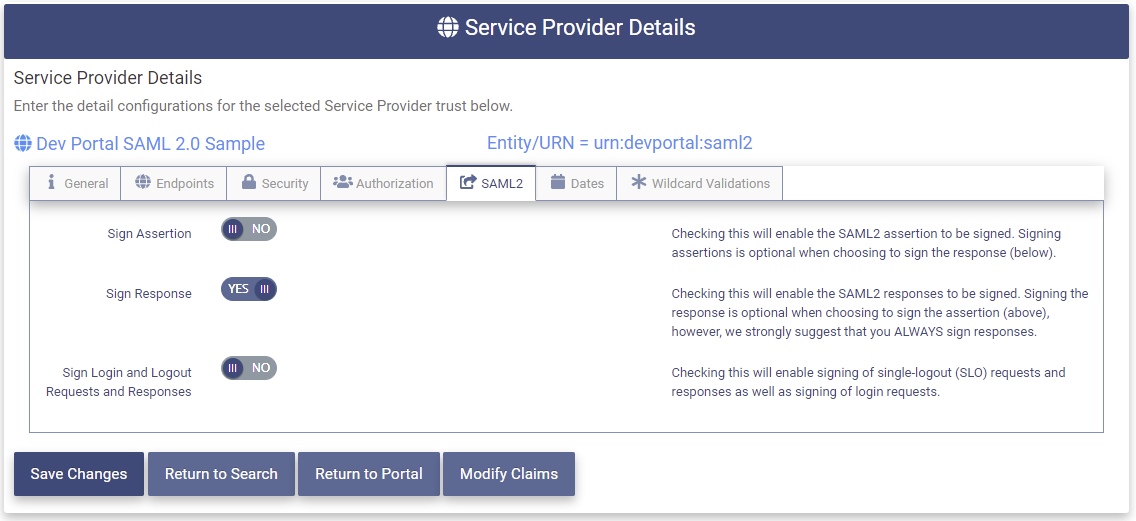
Please make the following selections:
- Sign Assertion - Set to YES to enable the Assertion in the Response to be signed when it is sent to the SP. This is optional if the Response is signed.
- Sign Response - Set to YES to enable the Response to be signed when it is sent to the SP. This is strongly recommend. This is optional if the Assertion is signed. This is the default.
Either the Sign Assertion or the Sign Response field must be set to YES.
- Sign Login and Logout Requests and Responses - Set to YES to enable the Single-Logout (SLO) requests and responses to be signed. Login Responses always have the either the Assertion, the whole Response, or both signed.
SP OAuth2/OIDC
If this Service Provider was configured to use the OAuth2/OpenIDConnect protocol the OAuth2/OpenIDConnect tab will be present. This tab allows for the set up of the OAuth2/OpenIDConnect protocol.
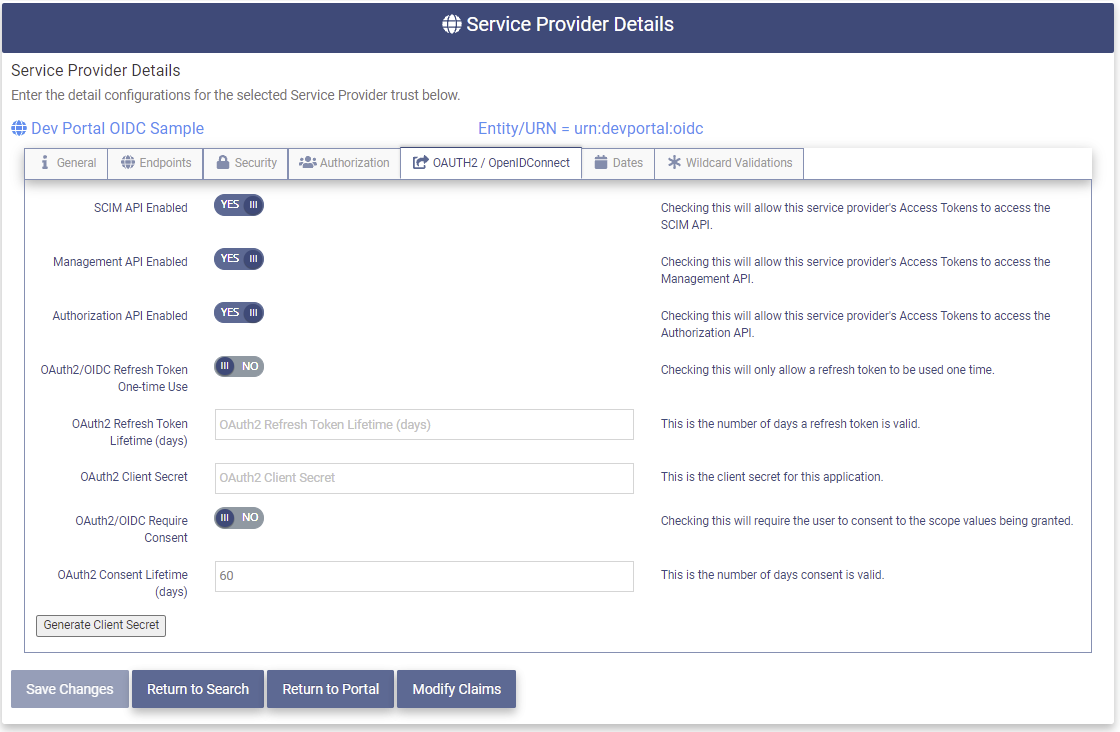
The OAuth2/OpenIDConnect tab contains the following fields:
The OptimalCloud supports three types of APIs. If enabled, When the SP gets an Access Token for the OptimalCloud it may use that Access Token to utilize any of the API types that are enabled.
-
SCIM API Enabled - If YES the SCIM API is enabled for use by this SP. This API provides the Identity Management functionality. See SCIM section for more information.
-
Management API Enabled - If YES the Management API is enabled for use by this SP. This API provides Administration functionality. Please contact support@optimalidm.com for more information.
-
Authorization API Enabled - if YES the Authorization API is enabled for use by this SP. This API provides Authorization functionality. Please contact support@optimalidm.com for more information.
-
OAuth2/OIDC Refresh Token One-time Use - This setting applies if the SP is requesting a Refresh Token from the OptimalCloud. If YES the OAuth2/OIDC Refresh Token will only be allowed to be used one time. If NO then the Refresh Token is reused until it expires.
-
OAuth2/OIDC Refresh Token Lifetime (days) - The Refresh Token will expire after the number of days specified.
-
OAuth2 Client Secret - If the SP is using the Authorization Code Grant, this value is sent to the OptimalCloud in the webservice call along with the Access Code and the client ID to retrieve the Access Token and the ID Token. (Optional).
To generate a client secret click on the
 button and a client secret will be placed in this field. An example of a client secret is shown below.

- OAuth2/OIDC Require Consent - If YES the user is required to consent to the user information being sent to the SP from the OptimalCloud.
- OAuth2/OIDC Consent Lifetime (days) - The lifetime in days that the Consent above lasts before the user is prompted to consent again.
SP Dates
The Dates tab contains important dates for this Service Provider. The fields on this tab are display only.
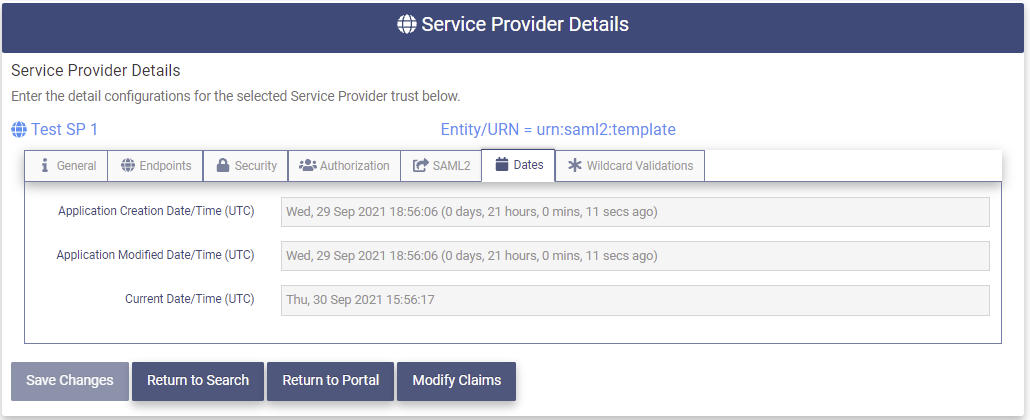
The DP Dates tab contains the following fields.
- Application Creation Date/Time (UTC) - The date/time (UTC) that the Service Provider was created.
- Application Modified Date/Time (UTC) - The date/time (UTC) that the Service Provider was last modified.
- Current Date/Time (UTC) - The current date/time (UTC).
SP Wildcard Validations
The Wildcard Validations tab allows potential Signon URLs that the SP would like to use to be tested against the Alternate Signon Endpoints from the Endpoints tab to see if they will match and be allowed. The match can be a direct match or be covered by a Alternate Endpoint containing wildcards.
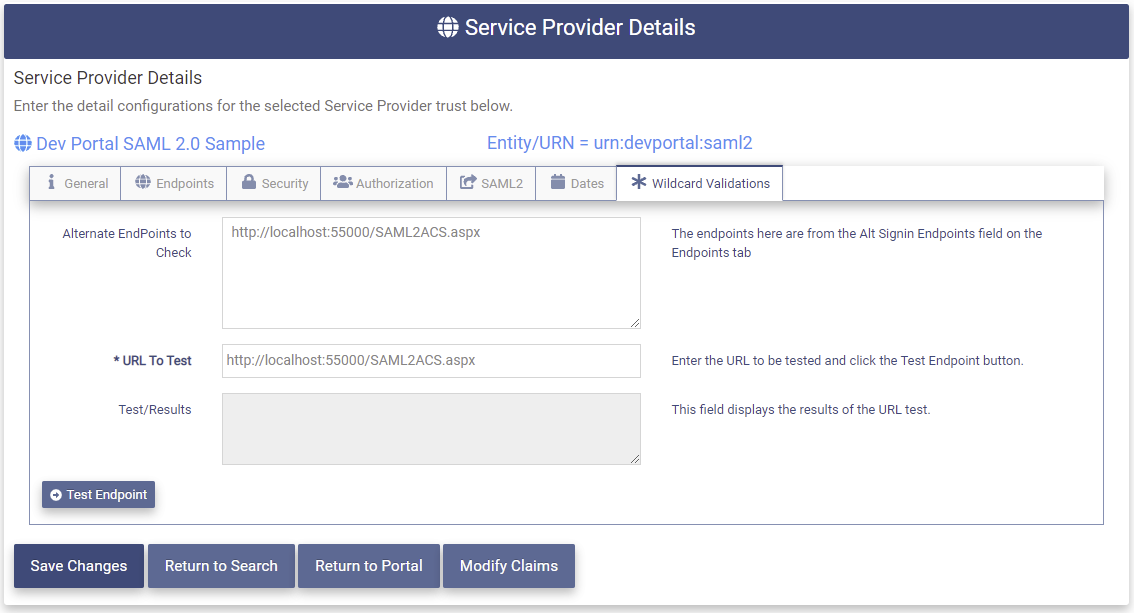
The Wildcard Validations tab contains the following fields:
- Alternate EndPoints to Check - These are the Alternate Signon Endpoints entered in the Endpoints tab. These may contain wildcards.
- URL to Test - Enter the potential Signon Endpoint that the SP would like to use.
- Test/Results - The results of the test will be displayed here. If the URL matches the text "MATCH" and the Alternate Endpoint that it matches will be shown. If the URL does not match the text "NO MATCH" will be displayed.
Click on the  button to begin the test.
Modify Claims
Claims are the method of passing information about the user to the Service Provider. Data attributes are assigned to Claim Types. To add claims to the SP click on the  button at the bottom of the page.
The SP Claims Manager will be presented. Depending on the Creation method chosen for this SP there may be a varying number of claims displayed.
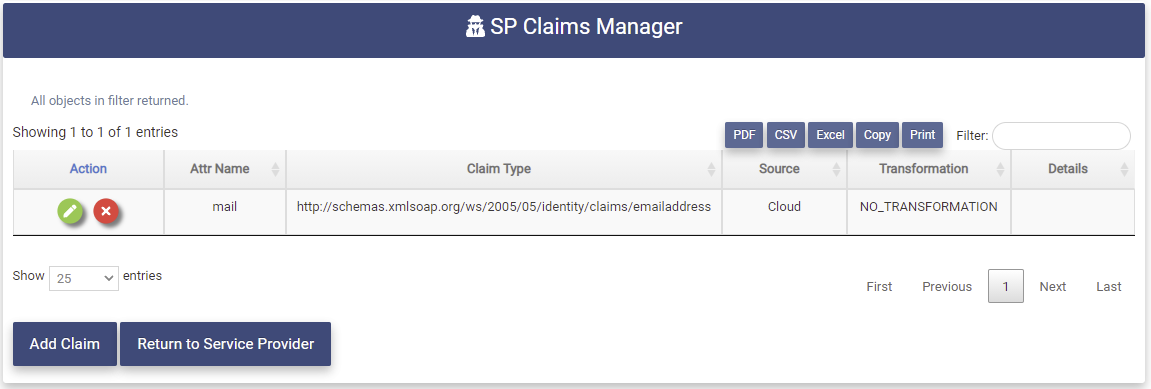
The SP Claims Manager page contains the following fields:
- Action - Clicking on these buttons perform actions on the associated claim
- Modify or View claim
- Remove claim
- Attr Name - The Name of the Cloud Attribute used to populate the claim.
- Claim Type - The Claim to be sent to the Service Provider.
- Source - The source of the user information.
- Transformation - The user information may be modified before it is put into the claim. This field shows whether a transformation has been performed on the associated claim.
- Details - This field shows any values used in the Transformation shown in the previous field.
Add a Claim
To add a claim to the SP click on the  button. The SP Claims Details page will be presented.
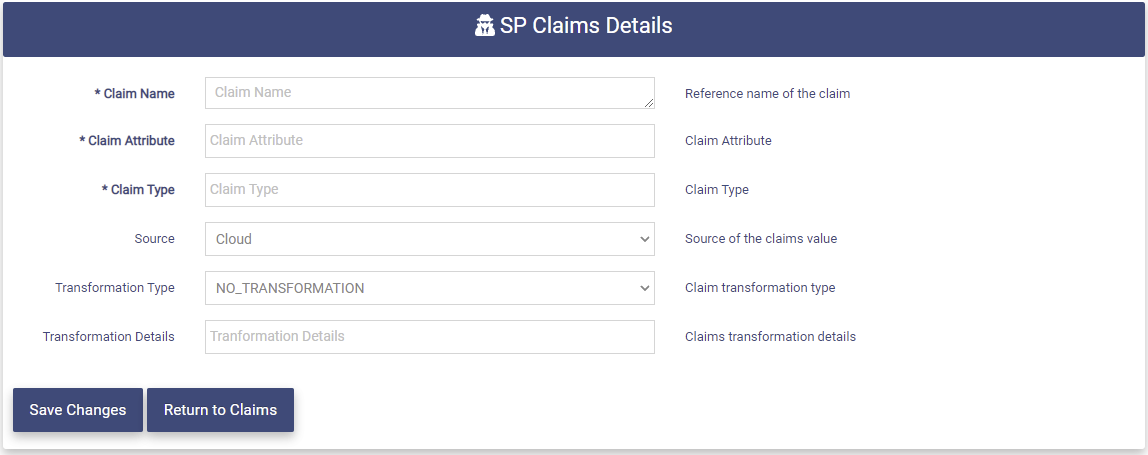
Enter the following information:
- Claim Name - Display name for the claim.
- Claim Attribute - Cloud Attribute to be used to populate this claim. As you start entering letters suggestions will be presented.
-
Claim Type - The claim to be sent to the SP. As you start entering letters suggestions will be presented. If the
-
Source - The source of the user information. The following choices are available:
-
Cloud - Data from The OptimalCloud will be used to populate the claim. This is the default.
-
IdP - Data from a specified IdP will be used to populate the claim.
-
Cloud-IdP - Data from The OptimalCloud will be used first but if not available data from the IdP will be used.
-
IdP-Cloud - Data from the IdP will be used first but if not available data from The OptimalCloud will be used.
-
Both - Data from both sources will be used.
-
-
Transformation - actions to be performed on the data to be used to populate the claim. The following options are available:
-
NO_TRANSFORMATION - No actions will be performed. This is the default.
-
FIXED_VALUE - The claim will be populated with a fixed value that is specified in the Transformation Details field.
-
RENAME_CLAIM_TYPE - The Claim Type will be renamed to the Claim Type specified in the Transformation Details field.
-
TO_LOWER - The data in the Claim will be transformed to all lower case.
-
TO_UPPER - The data in the Claim will be transformed to all upper case.
-
-
Transformation Details - This field holds the value or Claim Type to be used in the Transformation chosen if needed.
Click on the button to save the claims. The new Claim will now be shown on the SP Claims Manager page.
Remove a Claim
To remove a claim click on the button next to the associated claim on the SP Claims Manager Page.
The Delete Message will be presented.

Type "YES" in the box and click on the  button. The following message will be presented.

The claim will no longer appear in the SP Claims Manager page.
Modify a Service Provider
To Modify a Service Provider click on the Service Provider application from the Administration tab.
The Service Providers page will be presented.
Click on the View/Modify button for the associated Service Provider.
The Service Provider Details page will be presented. The fields in gray cannot be modified.
For further information on the Service Provider Details tabs see the SP Details sections above.
Add Portal Display Configuration
The Portal Display configuration can be added to an existing application that was created and associated with a Service Provider during the creation of the Service Provider.
If the Service Provider was not created with an application a new application can be created and associated with an existing Service Provider. The Portal Display configuration can be specified during the creation of the application.
Existing Application
If this Service Provider was created with an associated application, there will be an application with the same name as the Service Provider in the Application Manager.
To modify the Portal Display configuration
- Go to the Application Manager on the Identity Management Tab.
- Edit the application by clicking on the button. The Application Details page will be presented with the Profile tab showing.
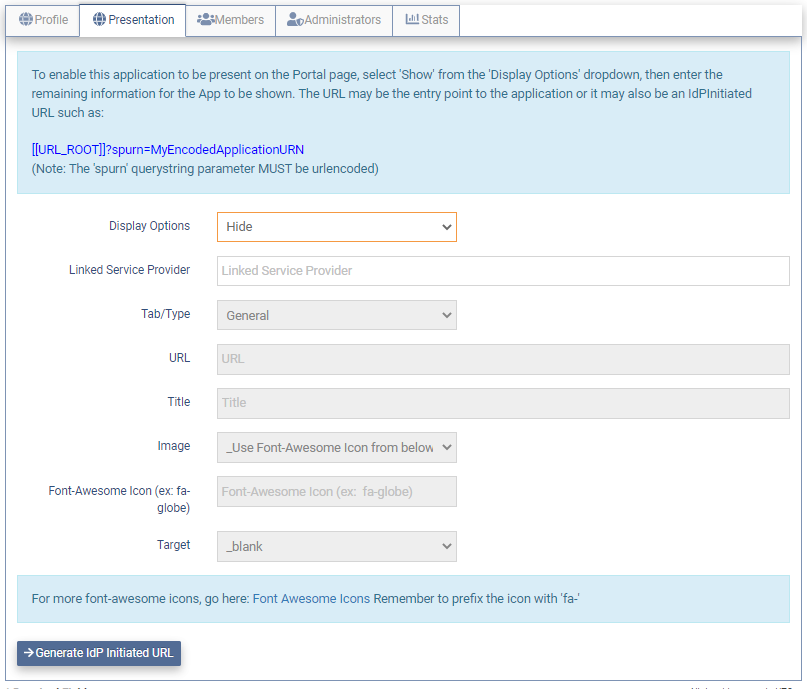
- Click on the Presentation Tab which will have the Display Options field set to "Hide".
- Set the Display Options field to "Show".
- Fill in the additional fields to have this application shown in the portal.
For further instructions on setting up the application Display Configuration see the Modify Application Presentation section.
Once all the information has been entered for the application, click the  button.
New Application
If this Service Provider was created without an associated application, an application may be created and associated with this Service Provider using the Application Manager on the Identity Management Tab.
- Go to the Application Manager on the Identity Management Tab.
- Click on the
 button and the New Application Wizard will be presented.
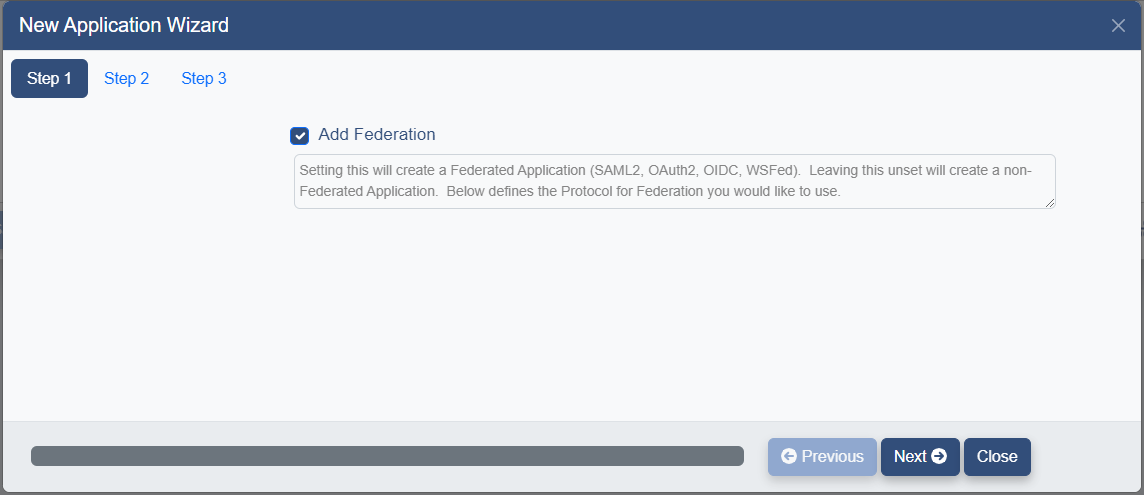
-
Uncheck the Add Federation box because the Service Provider already exists.
-
Click the
button. The Application Details page will be presented. -
Enter the application information. For further instructions on setting up an application see the Create Application section. (Skip the Federation Configuration section and continue with the Profile section.)
-
Enter Portal Display Configuration on the Presentation Tab.
-
To associate the application with a Service Provider go to the Federation Tab.
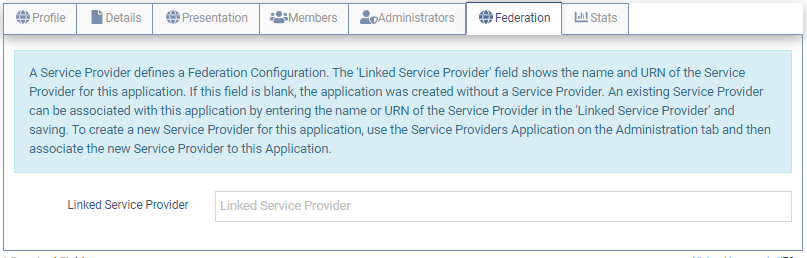
- Enter the name and URN of this Service Provider into the Linked Service Provider field in the following format.
name(URN)
Once all the information has been entered for the application, click the button.
Remove a Service Provider
To remove a Service Provider click on the button for the associated SP on the Service Providers page.

The following message will be displayed.

Type "YES" in the box and click the button.
The following message will be displayed and the SP will no longer appear on the Service Providers page.

Identity Providers (IdP)
The Identity Providers application allows the Tenant Admin to create and manage the identity providers for the Tenant.
An Identity Provider is a system that stores and manages identity information for users and provides authentication to applications.
Clicking on the Identity Providers application will present the Identity Providers page. The Identity Providers page shows all Identity Providers that have been configured for the Tenant.
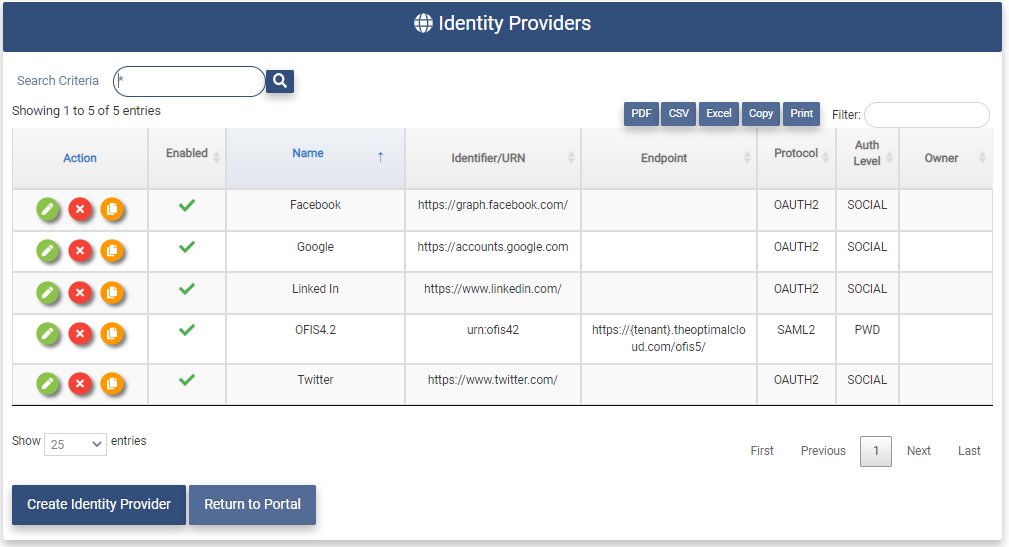
The Identity Providers page contains the following fields for each Identity Provider in the Tenant:
- Action - Clicking on these buttons perform actions on the associated Service Provider.
- Modify or View Identity Provider configuration.
- Remove Identity Provider configuration.
- Copy Identity Provider configuration. This function is useful for creating a new Identity Provider with a similar configuration as an existing Identity Provider. The IdP Identifier/URN must be changed to be unique.
- Enabled Flag - : Enabled, : Disabled. If the IdP configuration is disabled it cannot be accessed.
- Name - Name of the Identity Provider.
- Identifier/URN - The unique identifier for the Identity Provider.
- Endpoint - The Signon Endpoint for the Identity Provider.
- Protocol - The protocol used by the Identity Provider.
- Auth Level - The Authentication Level needed to access the Identity Provider.
- Owner - Email Address of the contact for the Identity Provider.
Create an Identity Provider
This section provides the Tenant Admin with instructions on creating new Identity Providers for the Tenant.
Clicking on the  button will present the New Federated Identity Provider Wizard page.
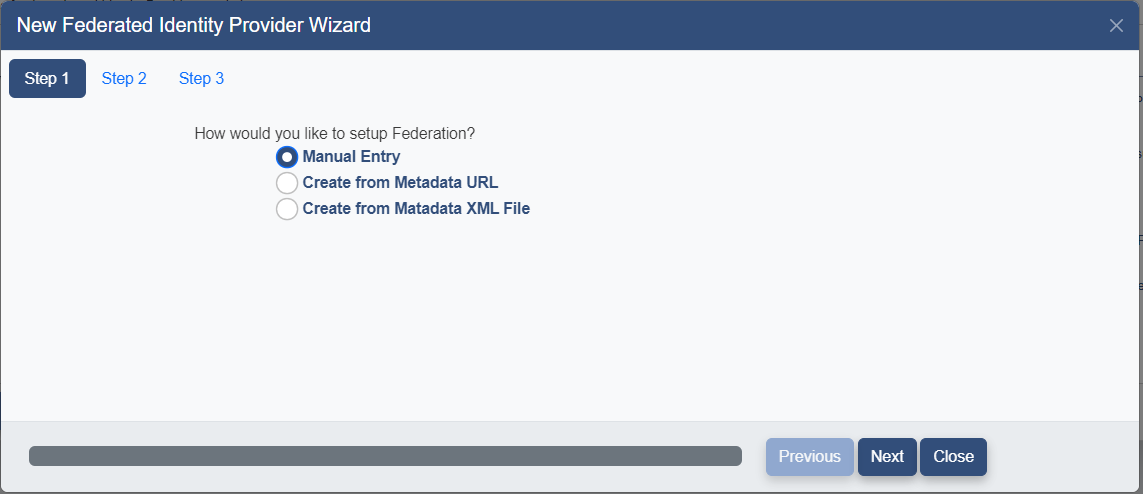
Select the method to be used for creating the IdP. The following options are available:
- Manual Entry - Fill in the all data fields manually
- Create from Metadata URL - Specify a link to Metadata containing the configuration
- Create from Metadata XML File - Specify a local Metadata XML file containing the configuration
Choose the appropriate option and click the button to proceed. The IdP Wizard Details page will be presented.
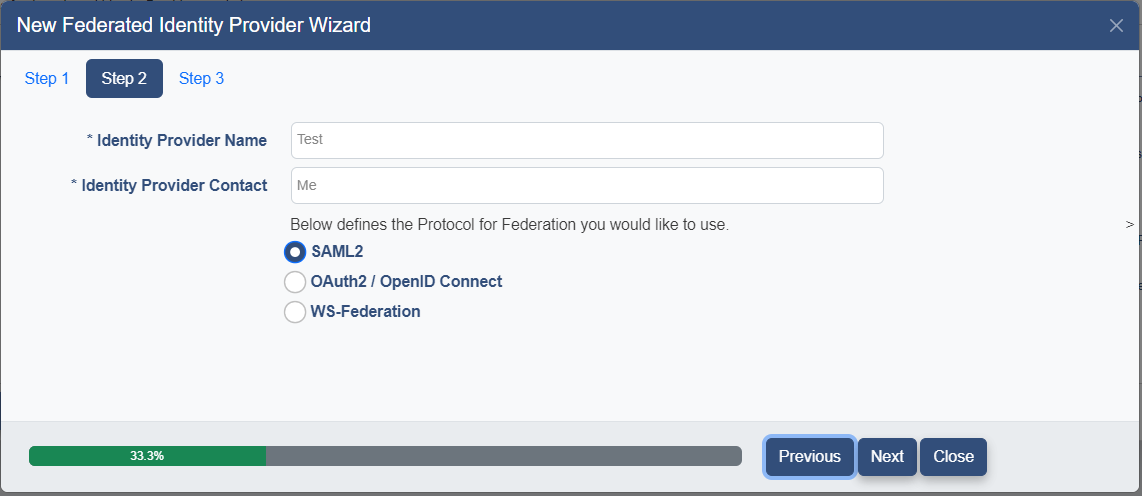
Fill in the following fields and click the button.
- Identity Provider Name - The name of the IdP to be displayed
- Indentity Provider Contact - The Email Address of the person to be contacted about this IdP
- Protocol - Specify the protocol to be use for this IdP (WS-Federation, SAML2, Oauth2/OpenIdConnect)
Continue to the appropriate section below based on the Setup Method chosen.
The Manual Setup method must be used to create an IdP using the OAuth/OpenIDConnect protocol.
Create via Manual Entry
If the Manual Entry option was selected the Details page below will be presented.

Fill in the following fields and click the button.
- URN/Identifier - The unique identifier for this IdP.
- Signin End Point - The Signin End Point URL for this IdP
The Identity Provider Details Page will be presented. Please continue to the Identity Provider Details section.
Create via Metadata URL
If the Create from Metadata URL option was selected the Metadata URL entry field will be presented as shown below.

Enter the Metadata URL and click the button.
The Identity Provider Details Page will be presented. Please continue to the Identity Provider Details section.
Create via Metadata File
If the Create via Metadata XML File option is selected the File Selection field will be displayed as shown below.
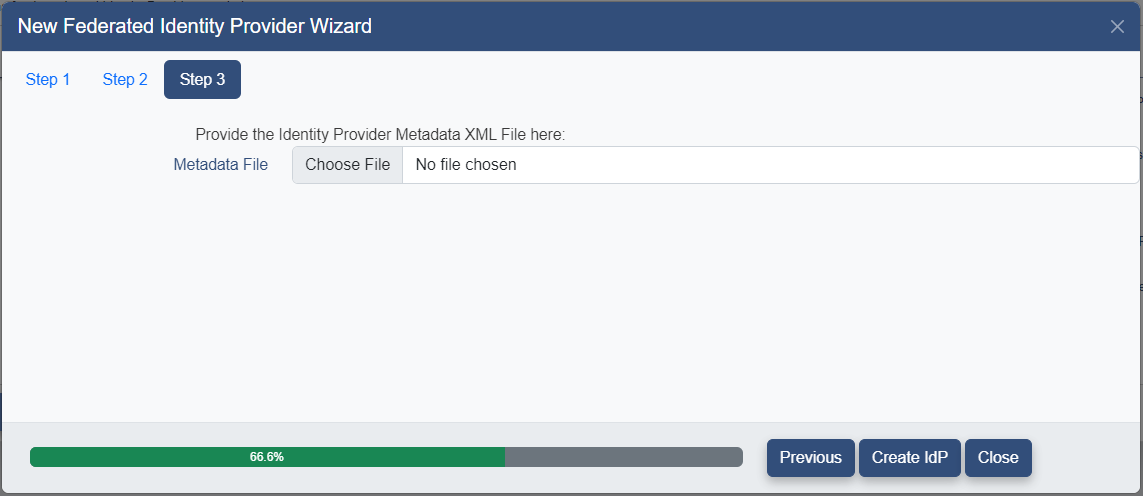
Click on the button and use the browser to select the Metadata XML File.
Then click the button.
The Identity Provider Details Page will be presented. Please continue to the Identity Provider Details section.
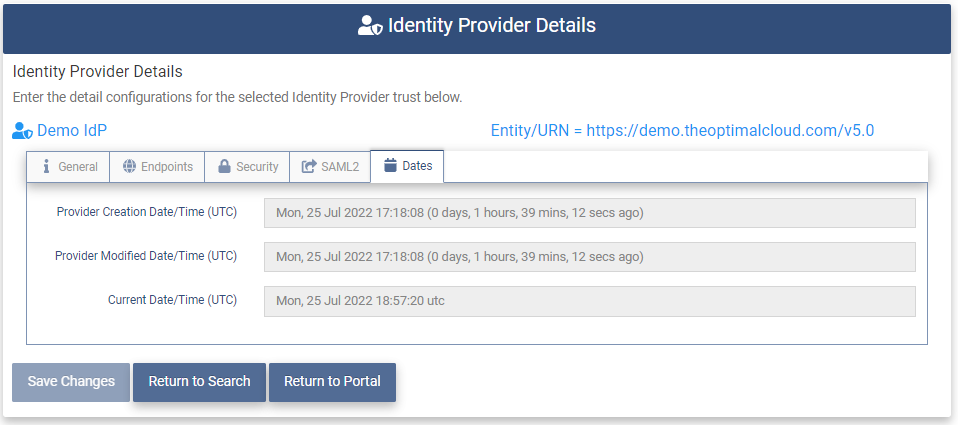
Identity Provider Details
The Identity Provider Details page allows the entry and modification of the Federation Configuration for the Identity Provider.
IdP General
The General tab contains the main pieces of information for the IdP.
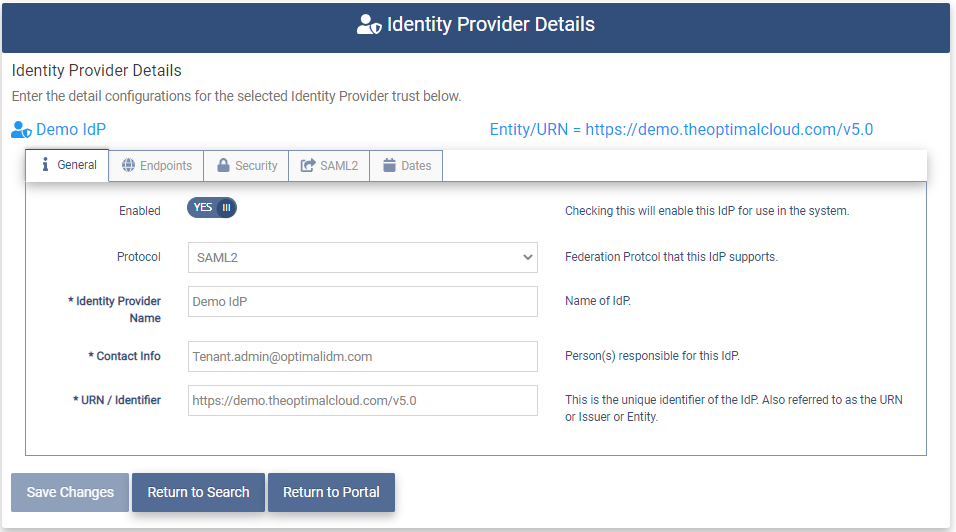
The Service Provider Details General tab contains the following fields:
- Enabled - This field shows whether the IdP is Enabled. (YES/NO) Default is YES.
- Protocol - The protocol used for this IdP configuration.
- Identity Provider Name - The friendly display name entered earlier.
- Contact Info - Email Address of the person to be contacted concerning this IdP
- URN/Identifier - The unique identifier of the IdP. Also referred to as the URN or Issuer.
These fields will be filled in by going through the Wizard process.
Enter the information on the following tabs.
When all of the required information is entered click the button. The following message will be presented.

IdP Endpoints
The Endpoints tab provides for the entry and modification of the endpoints associated with the Identity Provider.
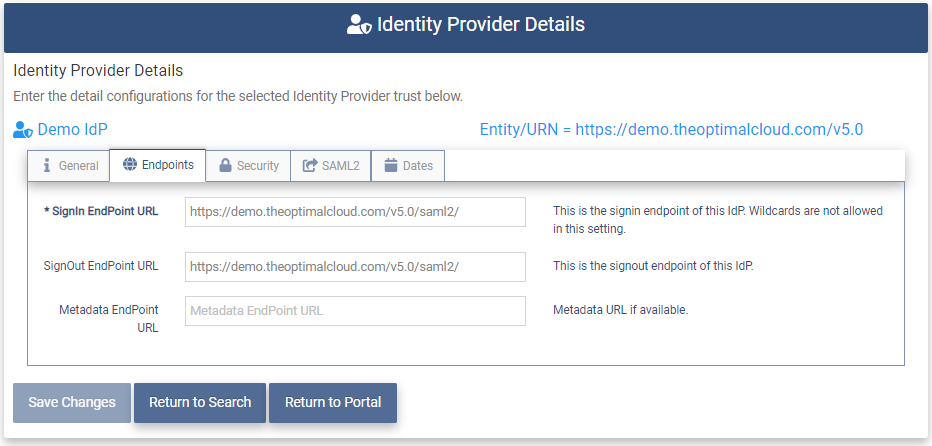
The Endpoints tab contains the following fields:
- Signin EndPoint URL - This the URL for the IdP that The OptimalCloud will send Signin Requests to. Wildcards are not allowed in this setting.
- Signout EndPoint URL - This is the URL for the IdP that The OptimalCloud will send Signout Requests to. This is optional.
- Metadata EndPoint URL - This is the metadata URL provided during creation of the IdP if a Metadata URL was used.
IdP Security
The Security tab allows the entry or modification of the security information for the IdP.
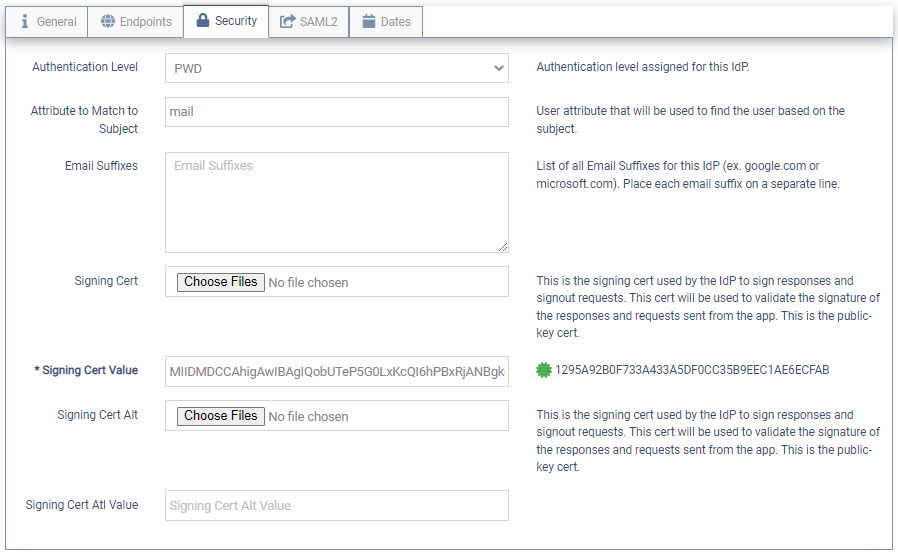
The Security tab contains the following fields.
-
Authentication Level - This dropdown is used to set the minimum Authentication Level required for the IdP.
The dropdown contains the following choices:
- PWD - users will be required to authenticate by using their username and password credentials.
- MFA - users will be required to authenticate first using their credentials and then an MFA option.
-
Attribute to Match to Subject - User account attribute that will be used to match the user to the Subject in the Response sent by the IdP.
-
Email Suffixes - The email domains associated with this IdP. Place each email domain on a separate line.
-
Signing Cert - The certificate used by the IdP to sign the responses and Signout requests and will be validated by the OptimalCloud. It will also be used to validate the signature of the Responses and Requests sent from the application. This is the Public Key certificate. If the IdP was created via a Metadata URL or Metadata XML File, the Signing Cert may be added automatically.
If the IdP was created via Manual Entry or the certificate was not added automatically, use the
button to select a Signing Cert file ending in ".cer". This is a required field. -
Signing Cert Value - When the certificate has been entered the full certificate will be shown in the Signing Cert field and the Thumbprint will be displayed to the right as shown in the diagram above.
-
Signing Cert Alt - Alternate certificate used the same as the Signing Cert above.
-
Signing Cert Alt Value - Alternate certificate value displayed the same as Signing Cert Value above.
IdP SAML2
The IdP SAML2 tab allows for the setting of the SAML2 protocol options.
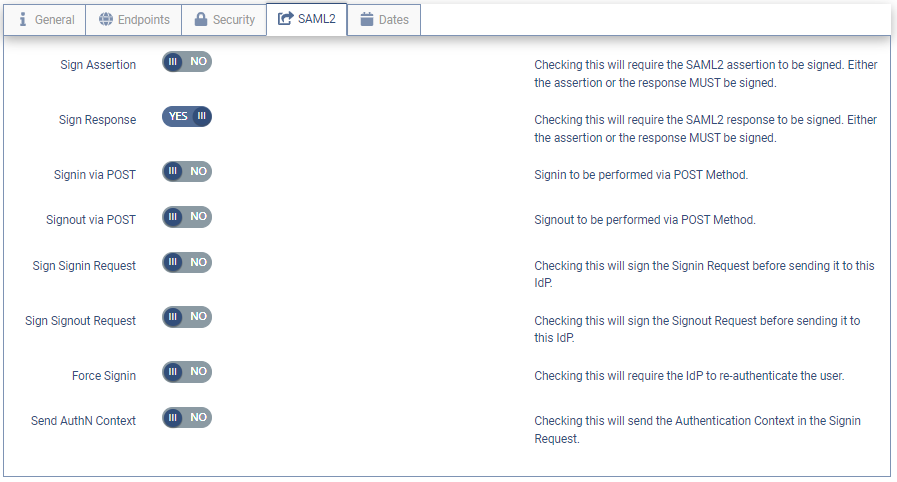
The following options may be set:
- Sign Assertion - Set this to YES if the IdP will be signing the Assertion in the Response sent to The OptimalCloud. This is optional if the Response is signed.
- Sign Response - Set this to YES if the IdP will be signing the Response sent to The OptimalCloud. This is the default.
Either the Sign Assertion or the Sign Response field must be set to YES.
- Signin via POST - Set this to YES to have The OptimalCloud send the Signin Request via POST.
- Sign Signin Request - Set this to YES to have The OptimalCloud sign the Signin Request sent to the IdP.
- Sign Signout Request - Set this to YES to have The OptimalCloud sign the Signout Request sent to the IdP.
- Force Signin - Set this to YES to require the IdP to re-authenticate the user.
- Send AuthN Context - Set this to YES to have the Authentication Context required for the user sent in the Signin Request.
IdP OAuth2/OIDC
If the Identity Provider was created using the OAuth/OIDC protocol, the OAUTH2/OpenIDConnect tab will be present.
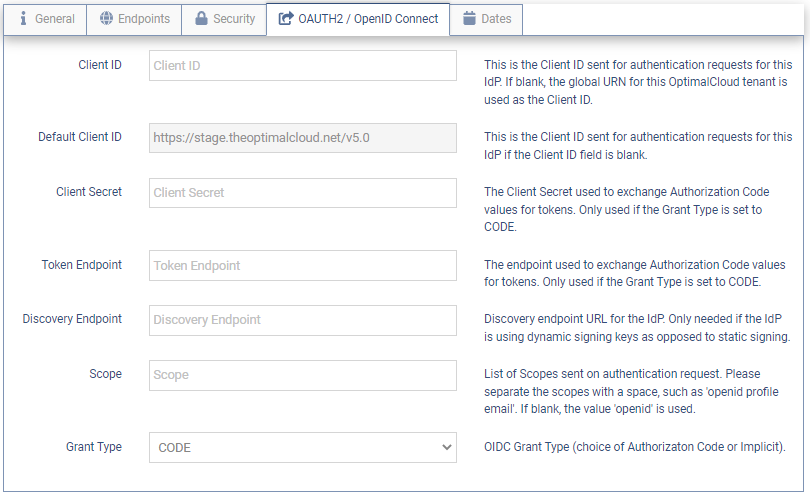
The OAUTH2/OpenIDConnect tab contains the following fields.
-
Client ID - The Client specific URN sent for authentication requests for this IdP. If blank the Global URN for the OptimalCloud is used.
-
Default Client ID - The Global URN for the OptimalCloud used if the Client ID is blank.
-
Client Secret - The client secret value used to exchange the Authorization Code values for tokens. Only used if the Grant Type field is set to CODE.
-
Token Endpoint - The Endpoint used to exchange Authorization Code values for tokens. Only used if the Grant Type field is set to CODE.
-
Discovery Endpoint - The Endpoint to find the IdP configuration. Only used when the IdP is using dynamic signing keys as opposed to static signing certs.
-
Scope - List of user information values to pass to the IdP to be used for authentication. List the values separated by a space.
-
Grant Type - The Grant Type to be used for authenticating to this IdP (Authorization Code (CODE) or Implicit (IMPLICIT))
For an explanation of these Grant Types please refer to the OAuth2/OIDC Grant Types Knowledge Based Article.
IdP Dates
The Dates tab shows the dates that the IdP was created and last modified along with the current date and time.
Modify an Identity Provider
To modify an Identity Provider go to the Identity Providers page.
Click on the button associated with the Identity Provider you wish to modify. The Identity Provider Details page will be presented. See the Identity Provider Details section above.
Modify the required information on all tabs and click the button. The following message will be presented.

Remove an Identity Provider
To remove an Identity Provider go to the Identity Providers page. Click the button associated with the Identity Provider you wish to remove. The Identity Provider Details page for that IdP will be presented with the following message on the top of the page.

Type "YES" in the box and click on the button. The following message will appear.

Condition Manager
The Condition Manager allows the Tenant Admin to create conditional rules that may then be used alone or in groups for Authentication and Authorization. The rules may be used for allowing users access to The OptimalCloud, applications, APIs, or provisioning.
Clicking the Condition Manager application will present the Condition Manager page. The Condition Manager page shows all conditions that have been defined for the Tenant. The Tenant Admin may create new conditions.
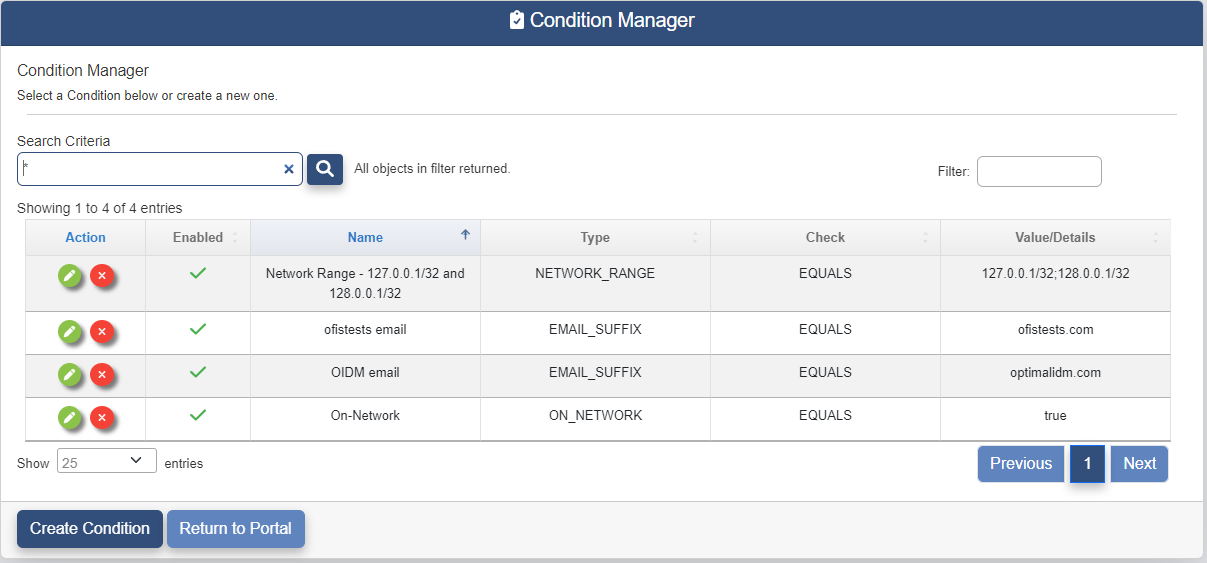
The Condition Manager page contains the following fields:
- Action - Clicking on these buttons perform actions on the associated condition.
- Modify or View condition
- Remove condition
- Enabled - Status of the condition. A green check means enabled. A red "X" means disabled.
- Name - Display name given to the condition when it was created.
- Type - Type of the condition.
- Check - The Type of check that is being performed for this condition.
- Value/Details - The value that the check is being performed against.
Create a Condition
The Tenant Admin may create a new condition by clicking on the  button.
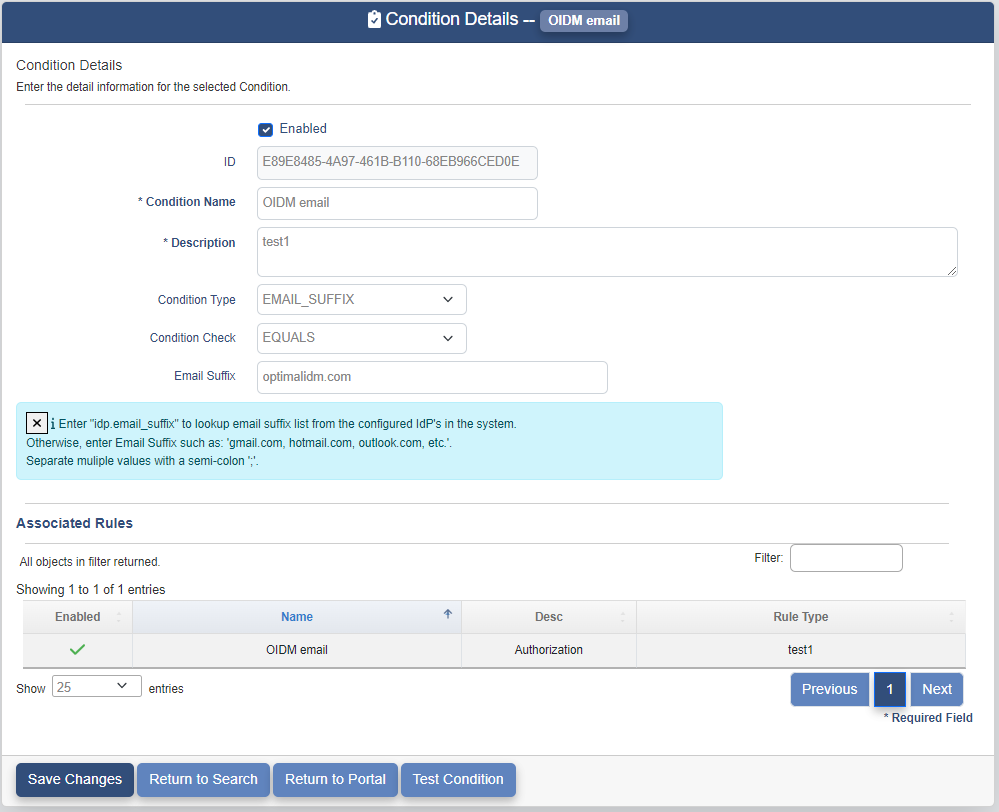
The Condition Details page will be presented.
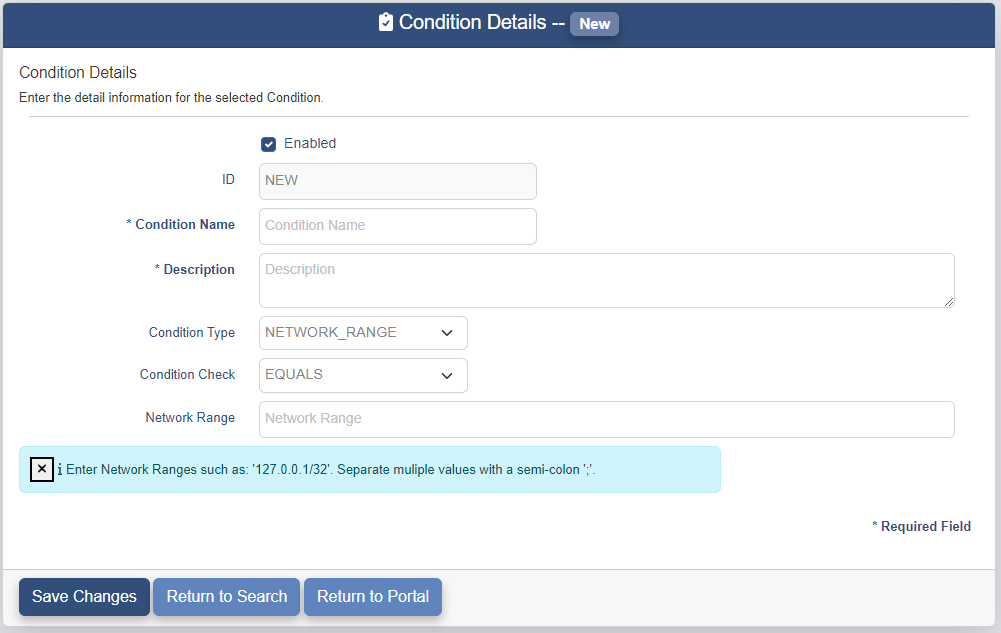
The Condition Details page contains the following fields. The fields marked with an "*" are required.
-
Enabled - This determines whether the condition is available to be used.
-
ID - The ID for the condition is a system generated field. Set to NEW for a new condition.
-
Condition Name - Display name for the condition.
-
Description - Description of the condition.
-
Condition Type - This field determines what type of item will be checked. The possible choices are:
-
ATTR_VALUE - An attribute on the user object in The OptimalCloud. If this Condition Type is selected you will be shown the following fields. Fill in the fields per the instructions in the blue message box.

-
AUTHCONTEXT - The method that the External IdP states that the user used to authenticate. If this Condition Type is selected you will be shown the following field. Fill in the field per the instructions in the blue message box.

-
AUTHLEVEL - The Authentication level the user used to login to The OptimalCloud. If this Condition Type is selected you will be shown the following field. Fill in the field per the instructions in the blue message box.

-
BROWSER_FINGERPRINTING - The unique set of attributes for the users browser. If this Condition Type is selected you will be shown the following fields.

Select the Browser Fingerprint Option variable from the dropdown. Fill in the Browser Fingerprint Value using the values for your browser that are associated with the Fingerprint Option variables shown in the blue message box.
-
CONTINENT - A single continent or multiple continents. If this Condition Type is selected you will be shown the following field. Fill in the field per the instructions in the blue message box.

-
COUNTRY - A single country or multiple countries. If this Condition Type is selected you will be shown the following field. Fill in the field per the instructions in the blue message box.

-
DATACENTER - The DataCenter the user is connected to when accessing The OptimalCloud. If this Condition Type is selected you will be shown the following field. Fill in the field per the instructions in the blue message box.

-
DAY - Day of the week. If this Condition Type is selected you will be shown the following field. Fill in the field per the instructions in the blue message box.

-
EMAIL_SUFFIX - Email suffix of the user. If this Condition Type is selected you will be shown the following field. Enter "idp.email_suffix" to have all of the email domains that have been configured for all of the IdPs in the system used as the comparison list. Otherwise, enter an email suffix or multiple email suffixes separated by a semi-colon":".

-
FRAUD_SCORE - Score of the user that is determined by Optimal AI. If this Condition Type is selected you will be shown the following field. Fill in the field per the instructions in the blue message box.

-
HEADER - The header provided by the browser or a proxy server. If this Condition Type is selected you will be shown the following fields. Enter the name of the header in the Header field. Enter the associated value in the Header Value field. You may enter multiple of each separated by a semi-colon ";". The header and associated value must be in the same order.

-
IDENTITYPROVIDER_URN - The URN of the External IdP. If this Condition Type is selected you will be shown the following field. Fill in the field per the instructions in the blue message box.

-
INTERNAL_USER - There is a Tenant configuration variable that defines whether a user is Internal or External. Check the box if you want the condition to be True or leave blank for False.

-
MEMBEROF_GRP - A group that has been defined for the Tenant. If this Condition Type is selected you will be shown the following field. Select the group from the dropdown.

-
MEMBEROF_ORG - An organization that has been defined for the Tenant. If this Condition Type is selected you will be shown the following field. Select the organization from the dropdown.

-
MEMBEROF_APP - An application that has been defined for the Tenant. If this Condition Type is selected you will be shown the following field. Select the application from the dropdown.

-
NETWORK_RANGE - Specified IP addresses and ranges. If this Condition Type is selected you will be shown the following field. Fill in the field per the instructions in the blue message box.

-
ON_NETWORK - There is a Tenant configuration variable that defines whether a user is On the clients Internal Network. Check the box if you want the Condition to be True or leave blank for False.
-
PLUGIN - Values that will be sent to a custom plugin. For use by Optimal Engineers.

-
SERVICEPROVIDER_AUTHLEVEL - The Authentication Level that the Service Provider requires. If this Condition Type is selected you will be shown the following field. Fill in the field per the instructions in the blue message box.

-
SERVICEPROVIDER_URN - The URN of the Service Provide. If this Condition Type is selected you will be shown the following field. Fill in the field per the instructions in the blue message box.

-
TIME - Time in UTC based on a 24 hour clock. If this Condition Type is selected you will be shown the following field. Fill in the field per the instructions in the blue message box.

-
USER_AGENT - A string that identifiers your Browser. If this Condition Type is selected you will be shown the following field. Enter a whole User-Agent string if Condition Check is EQUALS or a part of the string if using another Condition Check such as CONTAINS.

-
-
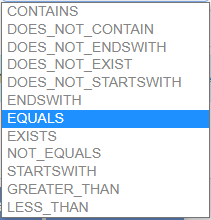
Condition Check - This determines how the item chosen as the Condition Type will be checked. The possible choices are shown below.
Once you have selected a Condition Type, a Condition Check, and filled in the additional fields, click on the button and the following message will appear.

Modify a Condition
The Tenant Admin may modify conditions. To modify conditions click on the action button associated with the condition to be modified. The Condition Details page for the condition will be presented.
The fields that are not gray may be modified. The fields with an "*" are required.
If the condition has been used in an Authorization or Authentication Rule, those rules will be listed in the Associated Rules table as shown above.
Remove a Condition
The Tenant Admin may remove conditions. To remove a condition click on the action button associated with the condition to be removed. The Condition Details page for the condition will be presented with the following message.

Type "YES" in the box and click on the button. The following message will appear.

Job Manager
The Job Manager application is used to run asynchronous jobs. This feature is used for importing and exporting data along with other job types.
Clicking on the Job Manager application will present the Job Manager page. The Job Manager page shows all the jobs that have been created for the Tenant.
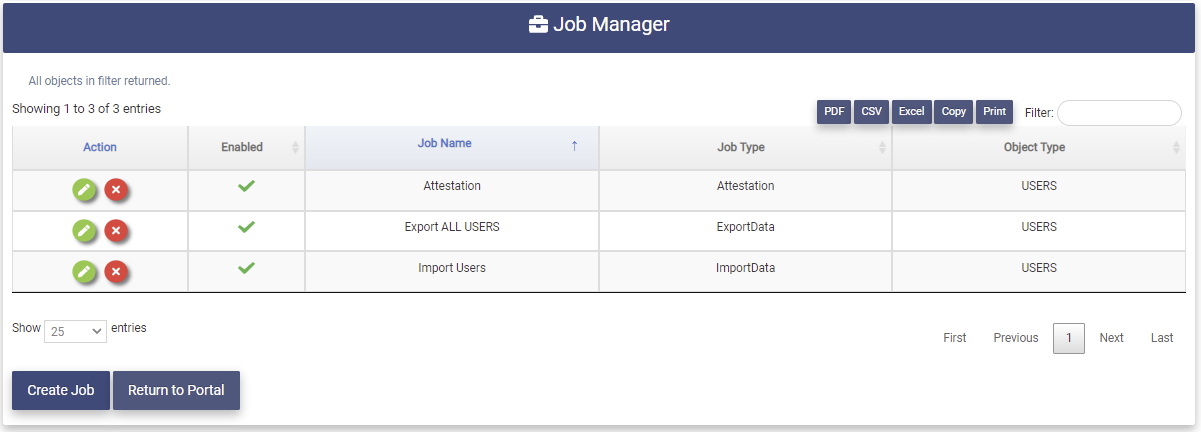
The Job Manager page contains the following fields:
- Action - Clicking on these buttons perform actions on the associated job.
- Modify or View job
- Remove job
- Enabled - Status of the job. A green check means enabled. A red "X" means disabled.
- Job Name - The name of the job.
-
Job Type - The type of the job.
-
Object Type - The type of data the job is run against.
Create Job
To create a new job click on the  button. The Job Details page will be presented.
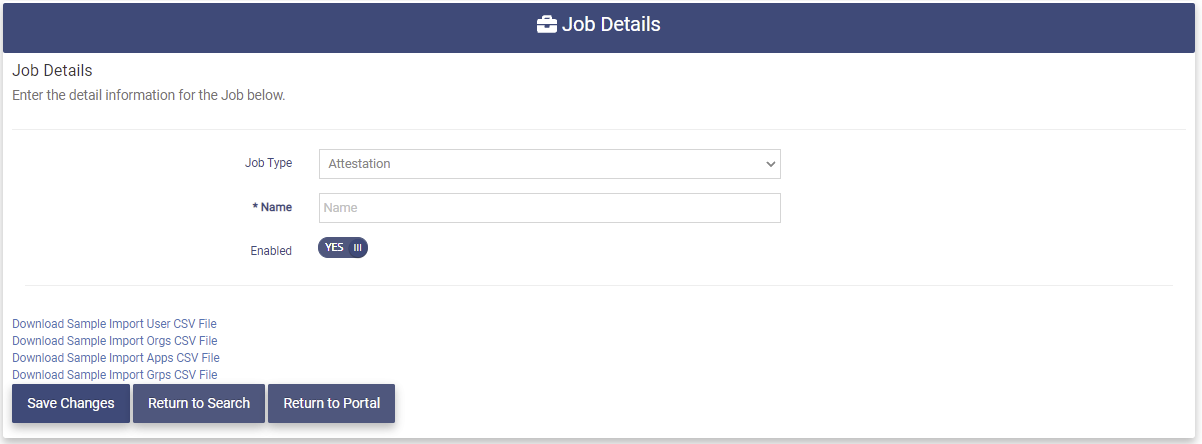
The Job Details page contains the following fields:
-
Job Type - The type of the job. The following Types of jobs are available:
-
Export Data - Export data of the Object Type chosen to a zipped CSV file.
-
Import Data - Import Data of the varying types specified by the header of the CSV file to be imported.
-
-
Name - The name of the job.
- Enabled - Status of the job.
Create an Import Job
To create an Import data job set the Job Type to Import.
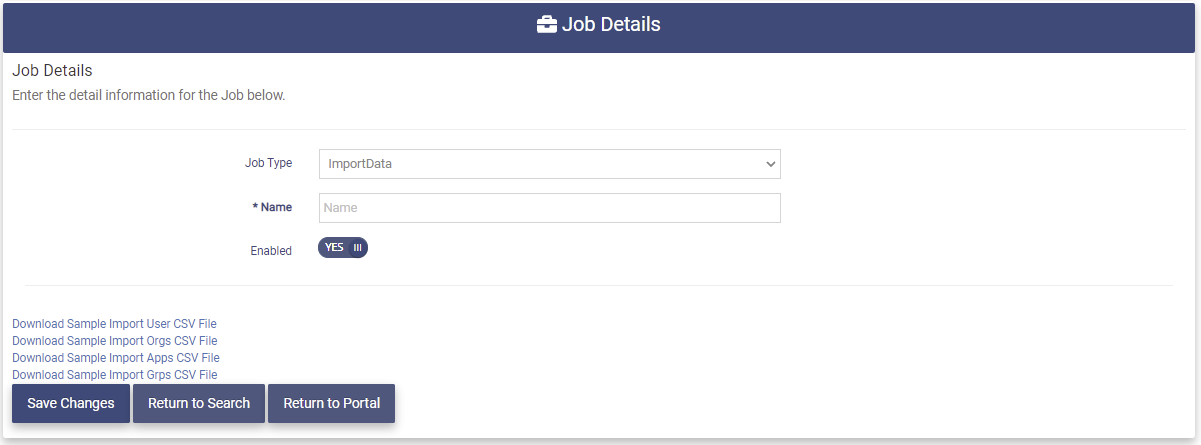
Fill in the Name field and click the button. The Import job will now appear on the Job Manager page.
The data to be imported is specified at run time. Sample CSV files for Users, Organizations, Applications, and Groups are available for download at the bottom left hand side of the page. These files must contain the header that is needed to identify each type of data import. Only one type per file.
Create an Export Job
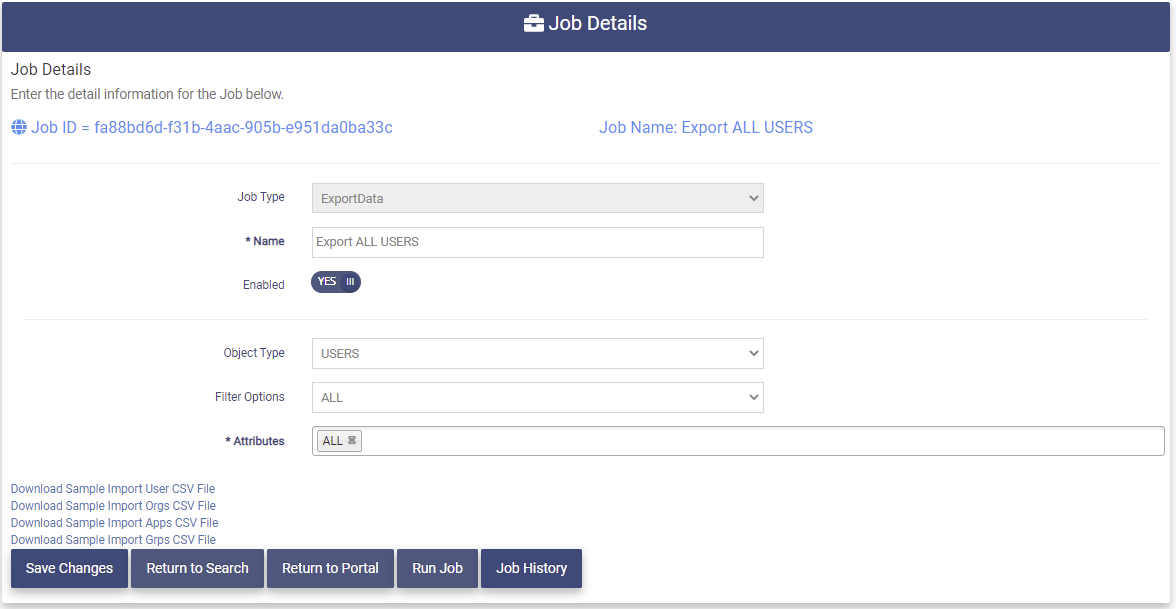
To create an Export data Job set the JobType to ExportData.
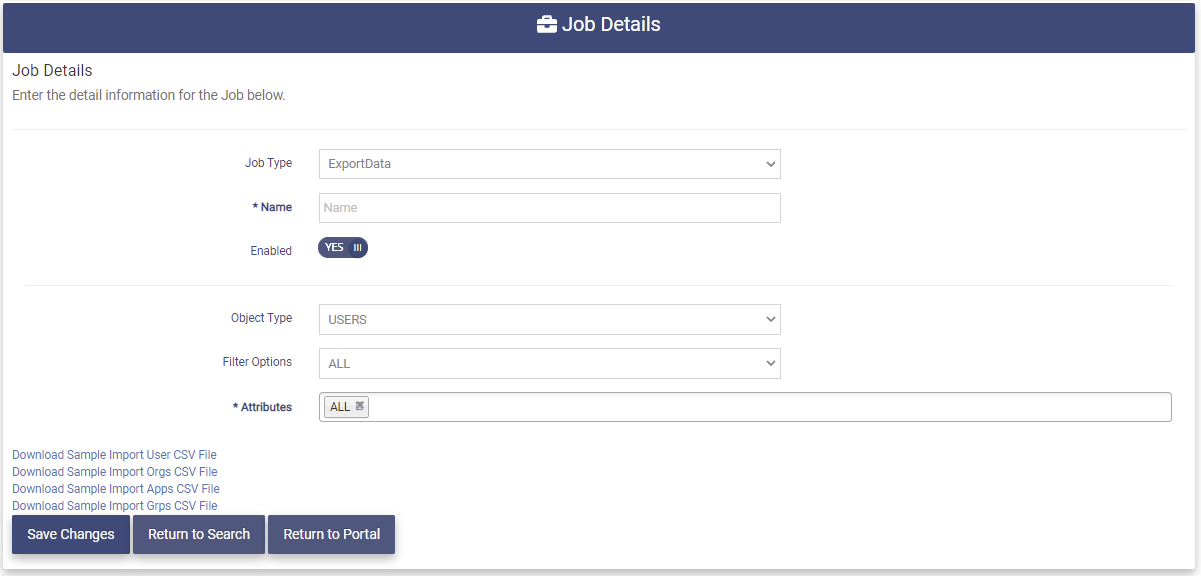
Fill in the following fields:
- Name - The Name of the job.
- Object Type - The type of data to be Exported.
- USERS - Users in the Tenant. The set of users can be filtered by using the Filter Options field.
- USERS WITH ACCESS TO APP - Users with access to a specified application. If this option is chosen, a field to enter the application name will appear.
- GROUPS - All groups in the Tenant.
- ORGS - All organizations in the Tenant.
- APPS - All applications in the Tenant.
- SERVICE PROVIDERS - All Service Providers in the Tenant.
- Filter Options - This field is used to select a specified set of users. The following options are available:
- ALL
- ENABLED
- DISABLED
- LOGGED-IN LAST 24-HRS
- LOGGED-IN LAST 7-DAYS
- NEVER LOGGED IN
- NO LOGIN LAST 7-DAYS
- Attributes - This field may be used to specify a set of user attributes to be exported. The default is ALL attributes. Typing into the field will bring up attributes to select from.
Click the button. The Import job will now appear on the Job Manager page. The header in the export zipped CSV file will identify the fields that are contained in the file.
Run a Job
Run an Import Job
To Import data choose an import job from the Job Manager table and click the associated button.

The Job Details page for that job will be presented.
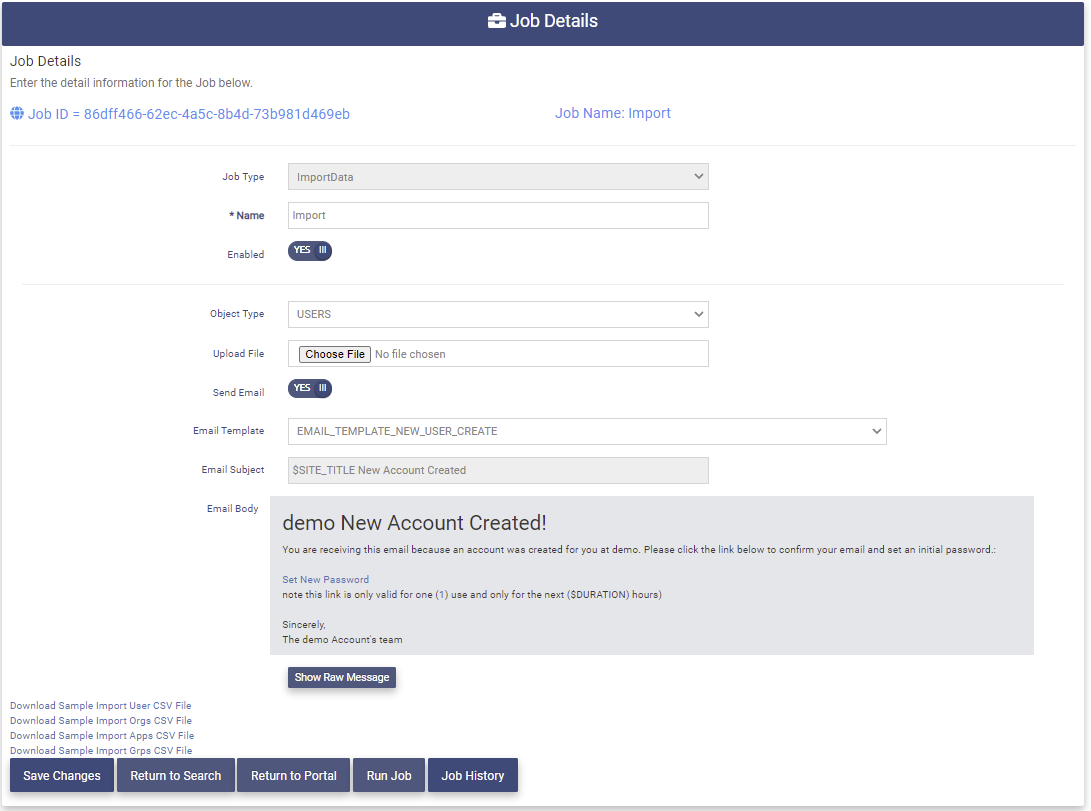
The Job Details page for an import job contains the following fields:
- Job Type - The Type for this job.
- Name - The Name of the job.
- Enabled - The job status.
- Object Type - The Type for this job is USERS. Other types may be selected from the Object Type dropdown.
- Upload File - Choose an upload file for this job. The upload file must be a CSV file and have a header that corresponds to the Object Type chosen. See the Sample Import files in the lower left corner of the page for an example.
- Send Email - This field determines whether a registration email is sent to each imported user. The default is YES. This is optional.
- Email Template - This is the name of the email template for the registration email that is sent to each imported user.
- Email Subject - This field shows the subject line of the the registration email.
- Email Body - This field shows the body of the registration email.
Choose an Upload File, set the Send Email toggle, and click the  button. The following message will be presented.

When the job has completed you will receive an email with a link to download the results. You may also find the results in the Job History.
To get the results of the job, click on the  button and the Job History/Results page will be presented.
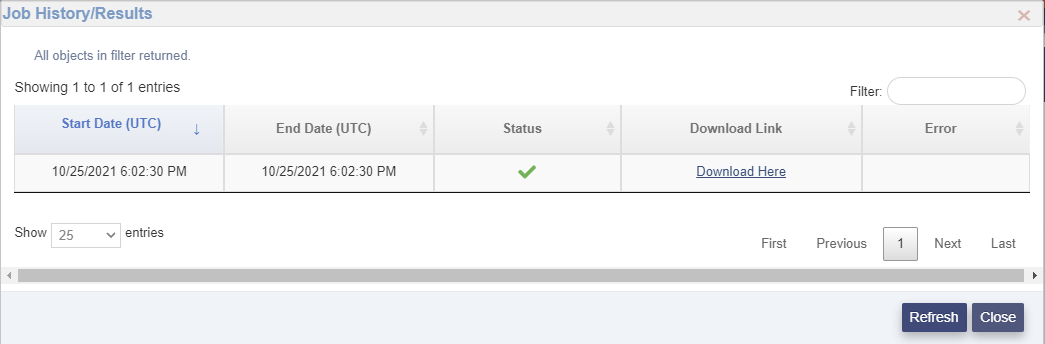
The Job History/Results page contains the following fields
- Start Date (UTC) - The date/time (UTC) that the job started.
- End Date (UTC) - The date/time (UTC) that the job ended. This field is blank if the job has not ended or failed.
- Status - Whether the job was processed successfully or not. Green check success, red X means the file could not be processed.
- Download Link - This link will download a zipped CSV file that contains the results of the Import.
- Error - This field indicates the reason the file could not be processed.
An entry in the Job History where the Job failed would look like this.

If the import job was successful click on the Download Here link and a zipped CSV file will be downloaded with the results of the job.
This file will contain the input data lines with two additional fields added to the end.
- Processed - This field indicates whether that input line has been processed (TRUE/FALSE).
- Error - If the above field is FALSE, this field indicates why that input line was not processed.
Run an Export job
To export data choose an export job from the Job Manager table and click the associated button.

The Job Details page for this job will be presented.
The Job Details page for an export job contains the following fields:
- Job Type - The Type for this job.
- Name - The Name of the job.
- Enabled - The job status.
-
Object Type - The Type for this job is USERS. Other types may be selected from the Object Type dropdown.
-
Filter Options - This field is used to select a specified set of users. This job has been set to ALL users. Other options can be chosen as specified above in the Create an Export Job section.
-
Attributes - This field may be used to specify a set of user attributes to be exported. This job has been set to ALL attributes. Specific attributes can be chosen.
Click on the button to run the job. The following message will be presented.
When the job has completed you will receive an email with a link to download the results. You may also find the results in the Job History.
To get the results of the job, click on the button and the Job History/Results page will be presented.
The Job History/Results page contains the following fields
- Start Date (UTC) - The date/time (UTC) that the job started.
- End Date (UTC) - The date/time (UTC) that the job ended. This field is blank if the job has not ended or failed.
- Status - Whether the job was processed successfully or not. Green check success, red X means the file could not be processed.
- Download Here - This is the link to a zipped CSV file containing the results of the export job. The header in the file will indicate which attributes are included.
- Error - This field indicates the reason the file could not be processed.
An error entry would look like this.
Click on the Download Here link to obtain the results file. The results file will be presented in a popup window.

You may then perform one of the following options:
- Click on the Open file link to open the file.
- Click on the file folder to view access the file in the download folder.
- Click on the trashcan to delete the file.
Modify a Job
To modify a job go to the Job Manager page and click on the button next to the associated job to be modified.c
The Job Details page for that job will be presented. Fields in gray cannot be modified.
Make the modifications needed and click the button. The following message will be presented.

Remove a Job
To remove a job go to the Job Manager page and click on the button next to the associated job to be removed.
The following message will be presented on the Job Details page for that job.

Type "YES" in the box and click the button. The following message will be presented.

API Key Manager
The API Key Manager allows the Tenant Admin to create and Manage API Keys. The API Keys are used by clients that are using a set of the OptimalCloud APIs. The API Keys are passed as authentication in the API calls between the client application and the OptimalCloud. It is recommended that each client application generate and use a separate API Key.
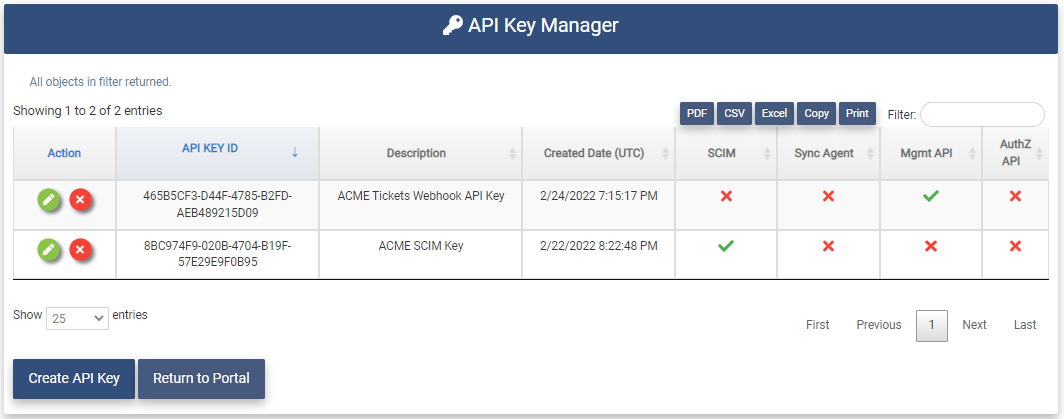
Clicking on the API Key Manager application will present the API Key Manager page.
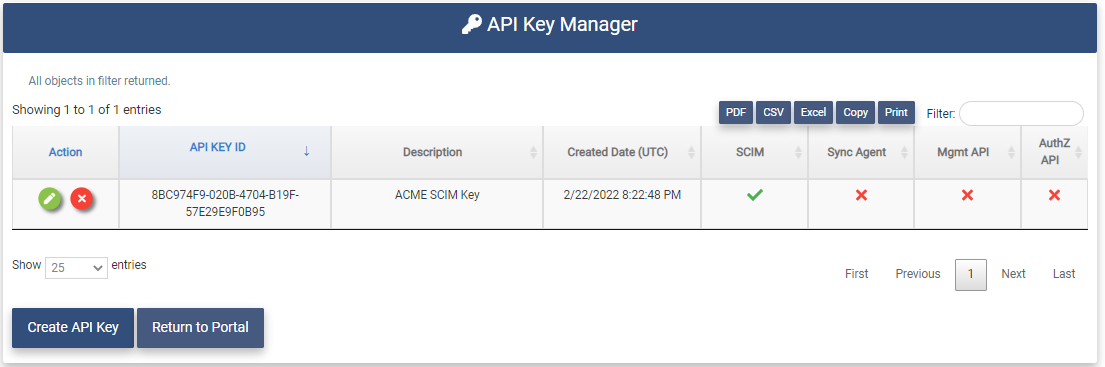
The API Key Manager page shows the API Keys that have been configured for the Tenant and the type of API Key it is.
Create an API Key
To create an API Key, click on the  button. The API Key Details page will be presented.
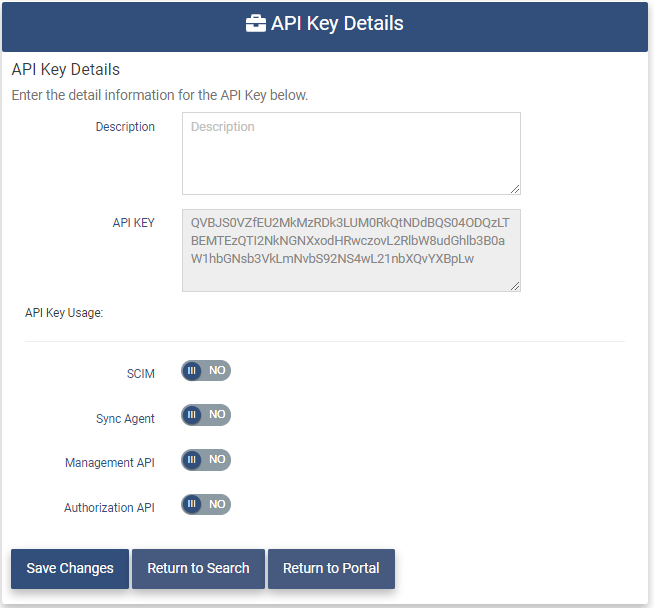
The API Key Details page contains the following fields.
- Description - Enter a description of what this API Key is being used for.
- API Key - The API Key which is generated by the OptimalCloud.
- API Key Usage - Set the type of API Key.
- SCIM - Set this field if the API Key is going to be used by applications using the SCIM protocol.
- Synch Agent - Set this field if the API Key is going to be used by a Synch Agent.
- Management API - Set this field if the API Key is going to be used by a Management API such as Webhooks.
- Authorization API - Set this field if the API Key is going to be used by the Authorization API.
Set the fields as needed and click the button. For this example, a Management API Key will be created. The following message will be displayed.
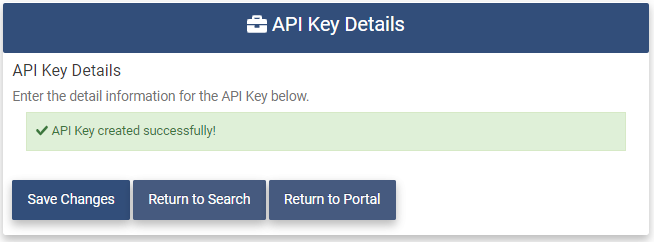
The new API Key will now be displayed on the API Key Manager page.
Remove an API Key
To remove an API Key, click on the button next to the API Key that you want to remove.
The API Key Details page for the associated API Key will be presented with the message below.

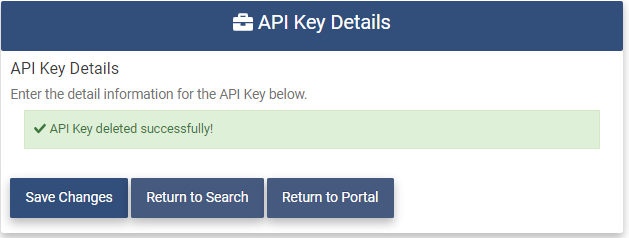
You must type "YES" in the box and click on the button.
The following message will be presented and the API Key will no longer be shown on the API Key Manager page.
Provisioning Manager
The Provisioning Manager application allows the Tenant Admin to create and Manage Provisioning Destinations. Provisioning Destinations are external SAS applications that the OptimalCloud can be configured to synch user data to and/or from.
Clicking on the Provisioning Manager application will present the Provisioning Manager page.
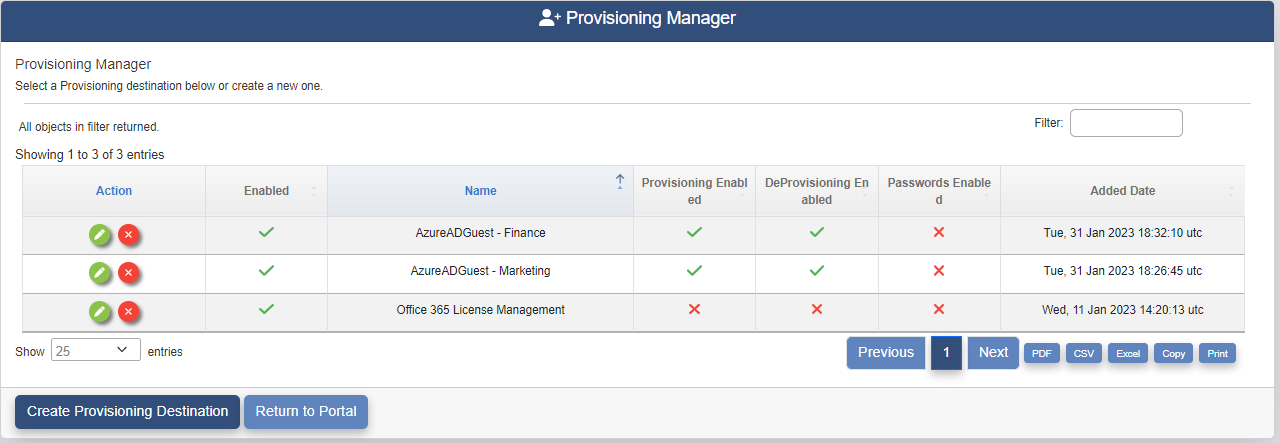
The Provisioning Manager page shows the Provisioning Destinations that have been configured for the Tenant and what features have been configured for each one.
- Provisioning Enabled - Creation and modification of user accounts will be synched between the OptimalCloud and the Provisioning Destination.
- DeProvisioning Enabled - Removal and Disabling of user accounts will be synched between the OptimalCloud and the Provisioning Destination.
- Passwords Enabled - User passwords are synched between the OptimalCloud and the Provisioning Destination.
Create a Provisioning Destination
Creating a Provisioning Destination within The OptimalCloud configures the connectivity to and the data to be provisioned to the provisioning destination.
To create a Provisioning Destination, click on the  button.
The Provisioning Templates page will be presented.
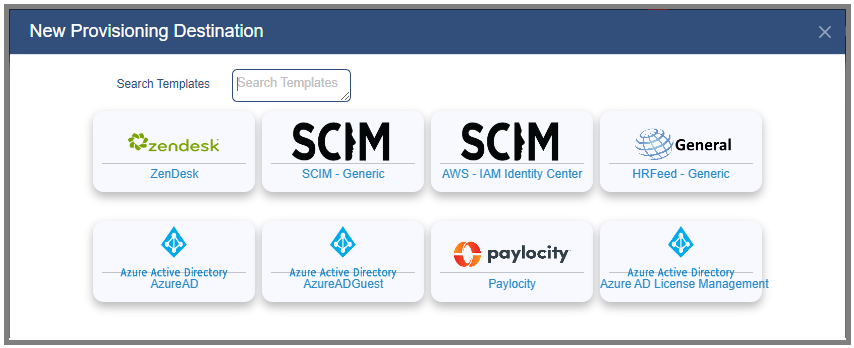
Click on a template and the Provisioning Details page will be presented with information from the template.
Basic Provisioning Information
The Basic Provisioning Information tab contains the basic information about the Provisioning Destination.
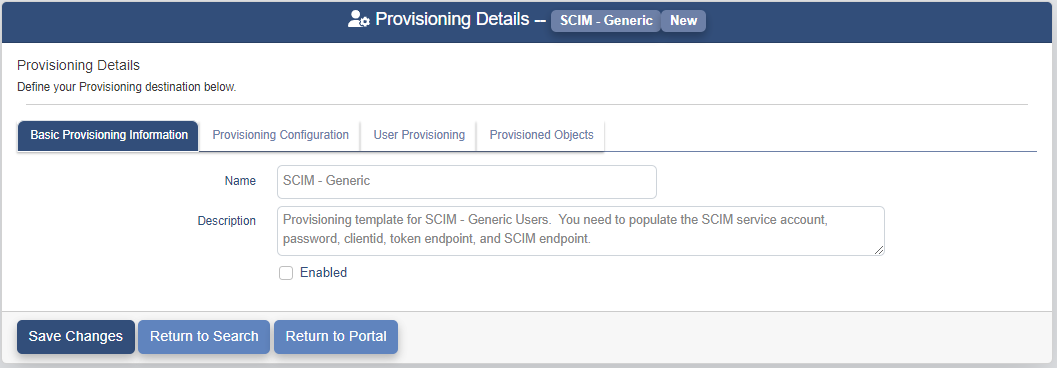
The Name and Description fields may be modified to specify what this Provisioning Destination will be used for. Check the Enabled box to enable this Provisioning Destination.
User Provisioning
The configuration for what user data is synched between the OptimalCloud and the Provisioning Destination is set on the User Provisioning tab.
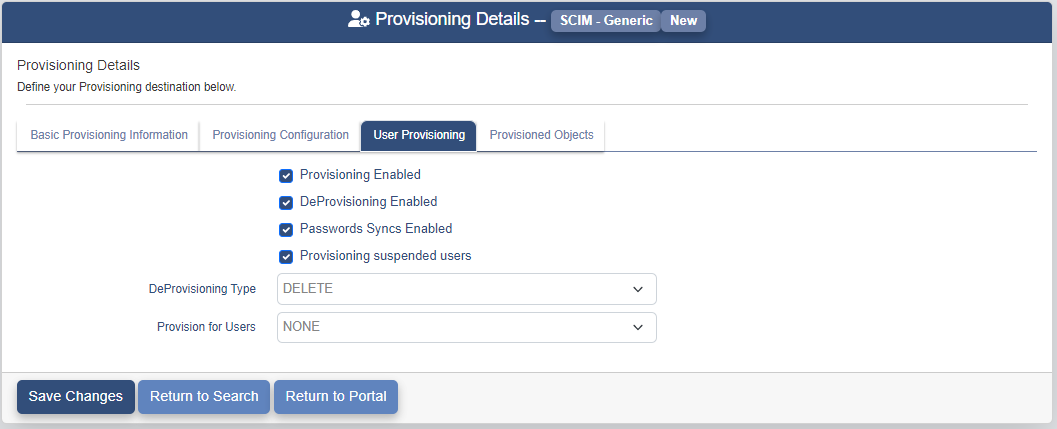
The User Provisioning tab contains the following fields.
-
Provisioning Enabled - Check this box to have the creation and modification of user accounts synched between the OptimalCloud and the Provisioning Destination.
-
DeProvisioning Enabled - Check this box to have the removal and Disabling of user accounts synched between the OptimalCloud and the Provisioning Destination.
-
Passwords Enabled - Check this box to have user passwords synched between the OptimalCloud and the Provisioning Destination.
-
Provisioning Suspended Users - Check this box to have suspended users synched between the OptimalCloud and the Provisioning Destination.
-
DeProvisioning Type - Set this field to determine whether the Provisioning Destination will Delete or Disable the user account.
-
Provision for Users - Set this field to tell the OptimalCloud which users to synch to the Provisioning Destination.
- NONE - No users will be synched.
- ALL USERS - All users will be synched.
- RULE - Authorization Rule to determine which users will be synched.
If the Provision for Users field is set to RULE, an Authorization Rule field will be displayed that allows the entry of the rule to determine which users will be synched.

Provisioning Configuration
The Provisioning Condiguration tab will contain fields specific to the Provisioning Destination template selected. Enter the information required.
When all of the information has been entered, click the button and the following message will be presented.
The new Provisioning Destination will now be displayed on the Provisioning Manager page.
View and Modify a Provisioning Destination
To view and modify a provisioning destination go to the Provisioning Manager page and click on the button associated with the provisioning destination to be viewed or modified. The Provisioning Details page for that provisioning destination will be presented.
Basic Provisioning Information
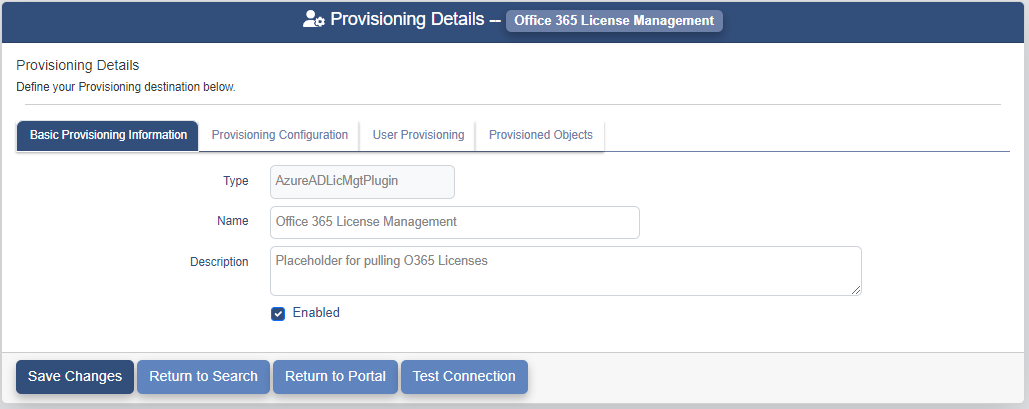
The Basic Provisioning Information tab contains a new field called Type. This is the type of the provisioning destination. This field cannot be modified.
All other fields may be modified. For more details on these fields see the Basic Provisioning Information section under the Create a Provisioning Destination section.
User Provisioning
All of the fields on the User Provisioning tab may be modified. For more details on these fields see the User Provisioning section under the Create a Provisioning Destination section.
Provisioning Configuration
The Provisioning Condiguration tab contains the fields specific to the Provisioning Destination template selected. The fields that are not greyed out may be modified.
Provisioning Objects
The Provisioning Objects tab shows the list of objects that have been provisioned to the provisioning destination.
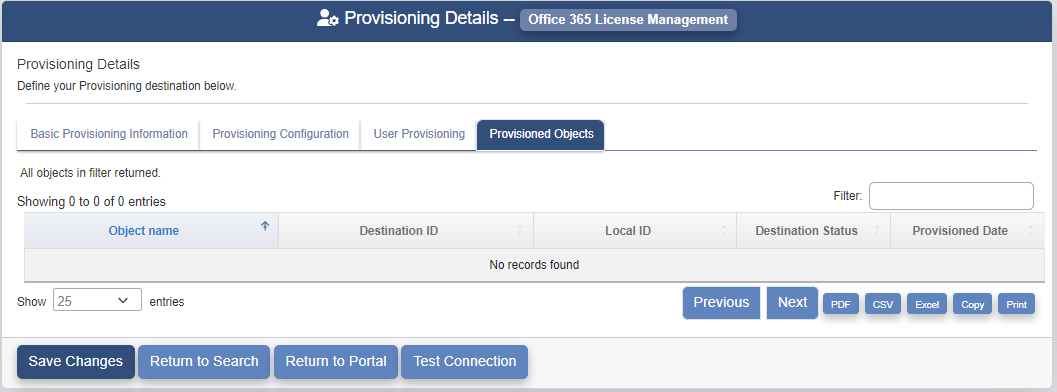
The Provisioning Objects tab contains the following fields. These field cannot be modified.
- Object Name - Name of the object that has been provisioned.
- Destination ID - The ID of the object in the provisioning destination.
- Local ID - The ID of the object in The OptimalCloud.
- Destination Status - Status of the object in the provisioning destination (Enabled or Disabled).
- Provisioned Date - Date that the object was provisioned to the provisioning destination.
When all of the information has been modified, click the button and the following message will be presented.

Remove a Provisioning Destination
To remove a Provisioning Destination, click on the button next to the Provisioning Destination that you want to remove.
The Provisioning Details page for the associated Provisioning Destination will be presented with the message below.

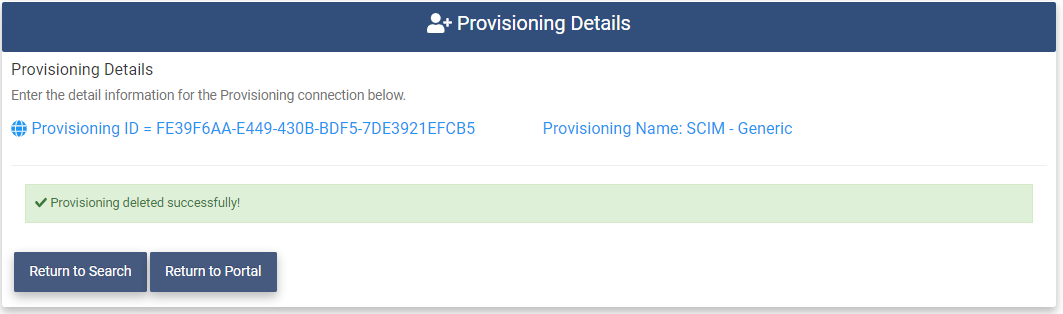
You must type "YES" in the box and click on the button.
A message similar to the following message will be presented and the Provisioning Destination will no longer be shown on the Provisioning Manager page.