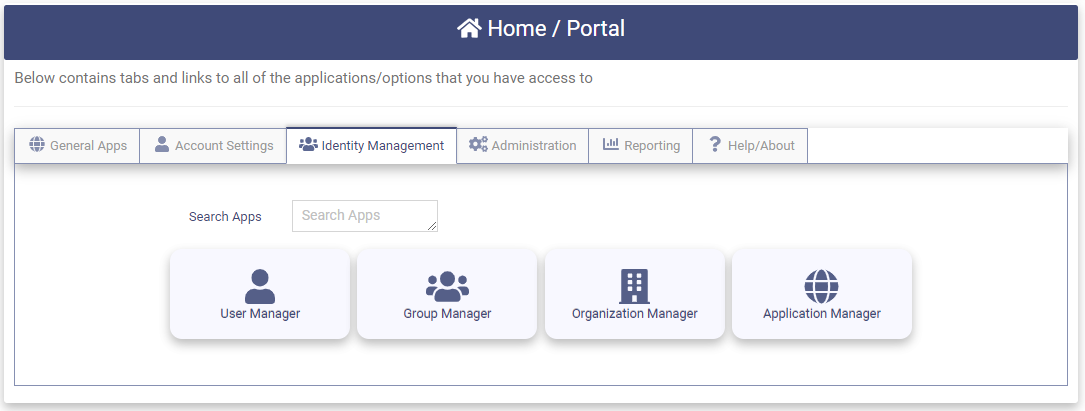
Identity Management
Identity Management is the administration of the users, groups, organizations and applications within your Tenant.
To access the Identity Management functions click on the Identity Management tab on the Home/Portal page.
The OptimalCloud supports the following types of Identity Management Administrators for the Tenant:
-
Tenant Administrator (Tenant Admin) - Performs all Identity Management functions for the Tenant. If the Tenant is in a shared platform the Tenant Admin will see only the data for their own Tenant.
-
Organization Admin (Org Admin) - Performs User and Organization Manager functions for the Organizations that they are the administrator for. The Tenant Admin will assign the first Org Admin for an organization. An Org Admin may be an administrator for multiple organizations.
-
Organization Type Admin (Org Type Admin) - Performs User and Organization Manager functions for the Organizations that are in the Organization Type that they are the administrator for. The Tenant Admin will assign the first Org Type Admin for an Org Type. An Org Type Admin may be an administrator for multiple Org Types.
-
Application Admin (App Admin) - Performs Application Manager functions for the applications that they are the administrator for. The Tenant Admin will assign the first App Admin for an application. An App Admin may be an administrator for multiple applications.
The following sections of documentation correspond to the applications on the Identity Management tab that are available to Administrators.
- User Manager - This section provides the instructions to manage the users of the Tenant.
- Group Manager - This section provides the instructions for managing the groups in the Tenant.
- Organization Manager - This section provides the instructions to manage the organizations in the Tenant.
- Application Manager - This section provides instructions to manage the applications in the Tenant.
Identity Manager Page Functions
The Identity Manager (User, Group, Organization, Application) pages have common functionality that will be described here.
Top of Page Fields and Buttons
The following fields and buttons are found at the top of the Identity Manager pages.

- Search Criteria - This field allows the data on the Identity Manger pages to be limited to those entries that contain the pattern entered. The default when accessing the Identity Manager pages is "*" which will return all of the entries that the administrator is allowed to view. The "***" can be used along with string patterns in a search.
The search on the Identity Manager pages uses the following fields:
- User Manager - Username, First Name, Last Name, Email
- Group Manager - Name of the group
- Organization Manager - Name of the organization
- Application Manager - Name of the application
-
 - Clicking on this button will process the search.
 -
Showing entries - This message informs the administrator how many entries of the total number of search results entries are being displayed on the current page. The initial search returns 250 entries or less that match the search criteria.
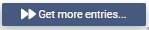 - If the data that matches the search criteria is greater than 250 entries this button will appear next to the Search button. Clicking on this button will retrieve 250 or fewer more entries that match the search criteria. When all entries have been returned the "All objects in filter returned" message will appear.
- Filter - This field allows the results of the search to be further limited by the pattern entered.
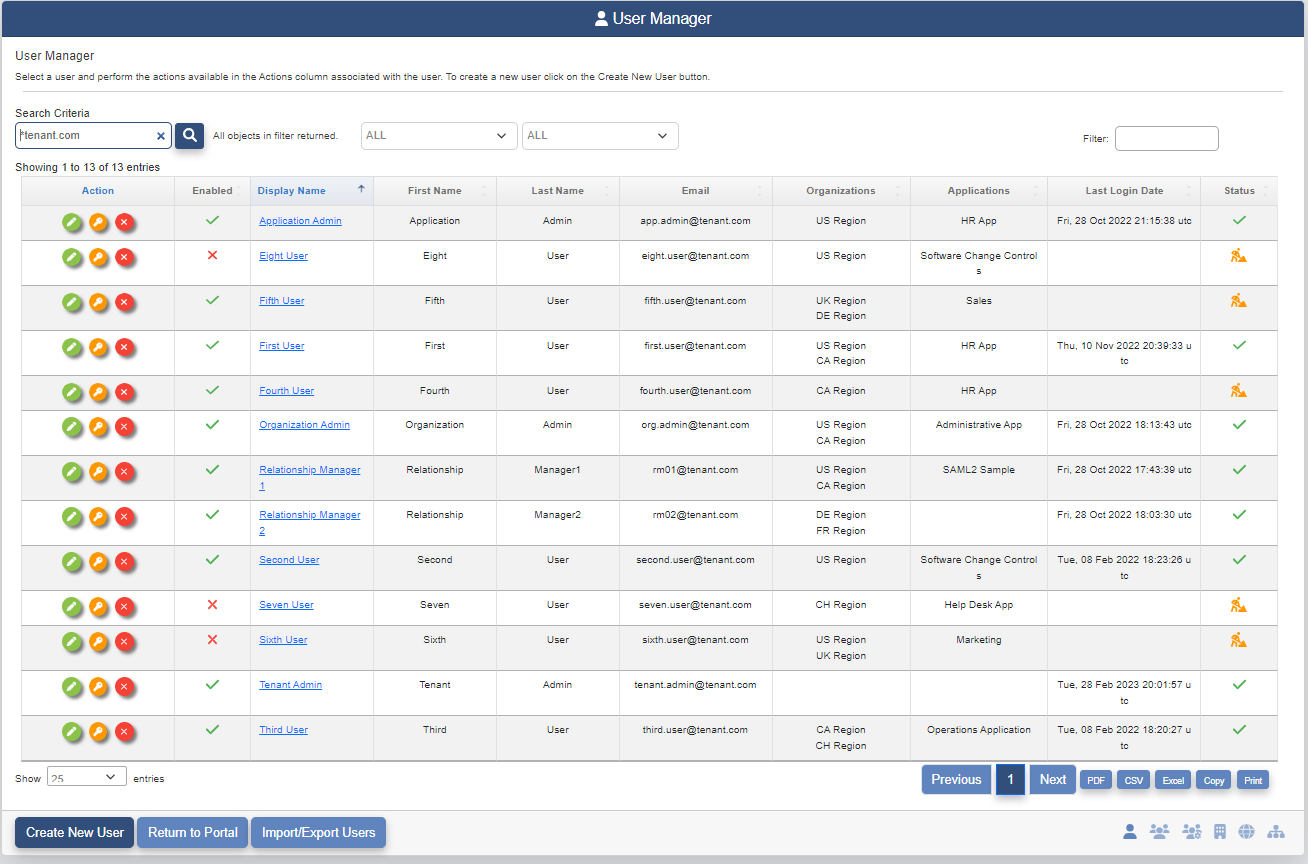
Below is the results of a search using the Search Criteria "tenant".
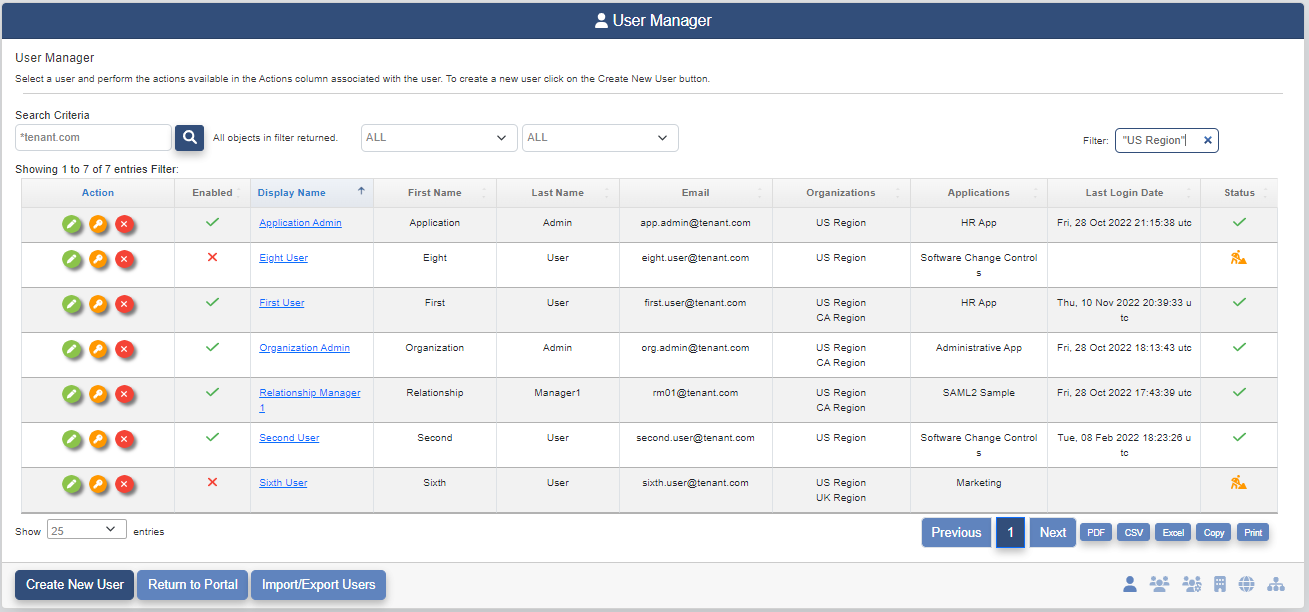
Below shows the above search further limited by the Filter "US Region".
Bottom of Page Fields, Controls and buttons
The following fields and buttons are found at the bottom of the Identity Manager pages.

-
Show entries - This drop down allows the administrator to choose the number of entries from the search results that are displayed on the page at a time.
-
 - Clicking on this control will direct the administrator to the previous page of the search results.
 -
 - The number is this box indicates the page number of the search results currently being displayed.
 -
 - Clicking on this control will direct the administrator to the next page of the search results.
 -
 - Clicking on this button will export the search results to a local PDF file with the naming convention "Page Name - Date.pdf".
 -
 - Clicking on this button will export the search results to a local CSV file with the naming convention "Page Name - Date.csv".
 -
 - Clicking on this button will export the search results to a local Excel file with the naming convention "Page Name - Date.xlsx".
 -
 - Clicking on this button will copy the search results to the Clipboard where it may be copied to another document.
 -
 - Clicking on this button will print the search results.
Navigation Controls:

-
 - Clicking on this control will direct the administrator to the User Manager page.
 -
 - Clicking on this control will direct the administrator to the Group Manager page.
 -
 - Clicking on this control will direct the administrator to the Dynamic Groups Manager page.
 -
 - Clicking on this control will direct the administrator to the Organization Manager page.
 -
 - Clicking on this control will direct the administrator to the Application Manager page.
User Manager
This section provides the instructions to manage the users in the Tenant. The following functionality is supported for each administrative type.
- Tenant Admin - create, remove, and modify all users in the Tenant including adding users to and removing users from applications, groups, and organizations.
- Org Type Admin - create, modify and remove users that are in the organizations that are in the Org Type they are an administrator for. Add users to applications and groups that they are a member of.
- Org Admin - create, modify and remove users that are in the organizations that they are an administrator for. Add users to applications and groups that they are a member of.
Clicking on the User Manager application  will present the User Manager page.
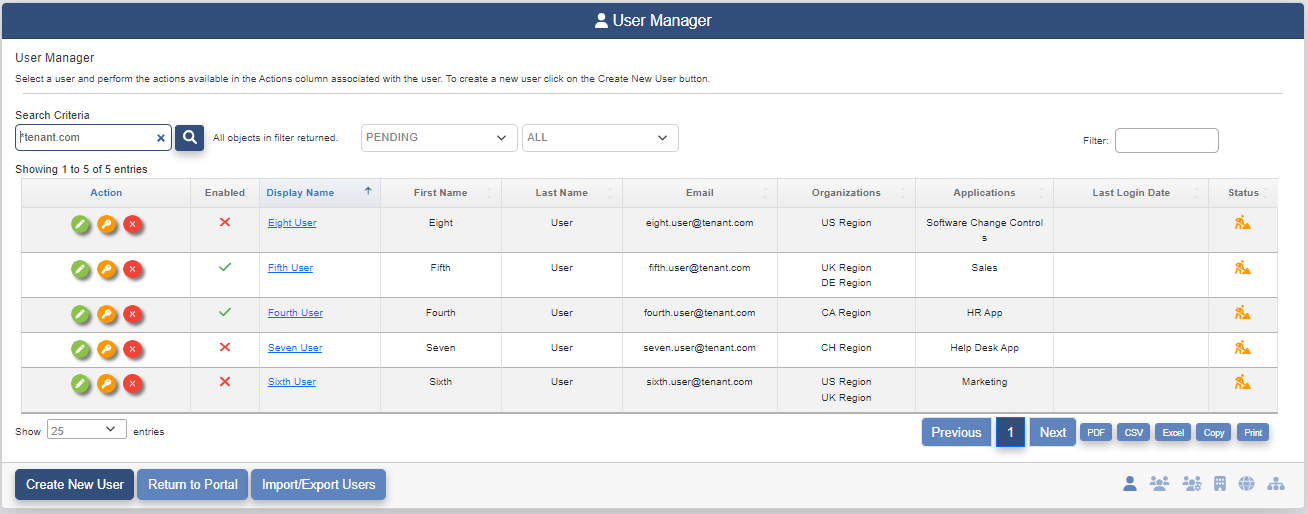
The default view when accessing the User Manager page is to see all users in the Tenant. The view has been limited to allow it to be represented here.
The User Manager page contains the following fields for each user in the Tenant:
- Action - Clicking on these buttons perform actions on the associated user account
 - Modify or View the user account
 - Remove the user account
 - Send the user a Reset Password email to the email address on the account.
- Enabled Flag -
 : enabled,
  : disabled. If the users account is disabled they cannot login.
 - Display Name - The user's full name. If this is a Shared Account the Display Name will have a
 sign following the name. If this is a Guest Account the Display Name will be followed by a
  sign.
sign. - First Name - The user's first name.
- Last Name - The user's last name.
- Email - The user's email address (also used as the username for the account)
- Organizations - Any organizations that the user is a member of.
- Applications - Any applications that the user is a member of.
- Last Login Date - The date the user last logged in to the OptimalCloud account. This field will be blank if the user has never logged in.
- Status - This field indicates the user's registration status.
- - The user has completed account registration.
 - The user that has not completed the registration process.
 - The user's account is locked after a number of failed login attempts. The number of failed login attempts is configured for all the users in the Tenant. The user must wait 15 minutes before trying again.
The results from a Search using a Search Criteria of "*tenant.com" and a Filter of "US Region" are shown below.
Search Users
The data displayed on the User Manager page can be limited to a specified set of users by using the Search Criteria and Filter fields. For a description of how these fields function please see the Top of the Page Fields and Buttons section above.
The User Manager Page has an two additional search dropdowns based on special types of users in the table.
The first drop down allows the administrator to choose from the Status options to limit the entries in the search results. This field is used in combination with the Search Criteria field.
The choices for this dropdown are:
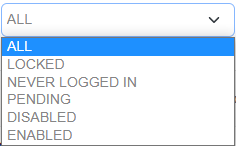
- ALL - All users.
- ENABLED - Users that have enabled accounts.
- PENDING - Users that have not completed the self-registration process.
- LOCKED - Users with accounts that are locked after failed login attempts.
- NEVER LOGGED IN - Users that have never logged in to their OptimalCloud account.
- DISABLED - Users that have disabled accounts.
The results from a search using the Search Criteria "user" and the dropdown status of "PENDING" are shown below.
The second dropdown allows the administrator to choose the type of user accounts they would like returned. This field is used in combination with the Search Criteria field. The choices are:
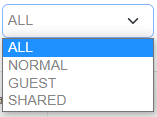
- ALL - This choice will return all user account types.
- NORMAL - This choice will return the accounts of individual users that have normal logins in The OptimalCloud.
- GUEST - This choice will return the accounts of users that are "guests" and cannot login to The OptimalCloud.
- SHARED - This choice will return accounts that are shared by multiple users. These accounts cannot login directly but are used for Federation.
Create New User
The following functionality is supported for each administrator.
- The Tenant Admin may create new users in their Tenant.
- The Org Admin may create a new user in the organizations that they are the administrator of.
- The Org Type Admin may create a new user in the organizations that are in the Org Type that they are the administrator of.
To create a new user view the video or follow the instructions below.
Click on the 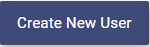 button and the User Details page will be presented.
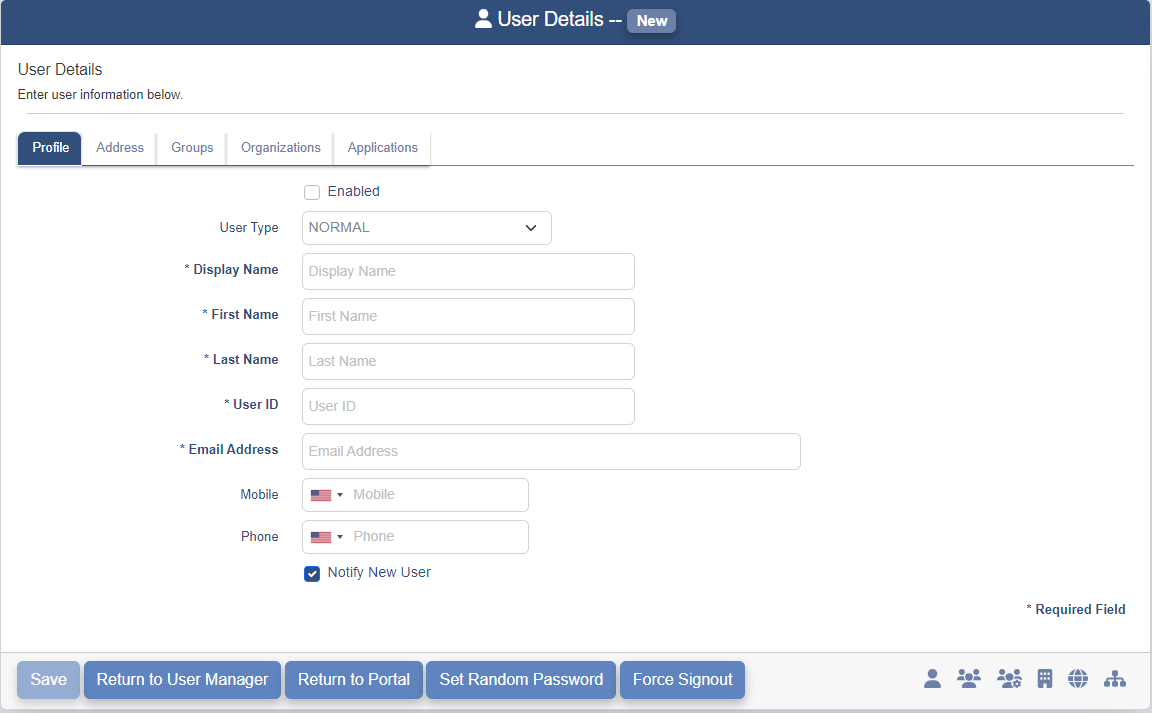
The following information may be entered for the new user.
User Profile
The Profile Page contains the following fields. The fields that are preceded by an "*" are required.
-
Enabled - Check this box to allow the user to login. If the box is not checked, the user is disabled and they cannot login.
-
UserType - Type of user to be created
-
NORMAL - An individual user with their own credentials.
-
SHARED - A user account shared by multiple users with shared credentials
-
GUEST - An individual user that cannot login to The OptimalCloud.
-
-
Display Name - User's complete name used for Display.
-
First Name - User's first name.
-
Last Name - User's last name.
-
User ID - Unique identifier assigned to the user by the OptimalCloud (Usually the email address).
-
Email Address - User's email address. This will become the username for login. The email address will be checked for uniqueness. If the email address is not unique the following message will be displayed:

-
Mobile - User's mobile phone number in (XXX) XXX - XXXX format. Use the Flag dropdown to indicate country code.
-
Phone - User's alternate phone number in (XXX) XXX - XXXX format. Use the Flag dropdown to indicate country code.
-
Notify New User - This toggle determines whether a Registration Email is sent to the new user. If the Registration Email is not sent, the Reset Password Action button on the User Manager page may be used to send an email to allow the user to set their password.
Fill in the fields on the Profile tab.
Set Random Password
The Set Random Password button at the bottom of the page will cause a Random Password to be generated and set for this user.
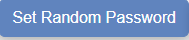
Clicking on this button will display the following message with the password. The user may use the Change Password functionality to change it later. Click the "Yes" button to set the password.
This is the only time the random password will be displayed. Make sure to copy it to provide it to the user.
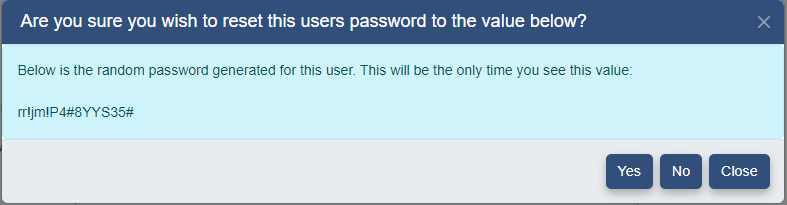
Address
The user's address information may be entered on the Address tab. These fields are optional.
The user may be added to groups, organizations, and applications during the creation process. The sections below have instructions on that functionality.
Once all fields are filled in and the user has been added to any group, organization or application, click the  button to save the user. The following successful creation message will appear.

The user will be created with their Enabled Flag set to disabled as shown by Eight User below because they have not completed the registration of their account.

The user will be sent an email at the time of account creation or via the Reset Password Action button on the User Manager Page with a link to verify their email address and set their password. Once the password has been entered, the user's Enabled Flag will be set to enabled and they will be able to login to the OptimalCloud.
Add User to Groups
The user may be added to groups during the creation process. The following functionality is supported for each administrator.
- The Tenant Admin may add the user to any groups in the Tenant.
- The Org Admin and Org Type Admin may add the user to any groups that they are a member of.
Click on the Groups Tab to present the page shown below.
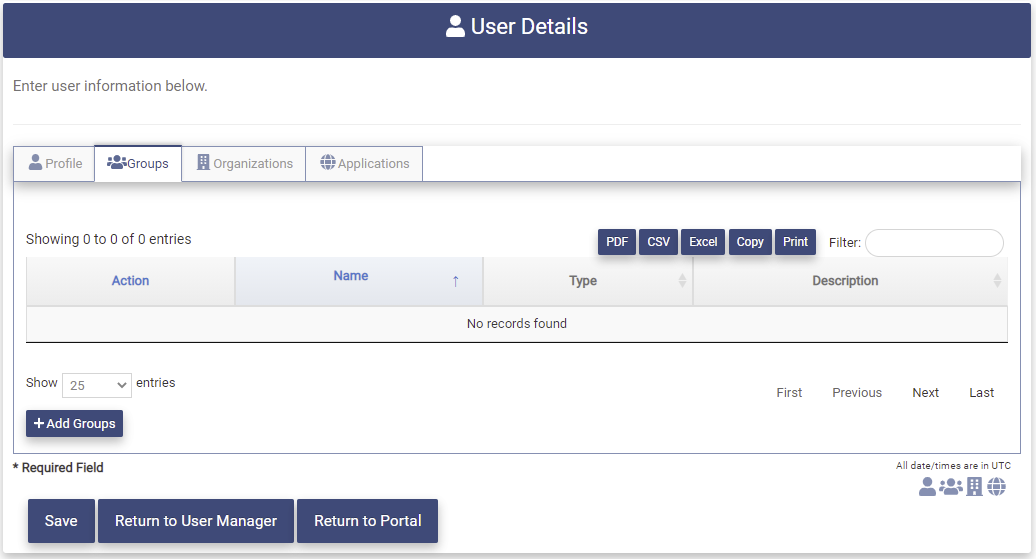
Click on the  button to bring up the Group Search page. The list of available groups will be presented.
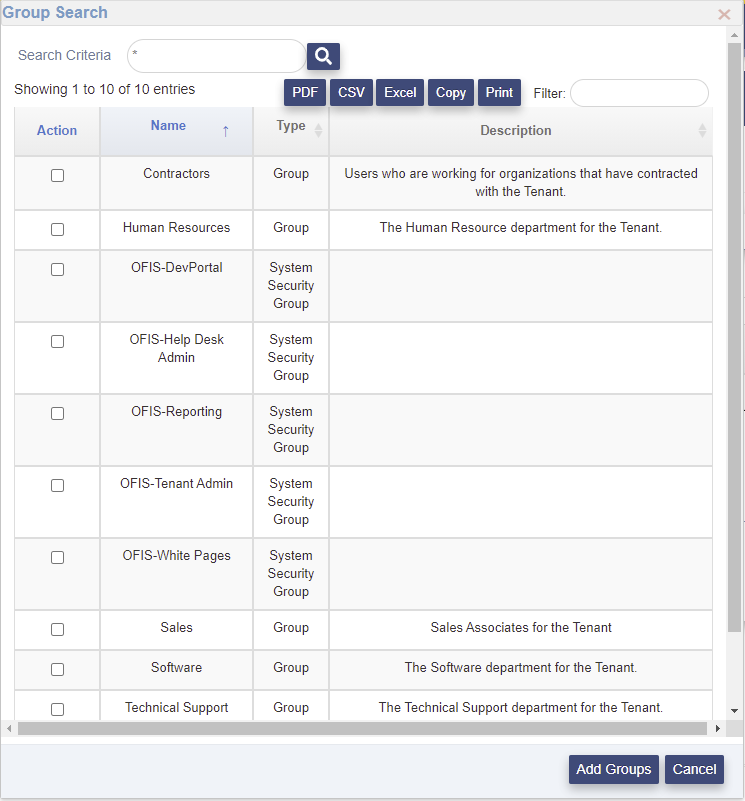
If the list of groups is large, the Search Criteria and Filter fields may be used to find the desired group. For more information on how the Search Criteria and Filter fields function please see the Top of the Page Fields and Buttons section.
Click on the Action box for one or more groups to select that group.

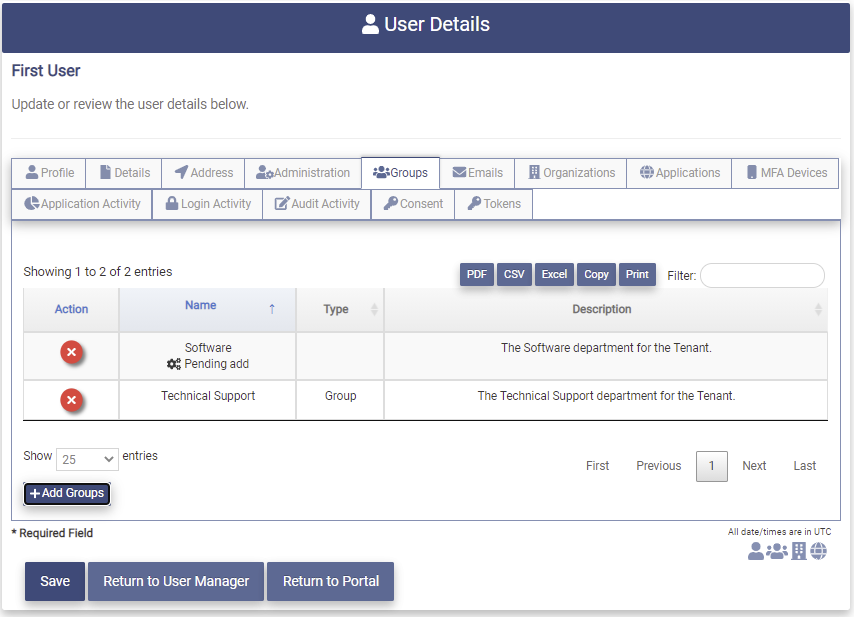
Click on the  button to add the user as a member of the selected group(s). Upon successful completion you will be returned to the Groups Tab. The selected group(s) will be displayed on the Groups Tab as shown below. The Group is shown as "Pending add" until the new user has been saved.
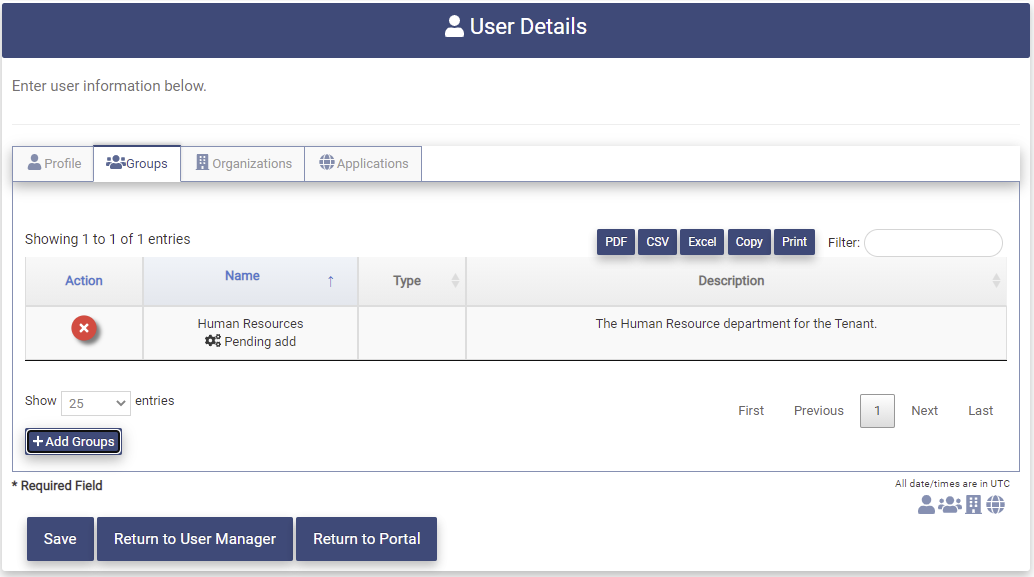
If the group displayed is not the intended group, it may be removed by clicking on the Action button next to the name of the group on the page.
Add User to Organizations
The user may be added to groups during the creation process. The following functionality is supported for each administrator.
- The Tenant Admin may add the user to any organization in the Tenant.
- The Org Admin may add the user to an organization that they are the administrator of.
- The Org Type Admin may add the user to any organization in the Org Type they are the administrator of.
Click on the Organizations Tab to present the page shown below.
Click on the  button to bring up the Organization Search page. The list of available organizations will be presented.
If the list of organizations is large, the Search Criteria and Filter fields may be used to find the desired organization. For more information on how the Search Criteria and Filter fields function please see the Top of the Page Fields and Buttons section.
Click on the Action box for the organization to be selected.

Click the  button to add the user as a member of the selected organization. Upon successful completion you will be returned to the Organizations Tab. The selected organization will be displayed on the Organizations Tab as shown below. The organization is shown as "Pending add" until the new user is saved.
If the organization displayed is not the intended organization, it may be removed by clicking on the Action button next to the name of the organization on the page.
Add User to Applications
The user may be added to applications during the creation process. This gives the user the ability to access the selected applications. The following functionality is supported for each administrator.
-
The Tenant Admin may add the user to any application.
-
The Org Admin may add the user to any application that they are a member of.
- The Org Type Admin may add the user to any application that they are a member of.
If Org Types are being used in the Tenant, only applications without Org Types may be added during the creation of a user.
Click on the Applications Tab to present the page shown below.
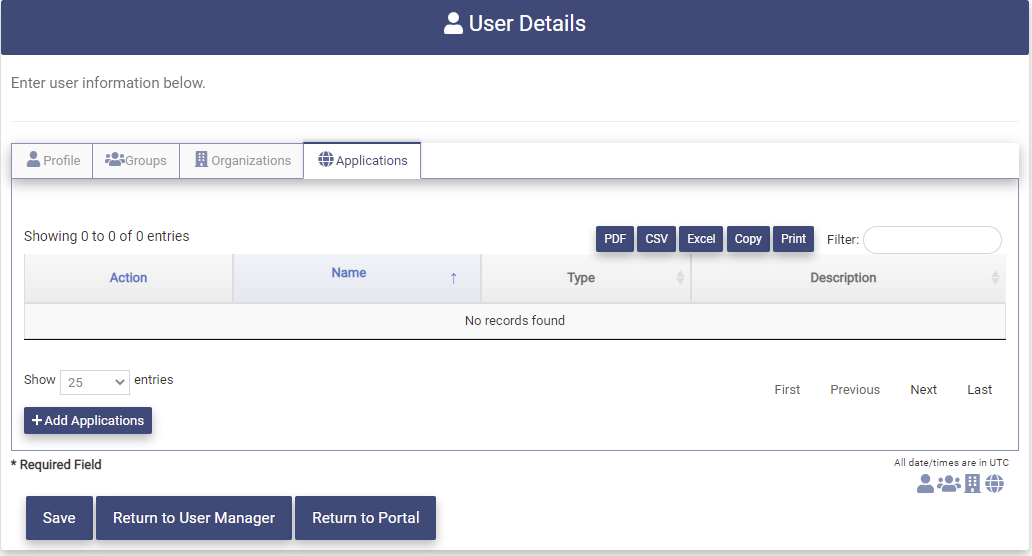
Click on the  button to bring up the Application Search page. The list of available applications will be presented.
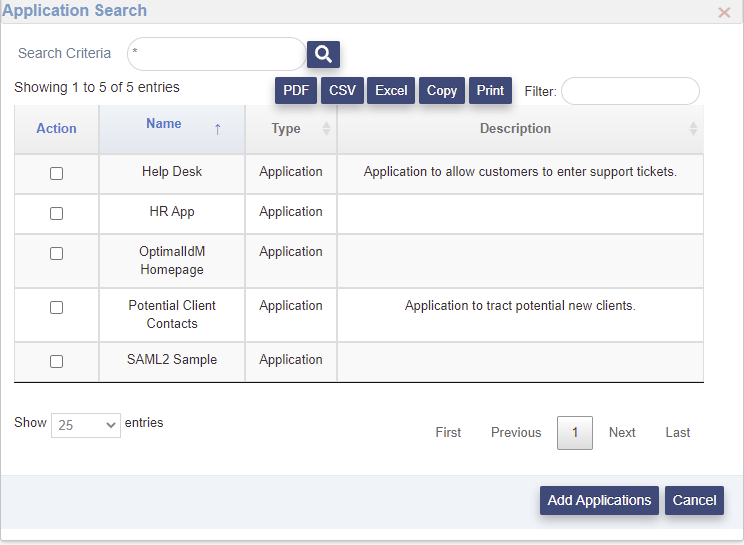
If the list of applications is large, the Search Criteria and Filter fields may be used to find the desired application. For more information on how the Search Criteria and Filter fields function please see the Top of the Page Fields and Buttons section.
Click on the Action box for the application to be selected.

Click the  button to add the user as a member of the selected application(s). Upon successful completion you will be returned to the Applications Tab. The selected application will be displayed on the Applications Tab as shown below. The application is shown as "Pending add" until the new user is saved.
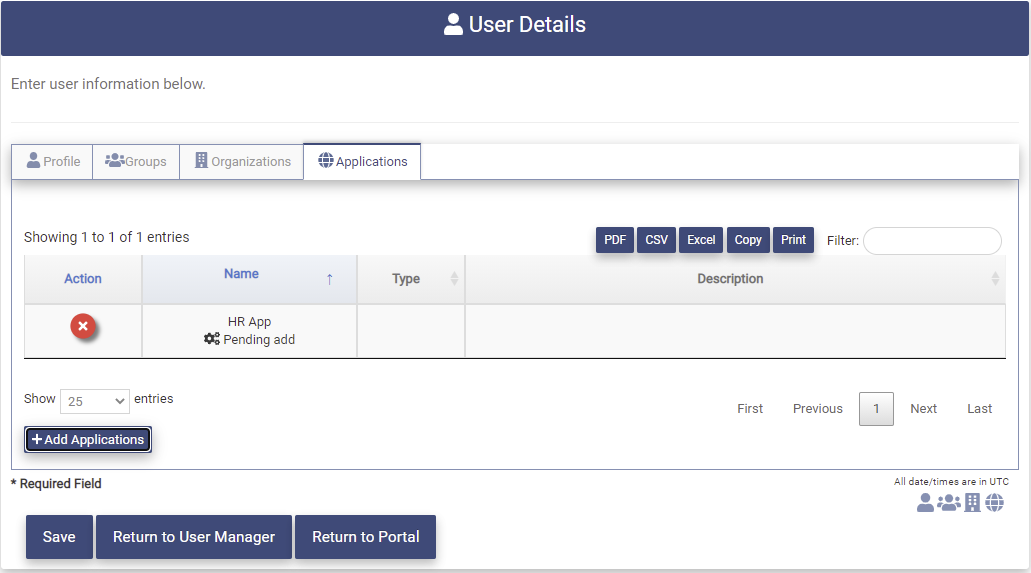
If If the application displayed is not the intended application, it may be removed by clicking on the Action button next to the name of the application on the page.
View and Modify User
The following functionality is supported for each administrator.
- The Tenant Admin may view or modify all users in the Tenant.
- The Org Admin may view or modify users in the organization that they are the administrator for.
- The Org Type Admin may view or modify user in the organizations in the Org Type that they are the administrator for.
Clicking on the User Manager application will present the page below.

The default view when accessing the User Manager page is to see all users in the Tenant. The view has been limited to allow it to be represented here.
Click on the Action button associated with the user to be viewed or modified

The User Details page for that user will be presented.
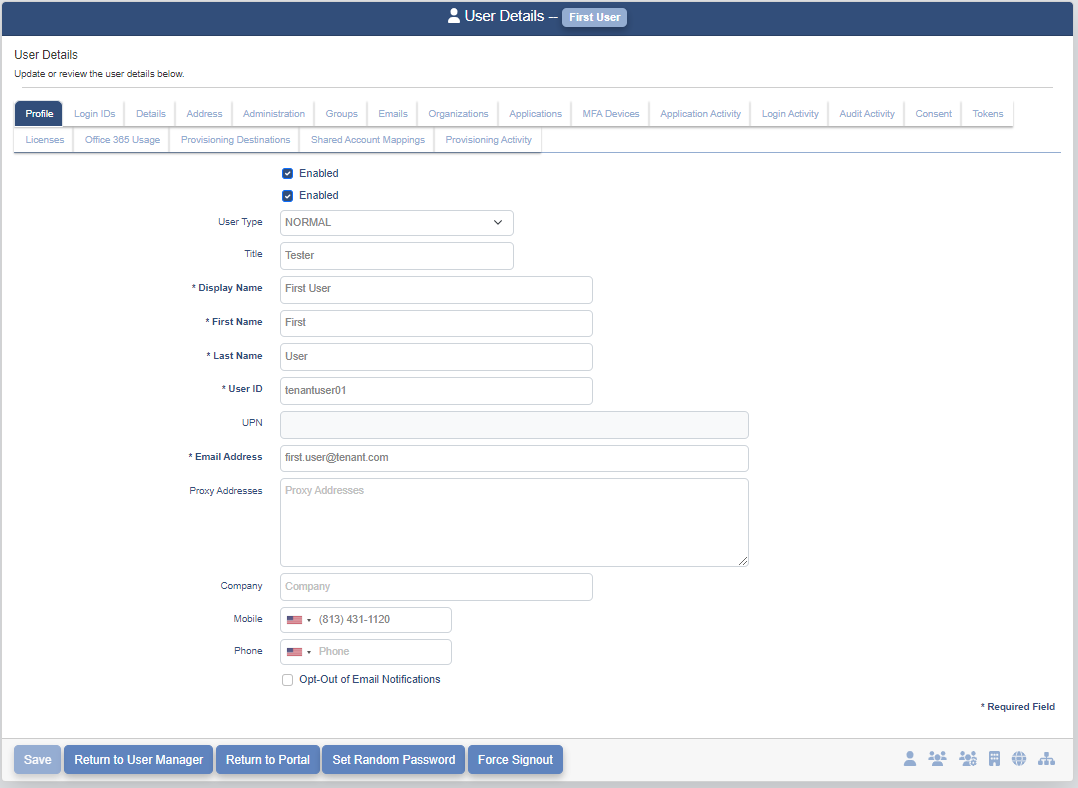
Profile
The Profile Page contains the following fields. The fields that are grayed out cannot be modified.
-
Enabled - If the box is checked the user is Enabled and may login. If the box is not check the user is Disabled and cannot login.
-
UserType - Type of user to be created
-
NORMAL - An individual user with their own credentials.
-
SHARED - A user account shared by multiple users with shared credentials
-
GUEST - An individual user that cannot login to The OptimalCloud.
-
-
Title - The user's title.
-
Display Name - User's readable name used for Display. If this is a Shared Account the Display Name will have a
sign following the name. If this is a Guest Account the Display Name will be followed by a sign. - First Name - User's first name.
- Last Name - User's last name.
- User ID - Unique identifier assigned to the user by the OptimalCloud (Usually the email address).
- UPN - User Principal Name for this user. Unique Identifier that is assigned by the Tenant.
- Email Address - Users email address. The username for login. The email address will be checked for uniqueness. If the email address is not unique the following message will be displayed:
- Proxy Addresses - Possible alternate email addresses used for this user. Not used for as username for login.
- Company - The company where the user is employed.
- Mobile - User's mobile phone number in (XXX) XXX - XXXX format. Use the Flag dropdown to indicate country code.
- Phone - User's alternate phone number in (XXX) XXX - XXXX format. Use the Flag dropdown to indicate country code.
- Opt-Out of Email Notifications - This toggle shows whether the user is set to receive email notifications.
- Notify New User - This toggle shows whether the user was sent a Registration Email when the account was created. If the toggle is set to NO and Registration Email has not been sent, the Reset Password Action button on the User Manager page may be used to send an email to allow the user to set their password.
Set Random Password
The Set Random Password button at the bottom of the page will cause a Random Password to be generated and set for this user.
Clicking on this button will display the following message with the password. The user may use the Change Password functionality to change it later. Click the "Yes" button to make this change.
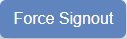
Force Signout
The Force Signout button at the bottom of the page allows the administrator to force this user to signout from the OptimalCloud and all applications they are accessing that support Single Logout. The user must have an active session with the OptimalCloud in order for this to take effect.
Once all the updates are made, click on the button to save the user. Upon successful modification of the user the following message will be presented.

Login IDs
The Login IDs tab shows the Login Credentials that have been configured for this User. There may be more than one set of Login Credentials configured.
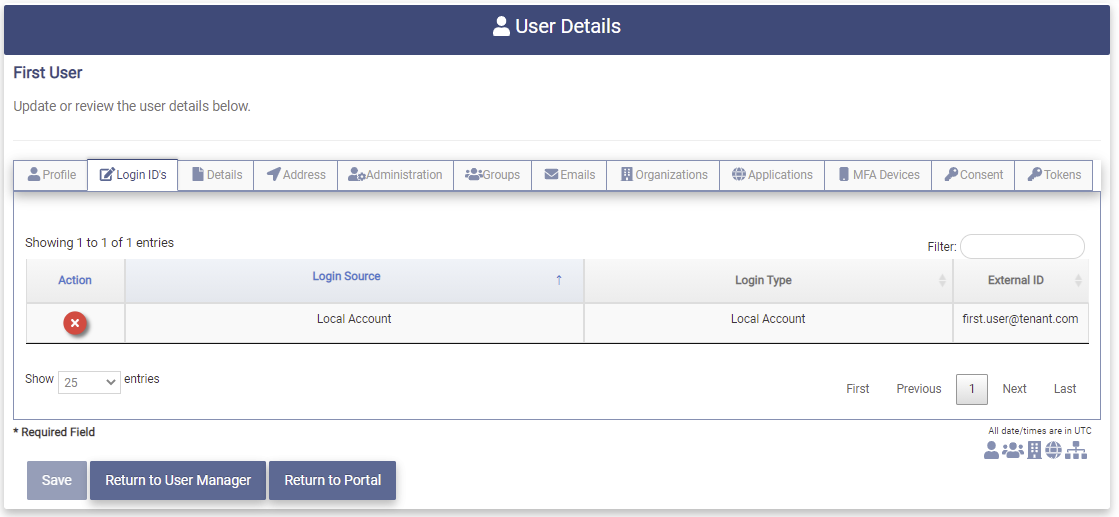
The Login IDs tab contains the following fields.
- Login Source - The source of the Login Credentials.
- Local Account - The Login ID uses Local Credentials.
- Social Media Account - Social Media Account name (Facebook, Google, etc.)
- Login Type - The Type of the Login Credentials.
- Local Account - The Login ID was configured in the OptimalCloud.
- Social Media - The Login ID was configured using a Social Media Account.
- External ID - The identification used for this configuration.
- For a Local Account the email address.
- For a Social Media Login ID an identification number.
The Tenant Admin may delete a user's Login ID by clicking on the button. The Login ID will be shown as "Pending Removal" until the user account is saved.
Details
The Details tab gives further connection and login information about the user.
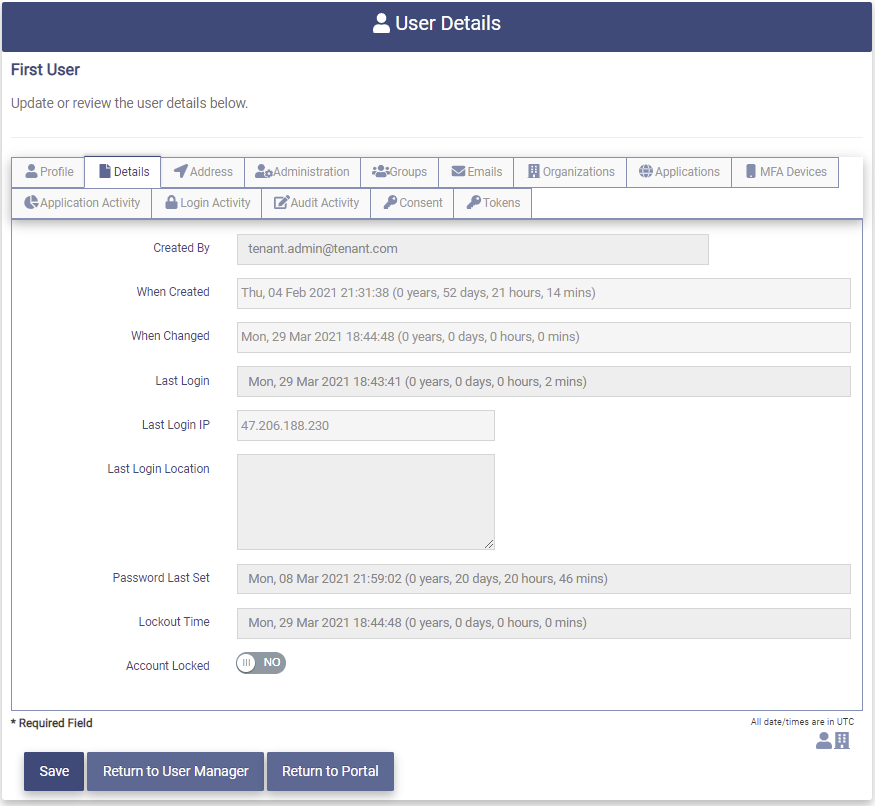
The Details tab contains the following fields. The fields on this tab a display only.
- Created By - The display name of the user or method that created the user's account.
- When Created - The date and time that the user's account was created.
- When Changed - The date and time that the user's account was last modified.
- Last Login - The date and time that the user last logged in to the OptimalCloud.
- Last Login IP - The IP Address that the user last logged in from.
- Last Login Location - The location that the user last logged in from.
- Password Last Set - The date and time that user last set their password.
- Lockout Time - The date and time that the user's account has been set to locked. The account will be set to locked if the user enters an incorrect password a configurable number of times. If the user's account is not locked it will be set to "account not locked".
- Account Locked - This toggle shows the status of the account and allows the Admin to unlock the account. If the account is locked the toggle will show YES. The account may be unlocked by clicking the toggle to show NO.
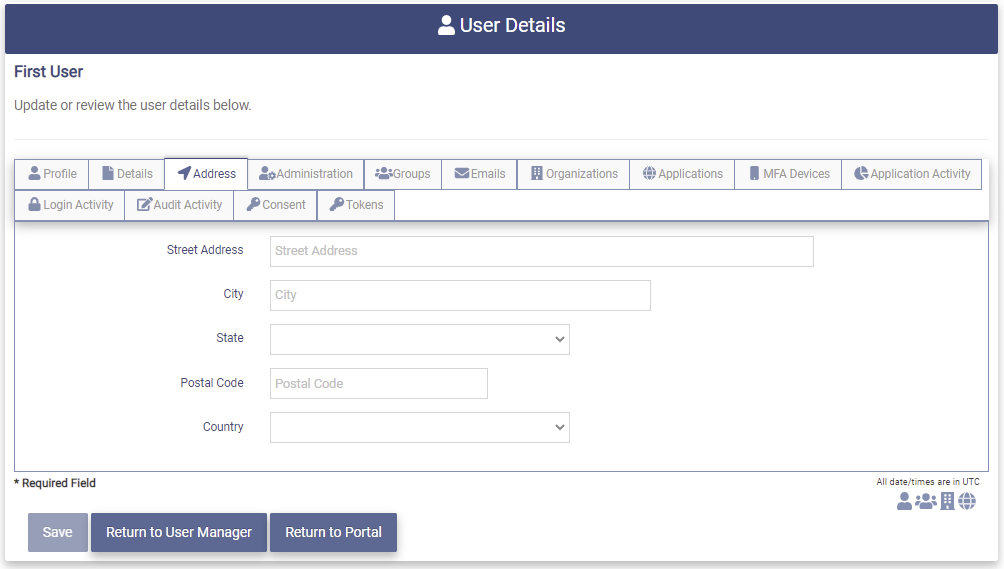
Address
The Address tab contains the address information for the user. All of the fields below are able to be modified.
Administration
The Administration tab displays the applications and organizations that the user is an administrator for.
Clicking on the Administration tab presents the page below. The information on this tab is display only.
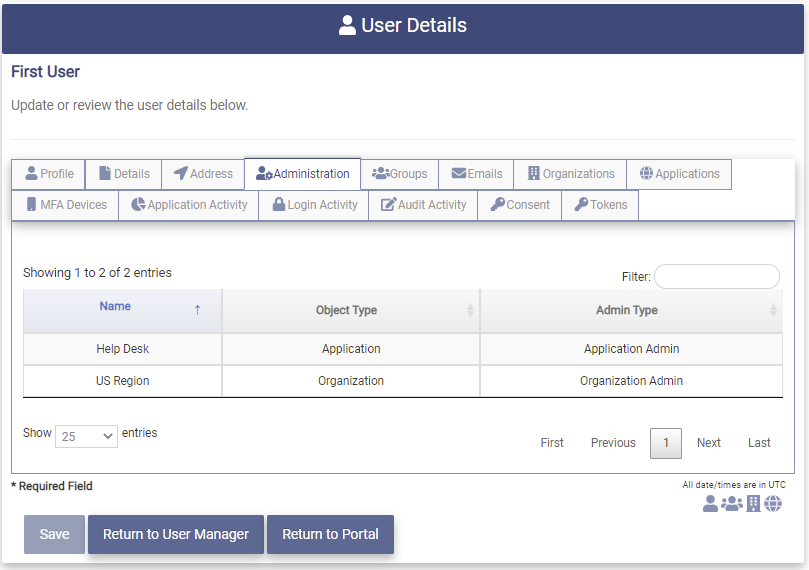
The Administration tab contains the following fields.
- Name - Name of the application or organization
- Object Type - Indicates whether the entry is an application or an organization.
- Admin Type - Indicates the type of administrator.
The Administration tab for this user shows that they are an App Admin of application Help Desk and an Org Admin for the US Region.
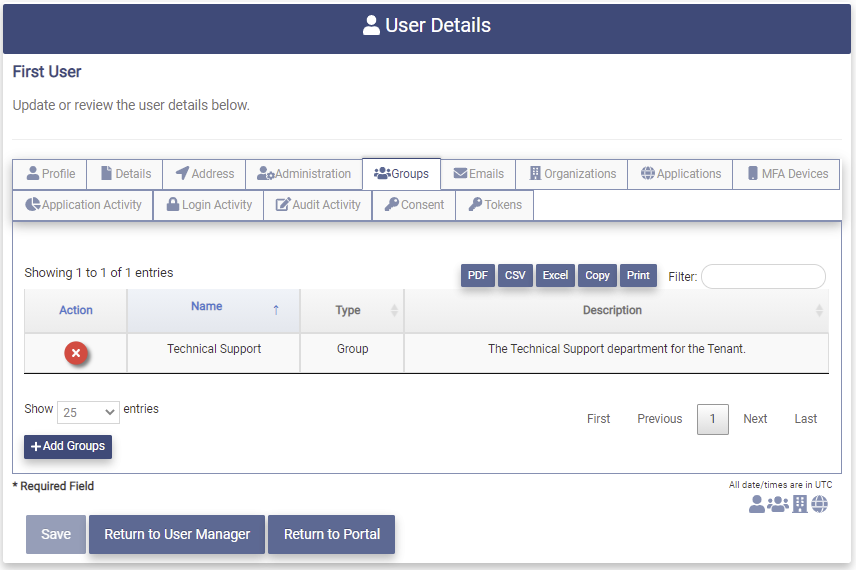
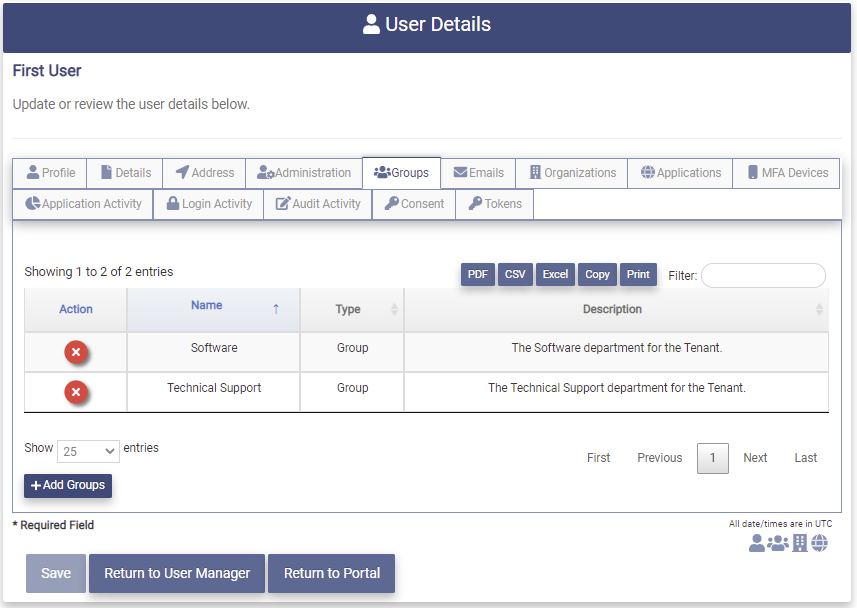
Groups
The Groups tab displays the groups that the user is a member of.
Clicking on the Groups tab will present the page below.
Add User to Groups
The following functionality is supported for each administrator.
-
The Tenant Admin may add the user to any group in the Tenant.
-
An Org Admin and the Org Type Admin may add the user to any group that the they are a member of.
Click on the and the list of groups to select from will be presented.
If the list of groups is large, the Search Criteria and Filter fields may be used to find the desired group. For more information on how the Search Criteria and Filter fields function please see the Top of the Page Fields and Buttons section.
Click on the Action box for one or more groups to select that group.

Click on the button to add the user as a member of the selected group(s). Upon successful completion you will be returned to the Groups Tab. The selected group(s) will be displayed on the Groups Tab as shown below. The Group is shown as "Pending add" until the new user has been saved.
If the group displayed is not the intended group, it may be removed by clicking on the Action button next to the name of the group on the page.
Click on the button to save the user. Upon successful modification of the user the following message will be presented.
Remove User from Group
The following functionality is supported for each administrator.
- The Tenant Admin may remove the user from any group in the Tenant.
- An Org Admin may remove the user from any group that the Org Admin is a member of.
- An Org Type Admin may remove the user from any group that the Org Type Admin is a member of.
Clicking on the Members Tab will present the page below.
To remove the user from a group click on the Action button associated with the selected group.

The selected group will appear in the group list as "Pending removal" until the user is saved.

Click on the button to save the user. Upon successful modification of the user the following message will be presented.
The group will no longer appear on the Groups tab.
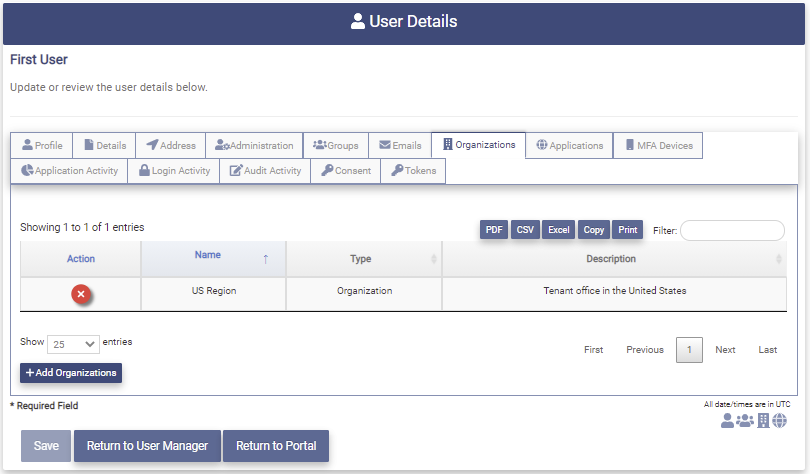
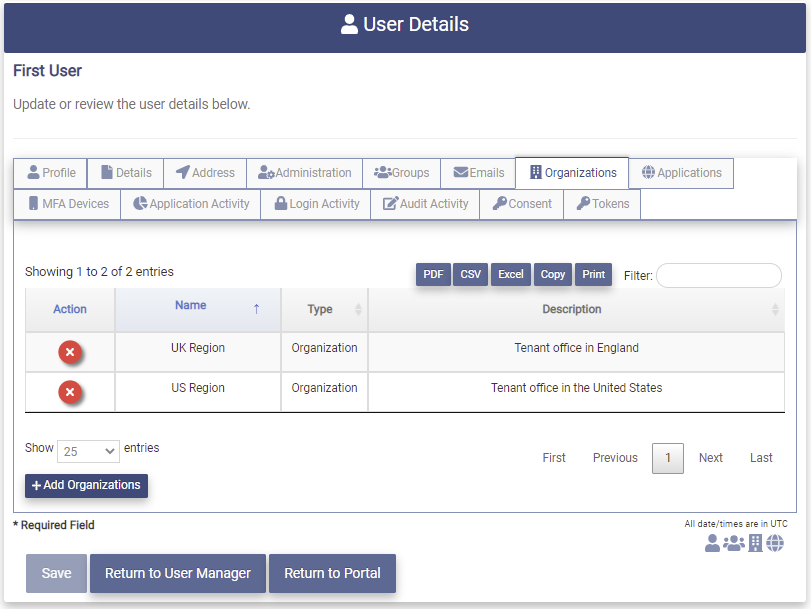
Organizations
The Organizations tab displays the organizations that the user is a member of.
Clicking on the Organizations tab presents the following page.
Add User to Organization
The following functionality is supported for each administrator.
- The Tenant Admin may add the user to any organization in the Tenant.
- An Org Admin may add the user to any organization that they are the administrator for.
- An Org Type Admin may add the user to any organization in the Org Type they are the administrator for.
Click on the button to bring up the Organization Search page. The list of available organizations will be presented.
If the list of organizations is large, the Search Criteria and Filter fields may be used to find the desired organization. For more information on how the Search Criteria and Filter fields function please see the Top of the Page Fields and Buttons section.
Click on the Action box for the organization to be selected.

Click the button to add the user as a member of the selected organization. Upon successful completion you will be returned to the Organizations Tab. The selected organization will be displayed on the Organizations Tab as shown below. The organization is shown as "Pending add" until the new user is saved.
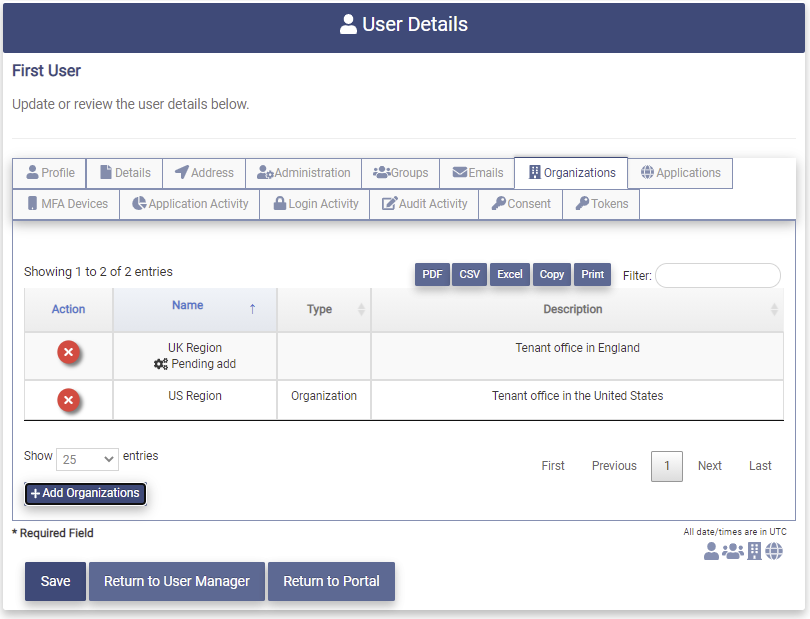
If the organization displayed is not the intended organization, it may be removed by clicking on the Action button next to the name of the organization on the page.
Click on the button to save the user. Upon successful modification of the user, the following message will be presented.
Remove User from Organization
The following functionality is supported for each administrator.
- The Tenant Admin may remove the user from any organization in the Tenant.
- An Org Admin may remove the user from any organization that they are the administrator for.
- An Org Type Admin may remove the user from any organization in the Org Type that they are the administrator for.
To remove the user from an organization, click on the Action button associated with the organization to be removed.

The selected organization will appear in the group list as "Pending removal" until the user is saved.

Click on the button to save the user. Upon successful modification of the user, the User successfully updated message will be presented and the user will no longer appear on the Organizations tab.
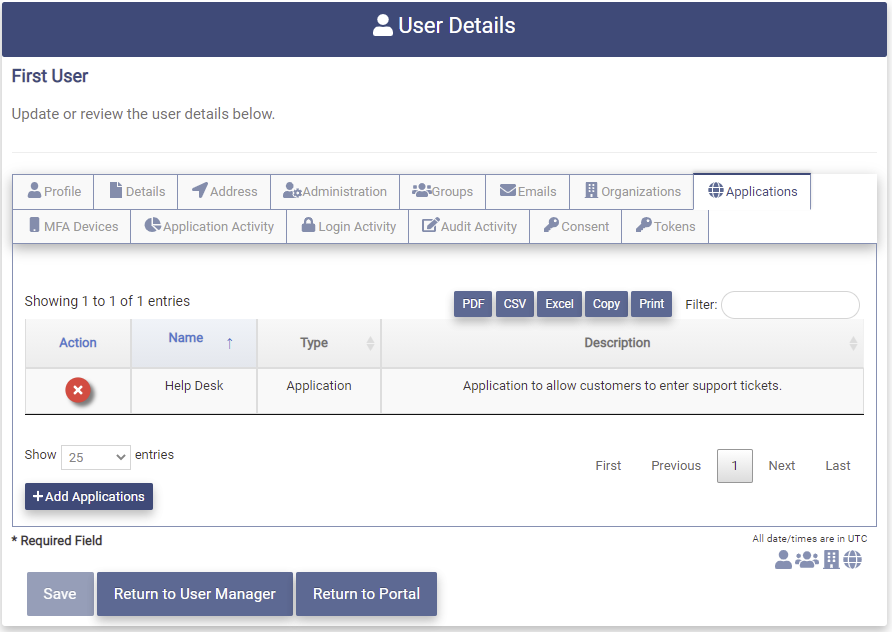
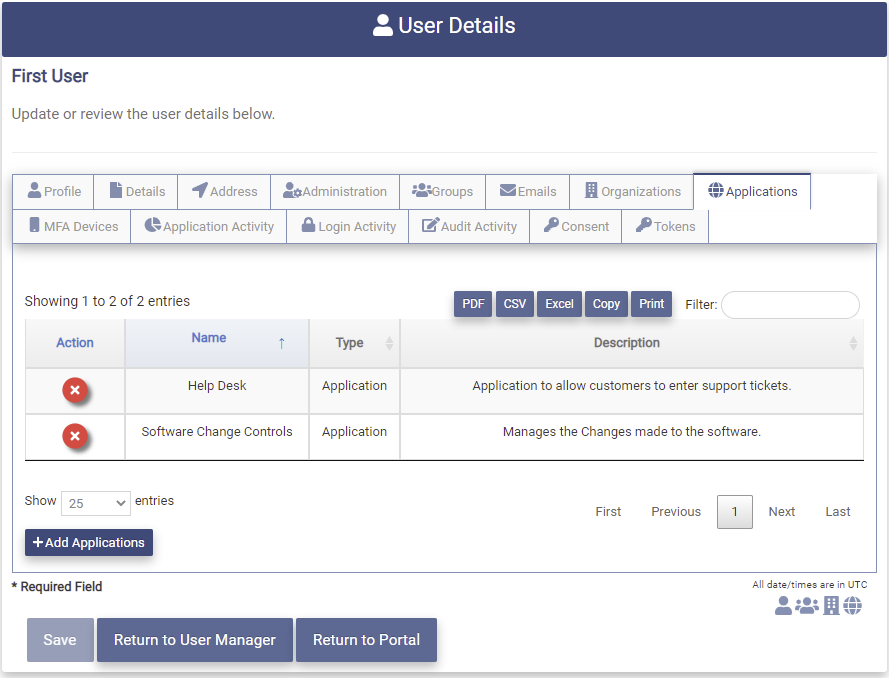
Applications
The Applications tab displays the applications that the user is a member of.
Clicking on the Applications Tab will present the page shown below.
Add User to Application
The following functionality is supported for each administrator.
-
The Tenant Admin may add the user to any application in the Tenant.
-
An Org Admin may add the user to any application that they are a member of.
-
The Org Type Admin may add the user to any application that they are a member of.
If Org Types are being used in the Tenant, the user may only be added to applications with the same Org Type that the Administrator is admin of and matches the Org Type of an organization the user has.
Click on the button to bring up the Application Search page. The list of available applications will be presented.
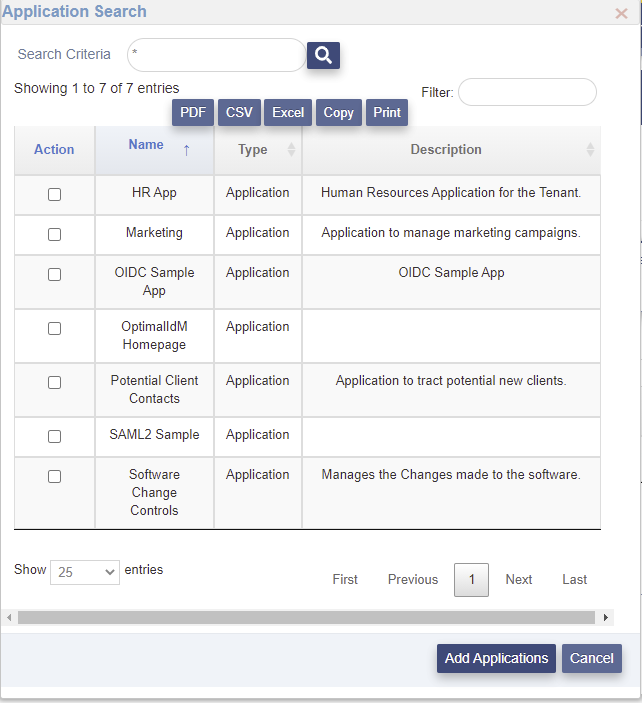
If the list of applications is large, the Search Criteria and Filter fields may be used to find the desired application. For more information on how the Search Criteria and Filter fields function please see the Top of the Page Fields and Buttons section.
Click on the Action box for the application to be selected.

Click the button to add the user as a member of the selected application. Upon successful completion you will be returned to the Applications Tab. The selected application will be displayed on the Applications Tab as shown below. The application is shown as "Pending add" until the new user is saved.
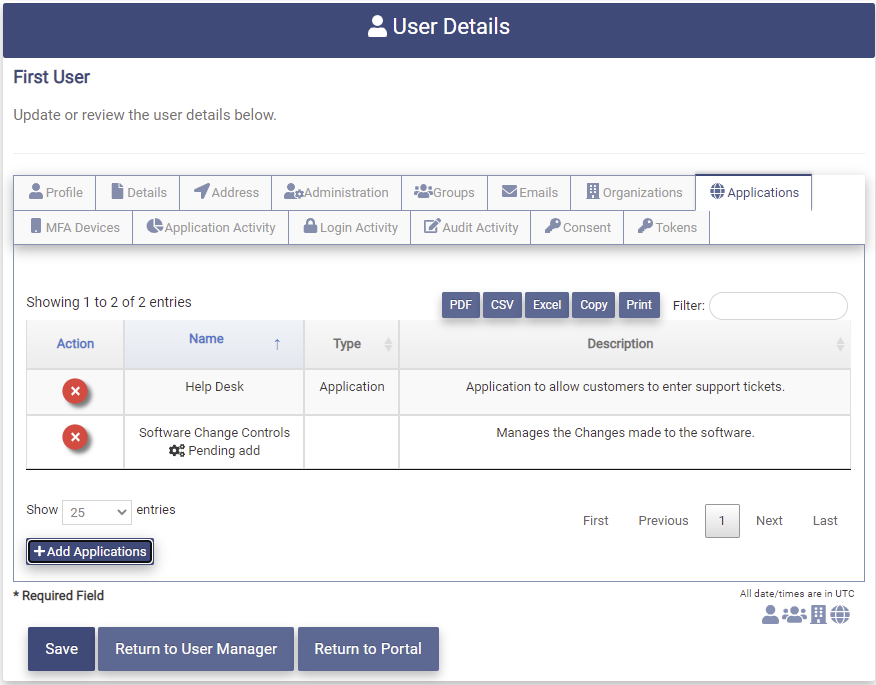
If the application displayed is not the intended application, it may be removed by clicking on the Action button next to the name of the application on the page.
Click on the button to save the user. Upon successful modification of the user, the following message will be presented.
Remove User from Application
The following functionality is supported for each administrator.
- The Tenant Admin may remove a user from any application in the Tenant.
- An Org Admin may remove a user from any application they are a member of.
- An Org Type Admin may remove a user from any application they are a member of.
If Org Types are being used in the Tenant, the user may only be removed from applications with the same Org Type that the Administrator is admin of.
Clicking on the Applications tab will present the page below.
To remove the user from an application, click on the Action button associated with the application to be removed.

The selected application will appear in the group list as "Pending removal" until the user is saved.

Click on the button to save the user. Upon successful modification of the user, the User successfully updated message will be presented and the user will no longer appear on the Applications tab.
MFA Devices
The MFA Devices tab shows the MFA options and devices that the user has registered for performing MFA authentication.
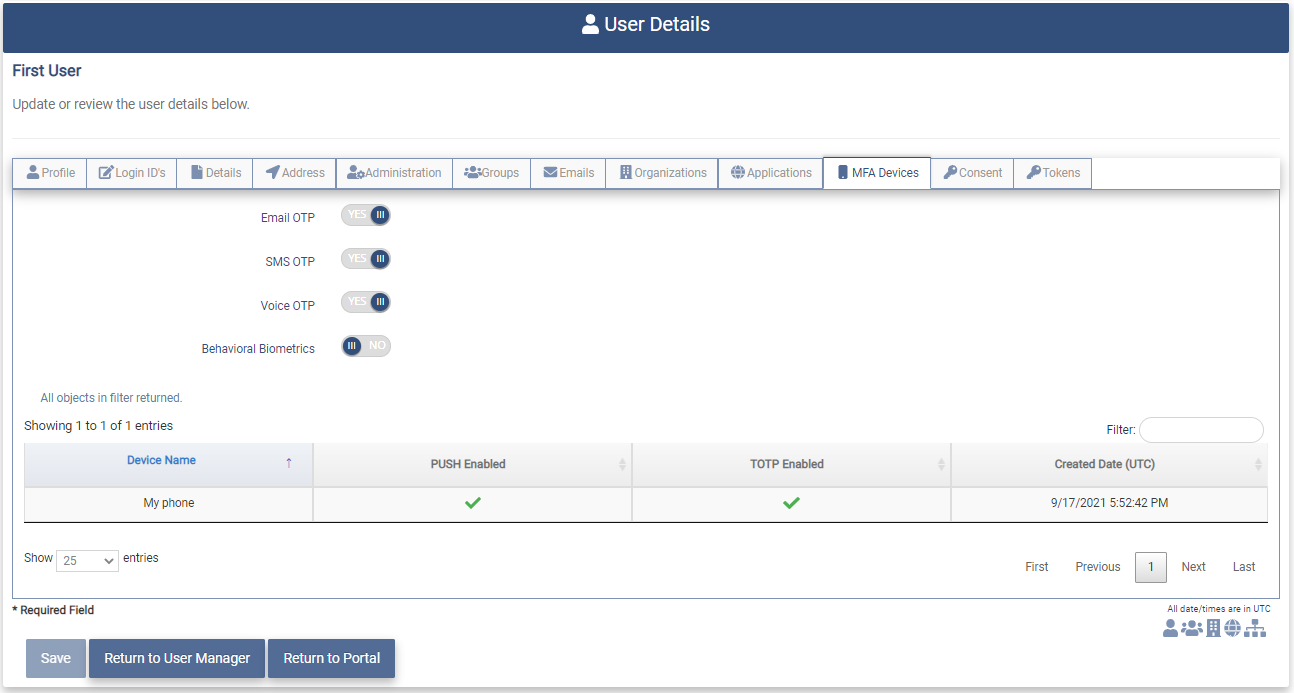
The top section of the page shows the MFA options that are available for this user. If the toggle shows "YES" that option is available. If the toggle shows "NO" that option is not available.
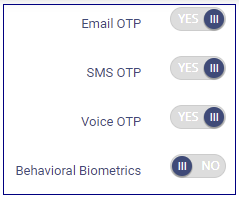
The Email OTP option becomes available when the user enters an email address during account registration. The SMS OTP, Voice OTP, and Behavioral Biometrics must be enabled for your Tenant. If they have been enabled, the SMS OTP and Voice OTP options become available when the user enters a mobile phone number. If Behavioral Biometrics is enabled for the Tenant, the user must use the Multi-Factor Behavioral Biometrics Options application on the Account Settings Tab to configure this option.
The lower half of the page shows the Devices that the user has registered for MFA.
For more information on MFA Options and Devices see the Multi-Factor Options documentation.
Application Activity
The Application Activity tab shows the applications that the user has accessed.
Clicking on the Application Activity tab will present the page below.
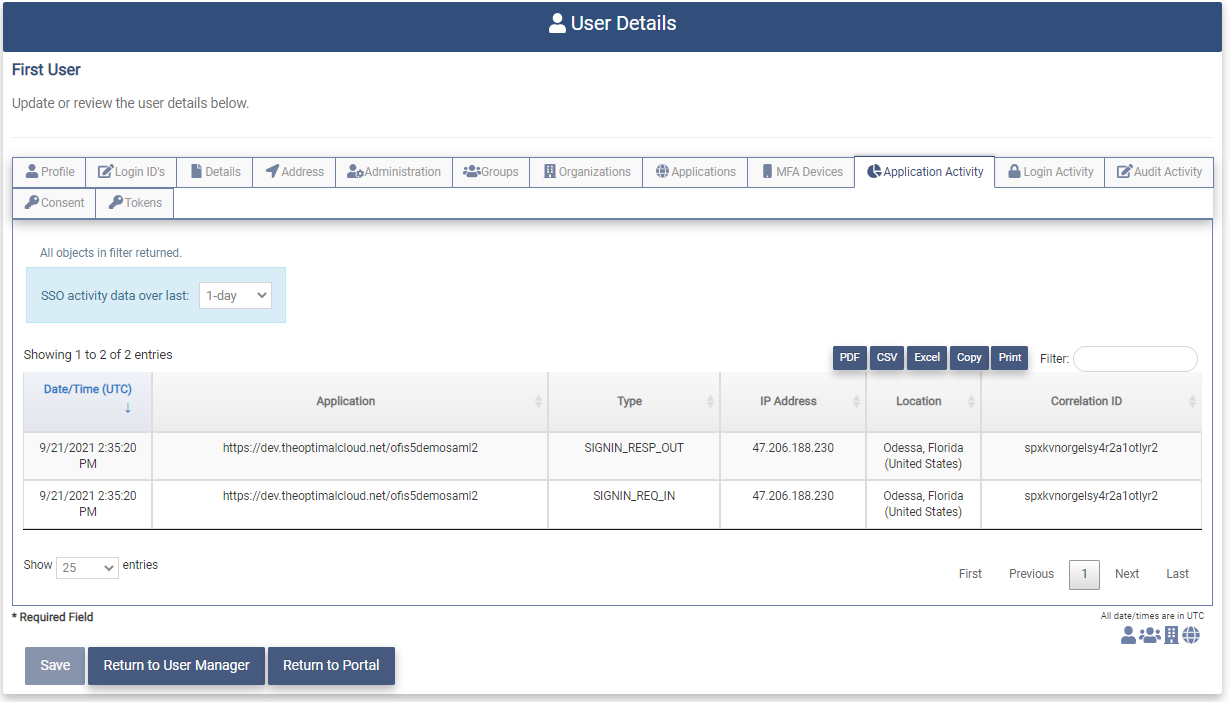
The Application Activity page contains the following fields;
- Date/Time(UTC) - The Date and Time in UTC time that the user performed the activity.
- Application - The application that the user accessed.
- Type - The type of activity that the user has performed.
- IP Addresss - IP Address of the user.
- Location - The location of of the user.
- Correlation ID - Unique ID used by the OptimalCloud to correlate events.
The Application Activity page contains the following controls:
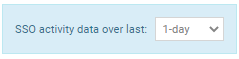
- Application Activity data over last Dropdown - The data on the page will be shown according to the timeframe selected in the dropdown.
-
Export Buttons - The Export buttons allow the data on the page to be exported. For a full description of how each button works please see the Bottom of Page Fields and Buttons section.

-
Filter - This field allows the results of the search to be further limited by the pattern entered.
Login Activity
The Login Activity tab shows the login attempts for the user.
Clicking on the Login Activity tab will present the page below.
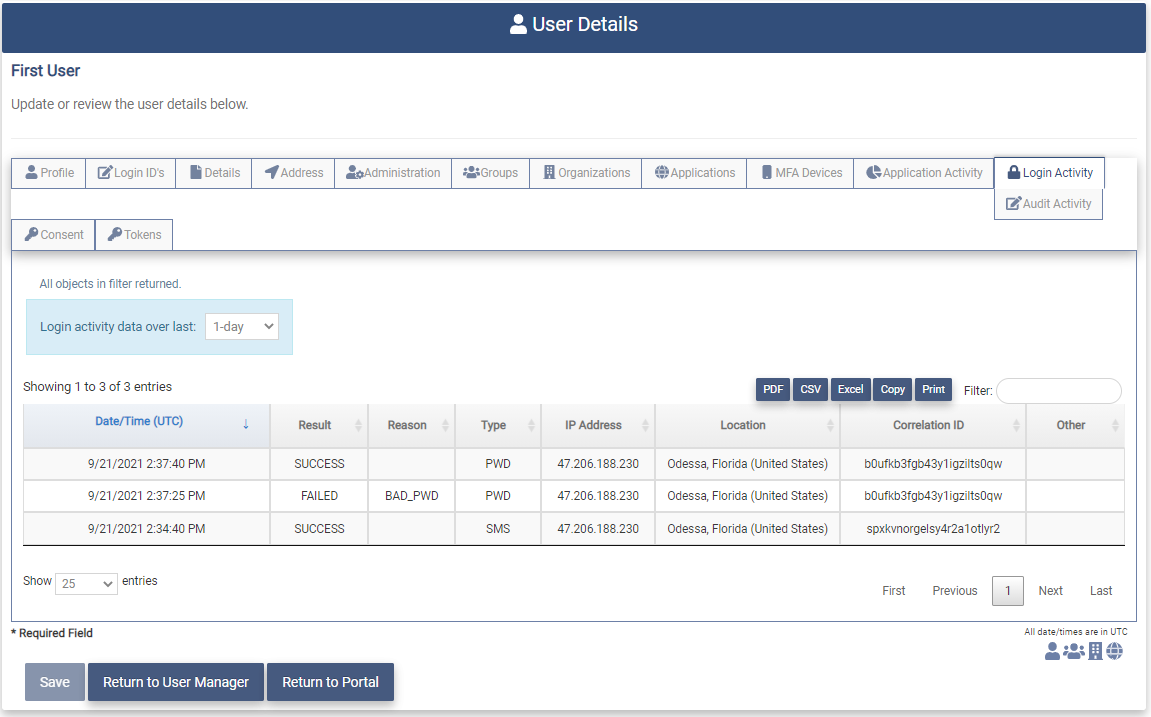
The Login Activity page contains the following fields.
-
Date/Time(UTC) - The Date and Time in UTC time that user attempted to login.
-
Result - The result of the login attempt ( FAILED, SUCCESS)
-
Reason - The reason the the login attempt Failed.
Some possible reasons for a Failed Login attempt are:
BAD_PWD - the password the user entered was not correct
ACCT_LOCKED - the user's account has been locked following multiple Failed Login attempts.
OAS_INVALID_OTP - the user entered an incorrect One Time Passcode (OTP)
-
Type - Type of authentication used by the user to login.
-
IP Address - The IP Address the user is logging in from.
-
Location - The location the user is logging in from.
-
Correlation ID - Unique ID used by the OptimalCloud to correlate events.
The Login Activity page contains the following controls:
-
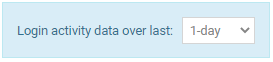
Login Activity data over last Dropdown - The data on the page will be shown according to the timeframe selected in the dropdown.
-
Export Buttons - The Export buttons allow the data on the page to be exported. For a full description of how each button works please see the Bottom of Page Fields and Buttons section.
-
Filter - This field allows the results of the search to be further limited by the pattern entered.
Audit Activity
The Audit Activity tab shows the changes that have been made to the user's account.
Clicking on the Audit Activity tab will present the page below.
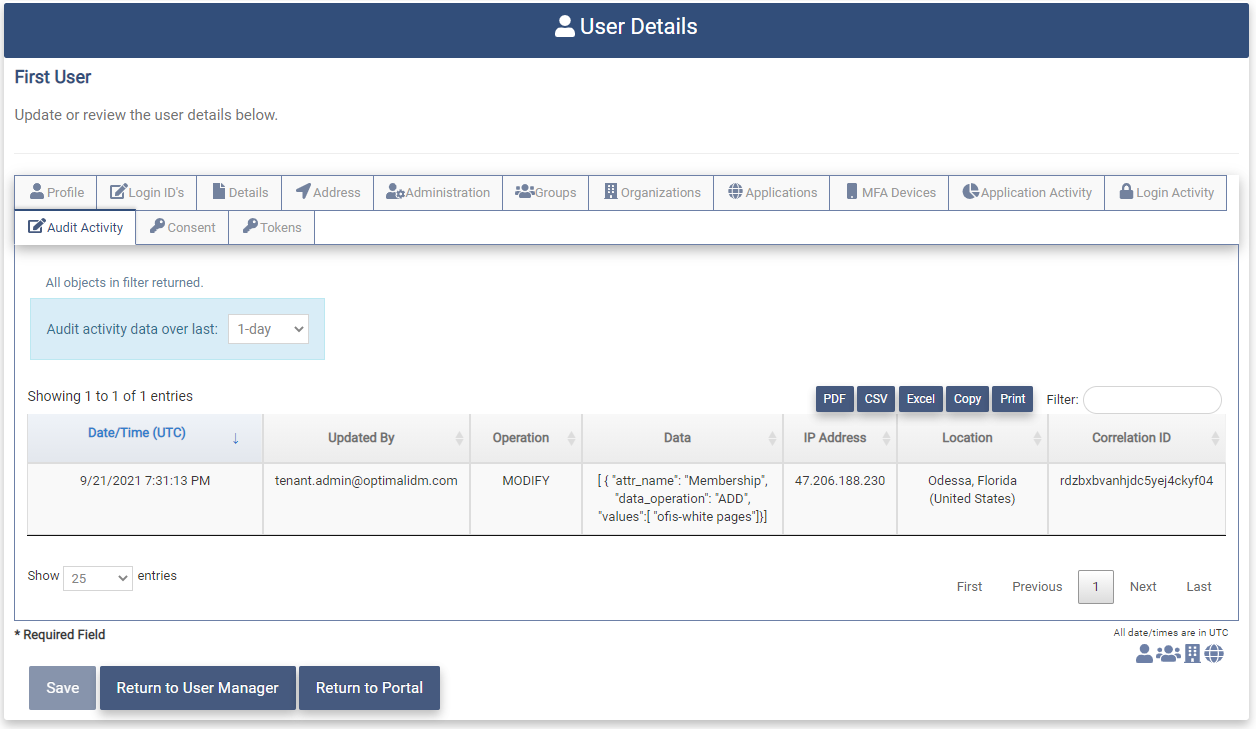
The Audit Activity page contains the following fields.
- Date/Time(UTC) - The Date and Time in UTC time that the account was changed.
- Updated By - The user that updated the account.
- Operation - The type of change made to the account (ADD, DELETE, MODIFY)
- Data - The data that was added, modified or deleted.
- IP Address - The IP Address of the user making the change.
- Location - The location of the user making the change.
- Correlation ID - Unique ID used by the OptimalCloud to correlate events.
The Audit Activity Page contains the following controls.
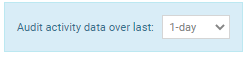
- Audit Activity data over last Dropdown - The data on the page will be shown according to the timeframe selected in the dropdown.
-
Export Buttons - The Export buttons allow the data on the page to be exported. For a full description of how each button works please see the Bottom of Page Fields and Buttons section.
-
Filter - This field allows the results of the search to be further limited by the pattern entered.
Consent
A Consent is the grant of a Permission. Some OpenID Connect (OIC) applications request Permissions (requests for user's information or to perform actions on behalf of the user). The user is required to grant consent for these Permissions. The grant is performed during the authentication process or can be configured to be automatic for each application. The consent is granted for a specified period of time. Once the period of time has expired the user will be prompted to grant consent for the Permissions again. The Consent Tab shows the Consents that the user has granted.
The Consent tab contains the following fields. All of the fields are display only.
- Action - There are no actions allowed.
- Granted On - The date the consent was granted.
- Expires - The date the consent will expire.
- Client - The application that the consent is granted to.
- Permission - The item of user's information or the action for which consent has been granted.
Tokens
The Tokens tab contains the OpenID Connect (OIC) Tokens that been issued to an application by the OptimalCloud during the authentication process. The Tokens are issued for varied lengths of time based on the requirements of the application.
There are three types of Tokens:
- Access Token - Authorizes the application to perform actions on behalf of the user.
- ID Token - Contains the users Profile information and other custom items that have been defined as needed by the application.
- Refresh Token - Similar to the Access Token but is issued for a greater length of time.
The table contains the following fields:
- Action - The Actions that are allowed for this Token (- View Token details, - Revoke Token).
- Issued On - The Date and Time the Token was issued.
- Expires - The Date and Time the Token will expire.
- Client - The Application that the Token was issued to.
- Type - The type of the Token
View
Clicking on the action will present the Token page. All of the fields are display only.
The Token page provides further details about the selected Token.
The Token Page for an Access Token is shown below.
The details available are:
- Token Type - The type of the Token.
- Client ID - The unique identifier for the application that the Token was issued to.
- Token - The Token for the Access Token is encrypted and only readable by the OptimalCloud.
The Token Page for an ID Token is shown below.

The details available are:
- Token Type - The type of the Token.
- Client ID - The unique identifier for the application that the Token was issued to.
- Token - The encrypted Token only readable by the OptimalCloud.
- Decoded Token Header - The text version of the Token Header.
- Decoded Token - The text version of the information contained in the Token.
Revoke
Clicking on theAction for a Token will present the Revoke Token message and the details of the token.

The field below will allow the administrator to remove all tokens for this user.
Enable to remove all tokens for client -
- No - Only this token will be revoked.
- YES - All tokens for this client will be revoked.
To revoke the Token(s) you must type "YES" in the box and click on the  button.
The Token(s) will be revoked and no longer appear on the Tokens Tab.
Licenses
The Licenses tab shows the Azure AD licenses that the user has been granted.
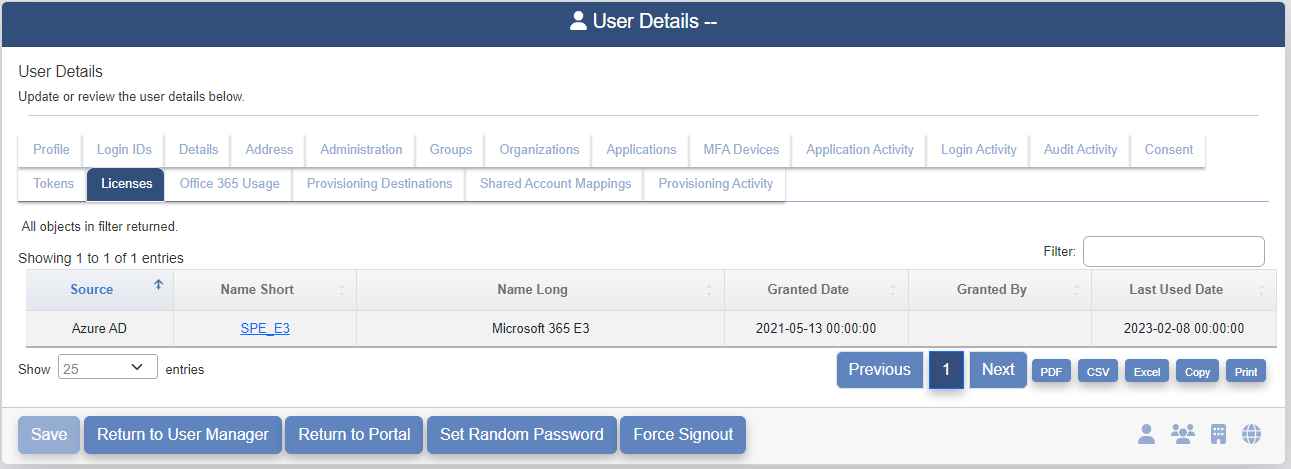
The Licenses tab contains the following fields:
- Source - The source of the license.
- Name Short - The short name for the license.
- Name Long - The long name for the license.
- Granted Date - The date the license was granted.
- Granted By - The email address of the person who granted the license.
- Last Used Date - The date the user last used the license.
Office 365 Usage
If the user has been granted an O365 License from Azure AD, the Office 365 Usage tab will show the information below based on the users usage of the license.
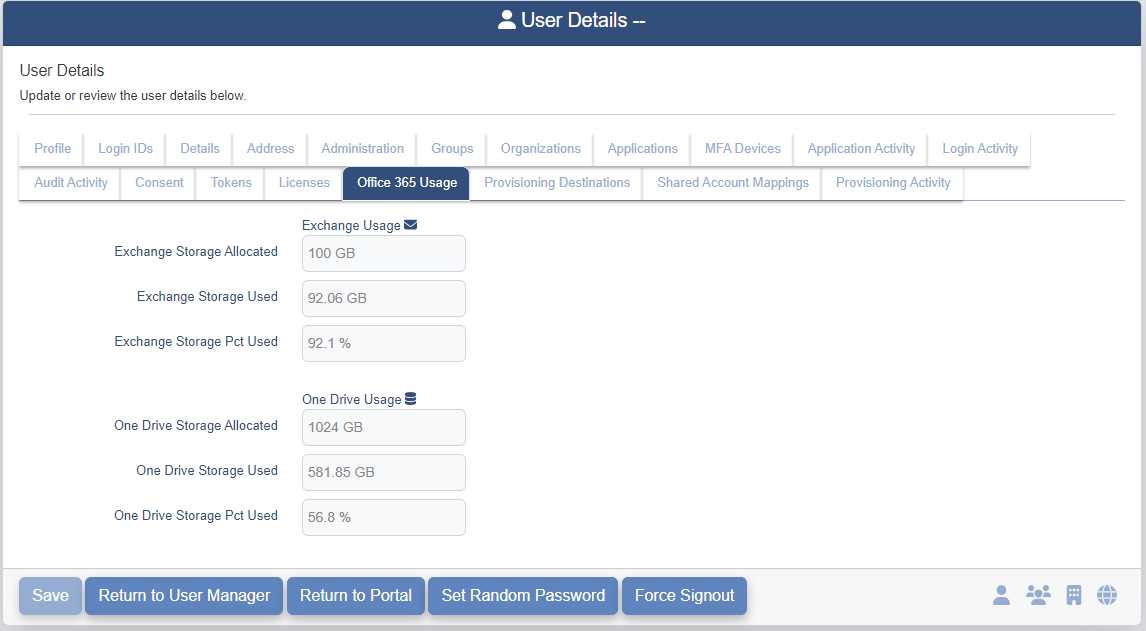
The Office 365 Usage tab contains the following fields.
- Exchange Storage Allocated - The amount of storage that has been allocated on the Exchange server for the users email.
- Exchange Storage used - The amount of allocated email storage that the user has used.
- Exchange Storage Pct Used - The percentage of the allocated email storage that the user has used.
- One Drive Storage Allocated - The amount of file storage that has been allocated on the One Drive server for this user.
- One Drive Storage Used - The amount of allocated file storage that the user has used.
- One Drive Storage Pct Used - The percent of allocated file storage that the user has used.
Provisioning Destinations
The Provisioning Destinations tab shows all of the Provisioning Destinations that this user is provisioned to.
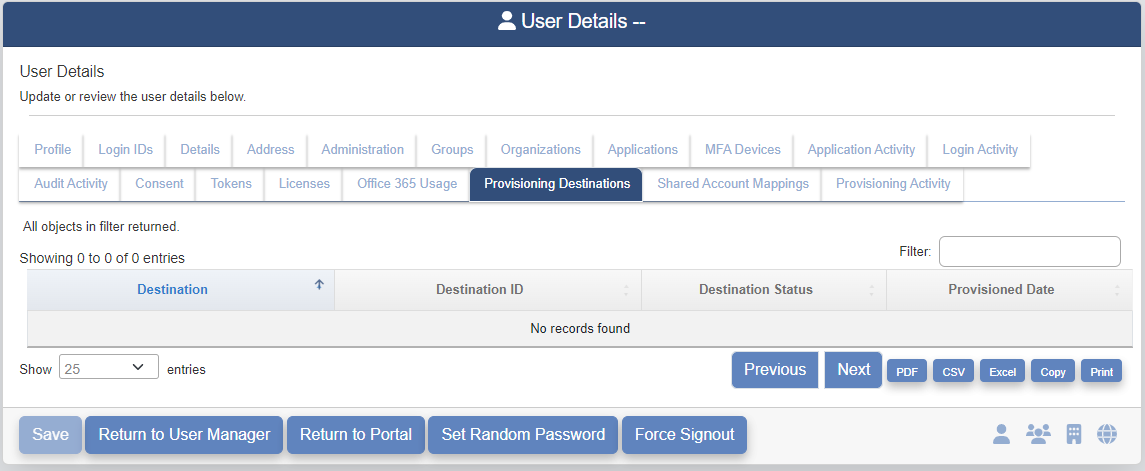
The Provisioning Destinations Tab contains the following fields.
- Destination - The provisioning destination that this user has been provisioned to.
- Destination ID - The ID of the user within the provisioning destination.
- Destination Status - The status of the provisioning of this user to the provisioning destination.
- Provisioned Date - The date this user was provisioned to the provisioning destination.
Provisioning Activity
The Provisioning Activity tab shows the provisioning activity for this user.
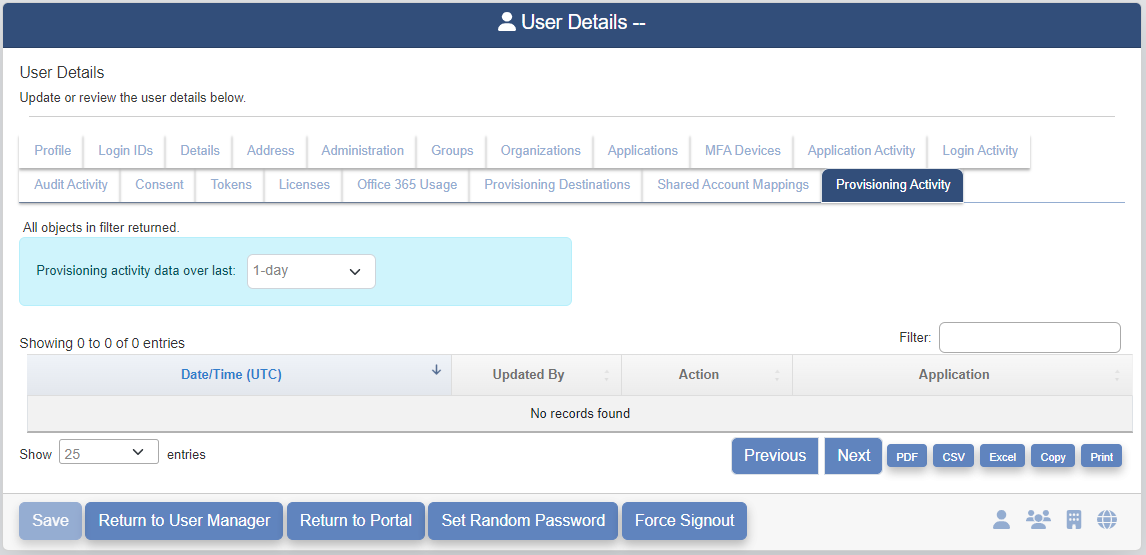
The Provisioning Activity tab contains the following fields.
- Date/Time(UTC) - The date and time (UTC) that the provisioning occurred.
- Updated By -
- Action - The provisioning action (provisioned, deprovisioned)
- Application - The Provisioning Destination.
The Provisioning Activity page contains the following controls:
-
Provisioning Activity data over last Dropdown - The data on the page will be shown according to the timeframe selected in the dropdown.

-
Export Buttons - The Export buttons allow the data on the page to be exported. For a full description of how each button works please see the Bottom of Page Fields and Buttons section.
-
Filter - This field allows the results of the search to be further limited by the pattern entered.
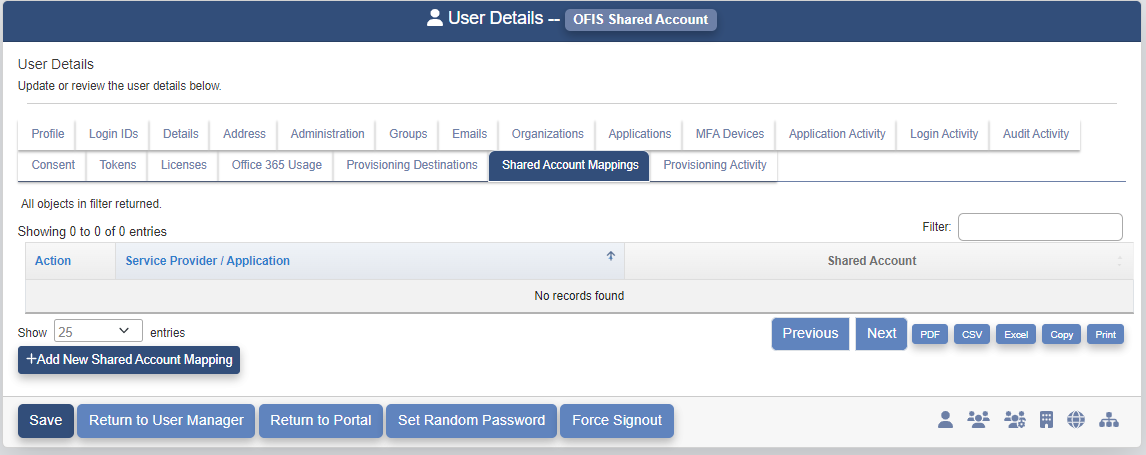
Shared Account Mappings
Shared account mappings allow a user to access a Service Provider/Application with a shared account.
The Shared Account Mappings tab shows the shared account mappings that have been setup for the user.
Add Shared Mapping
To add a shared account mapping for the user click on the  button and the following popup will be presented.
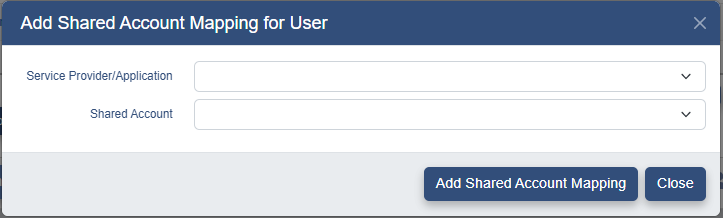
Select from the dropdowns for the following fields.
- Service Provider/ Application - The Service Provider/Application the user will access
- Shared Account - The Shared Account the user will use to access the Service Provider Application.
Click on the  button.
The Shared Mapping will be added to the Shared Mapping table as "Pending Add" until the user account is saved.

Click on the button to save the user. Upon successful modification of the user, the following message will be presented.
Remove Shared Mapping
To remove a shared account mapping go to the Shared Account Mapping tab and click on the button associated with the shared account mapping to be removed. The shared account mapping will be shown on the Shared Account Mapping table as "Pending Removal" until the account is saved.
Click on the button to save the user. Upon successful modification of the user, the following message will be presented.
Remove User
The Tenant Admin may remove any user account from the Tenant.
An Org Admin may remove the user account of a user who is a member the organizations that they are an administrator for.
An Org Type Admin may remove the user account of a user who is member of an organization that has the Org Type that the Org Type Admin is admin of.
Removing users is done from the User Manager page.
Click the Action button on the row of the user to be removed.
The following message and the Profile of the user will be presented to ensure that the correct user is being removed.

Type "YES" in the box and click the button. Upon successful removal of the user profile the following message will be displayed.

The user will no longer be displayed on the User Manager page.
If the user was a member of a group, organization or application, those memberships will also be removed.
Reset Password
The Tenant Admin may perform a Reset Password on any user account from the Tenant.
An Org Admin may perform a Reset Password on the user account of a user who is a member the organizations that they are an administrator for.
An Org Type Admin may perform a Reset Password on a user who is member of an organization that has the Org Type that the Org Type Admin is admin of.
Resetting User's Passwords is done from the User Manager page.
Click the Action button associated with the user whose password is to be reset.
The following message will be presented at the top of the User Details page for this user.

Type "YES" in the box and click the 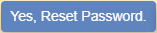 button. The following message will be presented.

An email will be sent to the email address specified for this account with a Reset Password link to allow the user to set their password.
Group Manager
This section provides the instructions to manage groups in the Tenant. The following functionality is supported for each administrative type.
- Tenant Admin - create, remove, modify, add members, and remove members for all groups in the Tenant except the groups with a type of System Security Group.
- Org Type Admin - add and remove members who are users in the organizations in the Org Type the Org Type Admin is administrator of from the groups the Org Type Admin has.
- Org Admin - add and remove members who are users in the organizations the Org Admin is administrator of from the groups the Org Admin has.
Clicking on the Group Manager application  will present the Group Manager page.
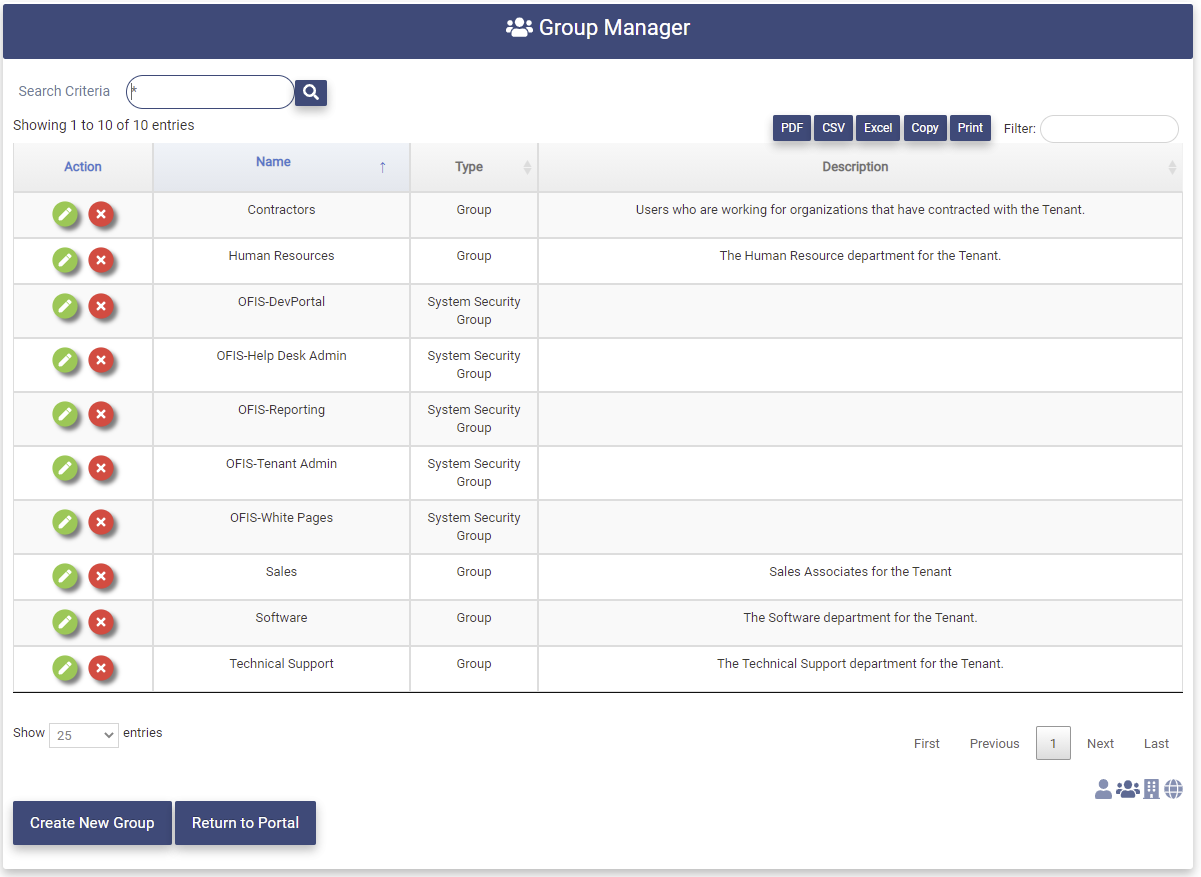
The Group Manager page contains the following fields for each group in the Tenant:
-
Action - Clicking on these buttons perform actions on the associated group
(
: Modify or View, : Remove ) -
Name - Name of the group.
-
Type - Type of the group. There a two types of groups:
- Group - Standard group created and managed by the Tenant Admin
- System Security Group - Optimal IdM group that cannot be removed.
-
Description - Description of the group.
Search Groups
The data displayed on the Group Manager page can be limited to a specified set of groups by using the Search Criteria and Filter fields. For a description of how these fields function please see the Top of the Page Fields and Buttons section above.
Create New Group (Tenant Admin only)
The Tenant Admin has the ability to create new groups for the Tenant.
Continue with the instructions below or view the video for an example of this process.
Click on the 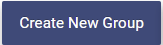 button and the Group Details page will be presented.
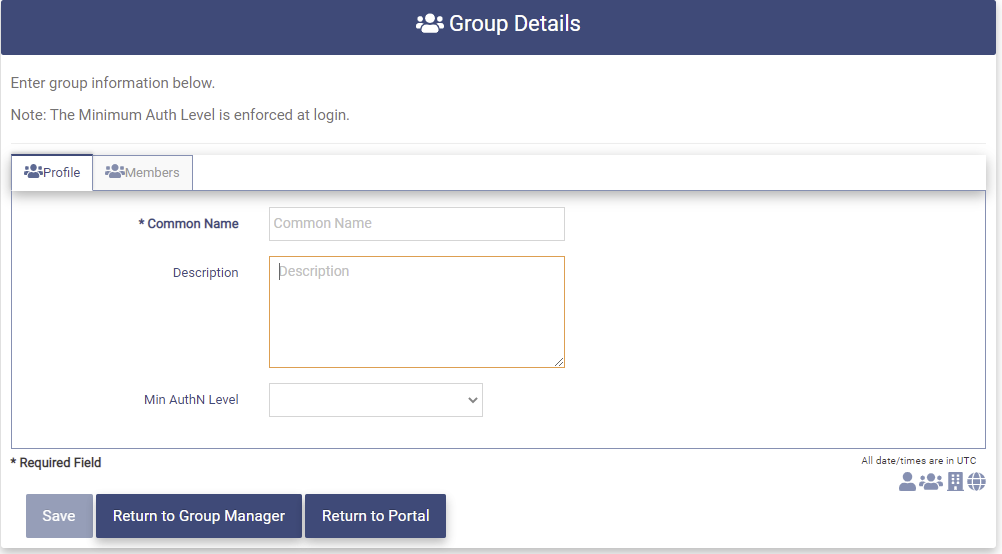
Profile
The Profile Tab on the Group Details page contains the following fields:
- Common Name - The Name of the group used for display.
- Description - The Description of the group.
- Min AuthN Level - The minimum authentication level at login required for users in this group.
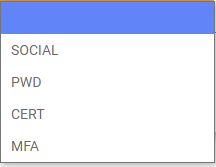
The dropdown contains the following choices:
SOCIAL - users in the group will be required to authenticate at least using their Social Media account
PWD - users in the group will be required to authenticate at least using their username and password credentials.
CERT - users in the group will be required to authenticate at least using a client certificate.
MFA - users in this group will be required to authenticate first using their credentials and then an MFA option.
Fill in the fields on the page. The fields preceded by an "*" are required.
If you would like to add Members to the Group during the creation of the group, see the Add Members section.
Click the button to save the new group. Upon successful creation of the group, the following message will be presented.

The new group will now appear on the Group Manager page.
Add Members
The Tenant Admin may add members to the group during the creation of the group. Clicking on the Members Tab will present the page below.
Click on the 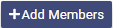 button to present the User Search page.
The User Search page will display all users in the Tenant. The entries have been limited here due to space limitations.
Click on the Action box for one or more users as shown below.

Click the  button to add the users as members of the group. The Members Tab will now display the members that have been selected. They are shown as "Pending add" until the Group has been saved.
If a user has been selected incorrectly, click on the Remove Action button associated with that user and that user will not be added to the group when the group is saved.
View and Modify Group
The Tenant Admin has the capability to view and modify any Group. This includes modifying the profile, and adding or removing members.
The Org Admin may add and remove users in the orgs that they are the admin of as members of a group that the Org Admin is a member of.
The Org Type Admin may add and remove users in the orgs that are in the Org Type that the Org Type Admin is admin of as members of a group that the Org Type Admin is a member of.
Click on the Action button associated with the group to be viewed or modified.

The Group Details page for that group will be presented.

Profile
The Profile tab contains the profile fields for the group that were filled in during the creation of the group.
All of the fields are available to be modified.
Common Name - The Name of the group used for display.
Description - The Description of the group.
Min AuthN Level - The minimum authentication level at login required for users in this group.
The dropdown contains the following choices:
- SOCIAL - users in the group will be required to authenticate at least using their Social Media account
- PWD - users in the group will be required to authenticate at least using their username and password credentials.
- CERT - users in the group will be required to authenticate at least using a client certificate.
- MFA - users in this group will be required to authenticate first using their credentials and then an MFA option.
Once a field has been modified the button will become available.
Members may be added or removed from the selected group. To implement that functionality please see the Add Members and Remove Members sections below.
Once all modifications have been completed, click on the button to save any changes. Upon successful completion of the modification the following message will be presented.

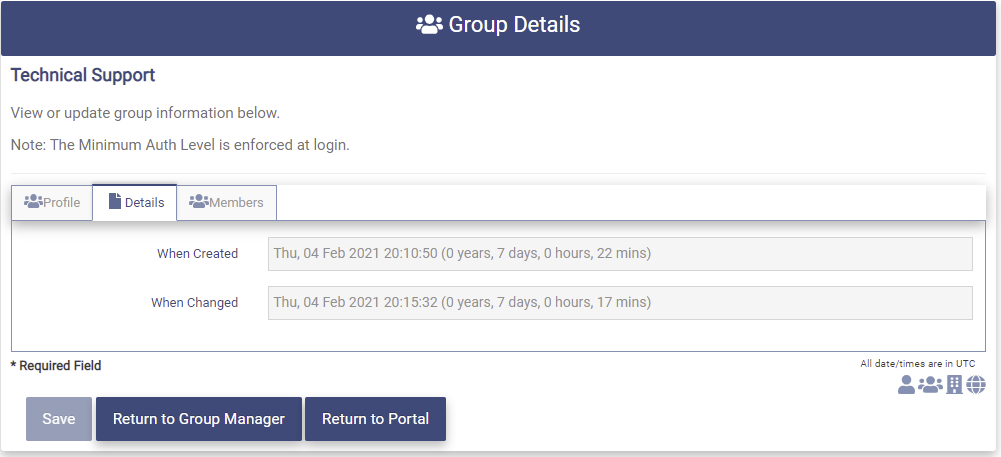
Details
The Details tab contains the following fields:
- When Created - The date and time the group was created.
- When Changed - The date and time the group was last modified.
The fields on this page are display only.
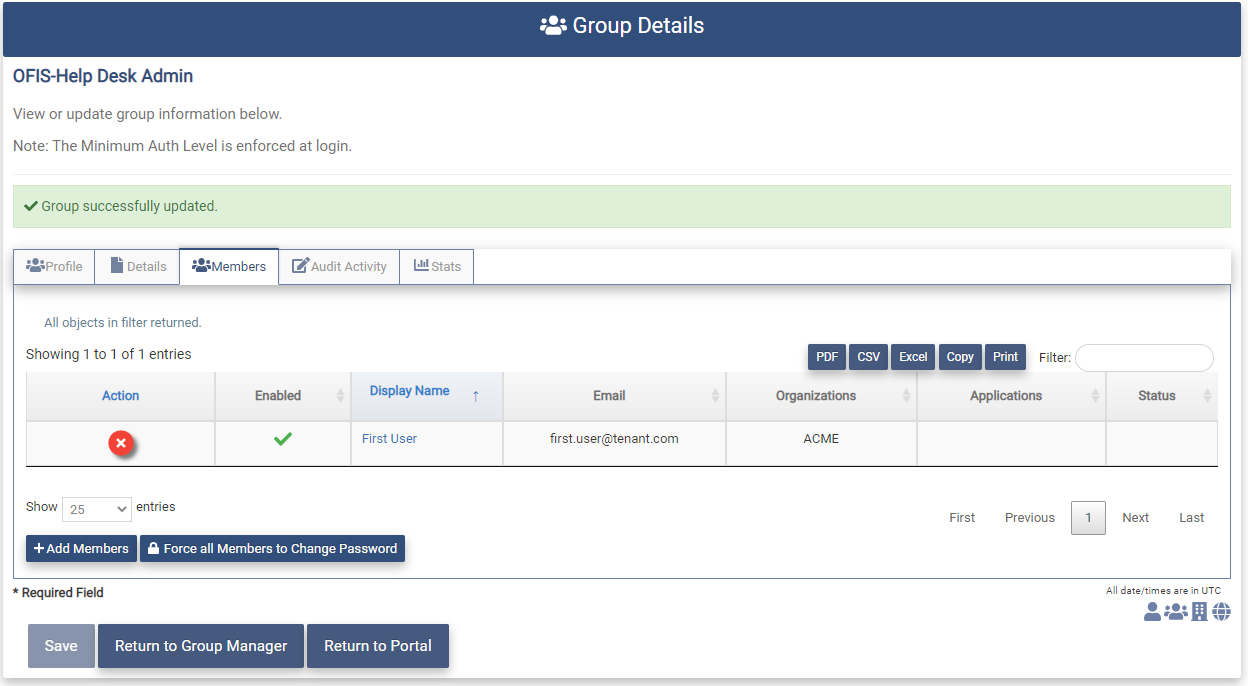
Add Members
The following functionality is supported for each administrative type.
- Tenant Admin may add members to all groups in the Tenant except the groups with a type of System Security Group.
- Org Type Admin may add members who are users in the organizations in the Org Type the Org Type Admin is administrator of to the groups the Org Type Admin is a member of.
- Org Admin may add members who are users in the organizations the Org Admin is administrator of to the groups the Org Admin is a member of.
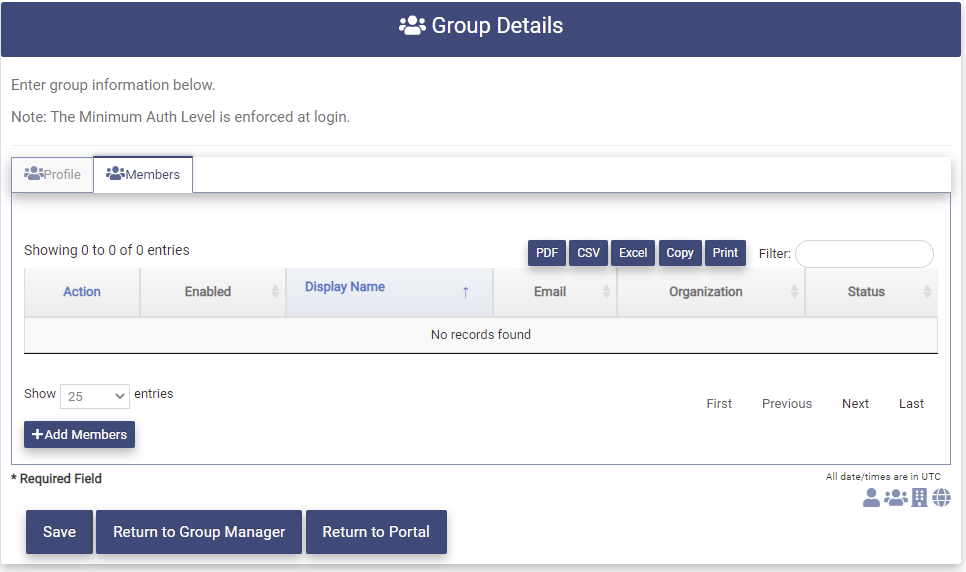
The Members tab displays the members that have been added to the group. Currently there are no members for the selected group.
Click on the button to present the User Search page.
The User Search page will display all users in the Tenant. The entries have been limited here due to space limits.
Click on the Action box associated with the users to be added as members of this group.

Click on the button to the users as members of the selected group. The users will now be displayed on the Members tab as "Pending add" until the group is saved.
If a user has been selected incorrectly, click on the Action button associated with that user. That user will be removed from the Members tab and will not be added to the group when the group is saved.
Click the button to save any changes. Upon successful completion of the modification the following message will be presented.
Remove Members
The following functionality is supported for each administrative type.
- Tenant Admin may remove any users who are members for all groups in the Tenant except the groups with a type of System Security Group.
- Org Type Admin may remove members who are users in the organizations in the Org Type the Org Type Admin is administrator of from the groups the Org Type Admin is a member of.
- Org Admin may remove members who are users in the organizations the Org Admin is administrator of from the groups the Org Admin is a member of.
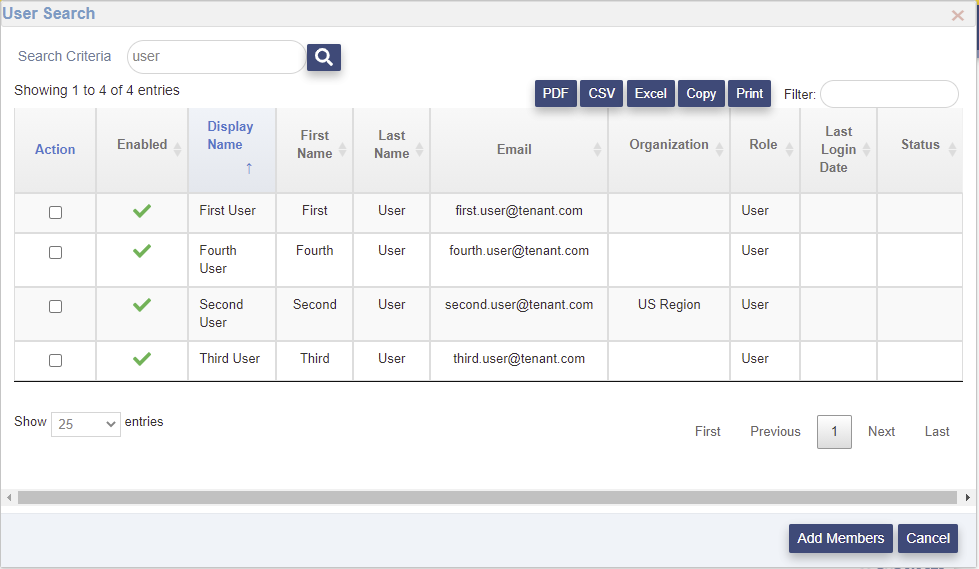
Following the above addition of members to the selected group, the Members tab will now be as shown below.
Click on the button associated with the member to be removed. The user will now be shown on the Members tab as "Pending Removal" until the group is saved.

Click the button to save the group. Upon successful completion of the update, the Group successfully updated message will be displayed and the user will no longer be displayed on the Members tab.
Force Member Password Change
The  on the Members tab allows the Tenant Admin to force all members of the associated group to change their password the next time they attempt to Login.
Audit Activity
The Audit Activity tab shows the changes that have been made to the group.
Clicking on the Audit Activity tab will present the page below.
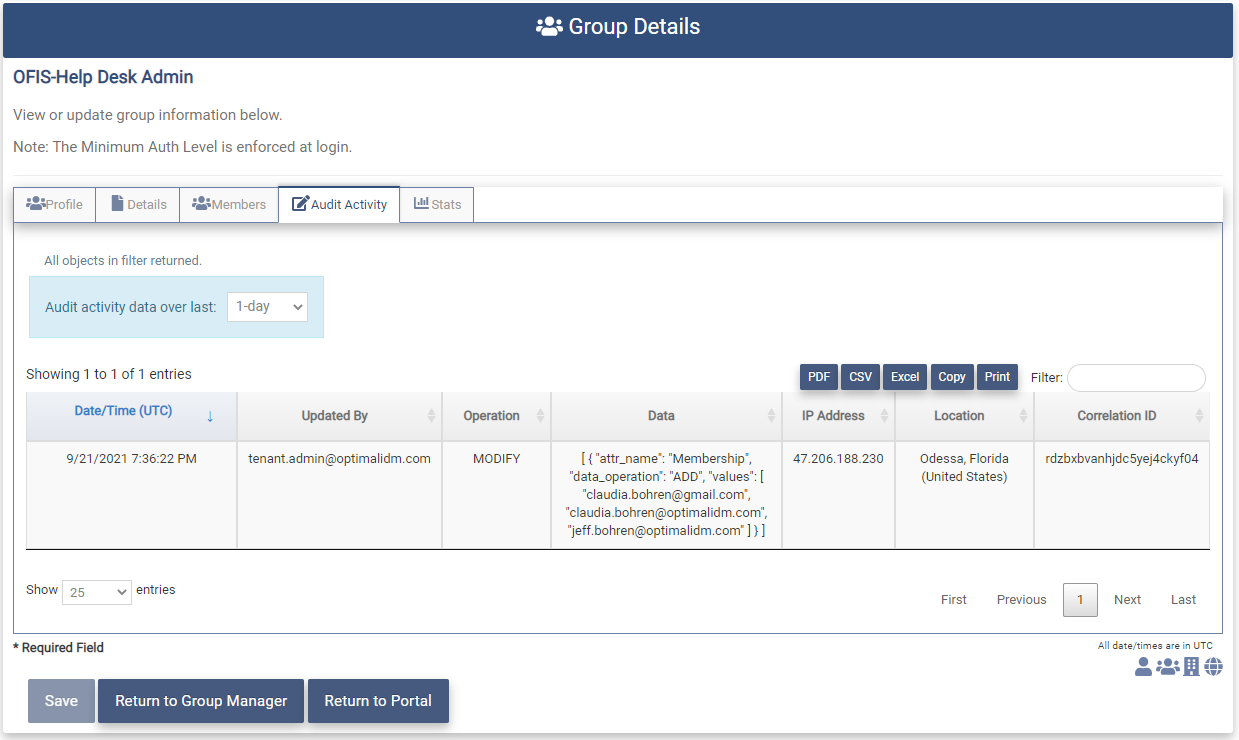
The Audit Activity page contains the following fields.
- Date/Time(UTC) - The Date and Time in UTC time that the group was changed.
- Updated By - The user that updated the group.
- Operation - The type of change made to the group (ADD, DELETE, MODIFY)
- Data - The data that was added, modified or deleted.
- IP Address - The IP Address of the user making the change.
- Location - The location of the user making the change.
- Correlation ID - Unique ID used by the OptimalCloud to correlate events.
The Audit Activity Page contains the following controls.
- Audit Activity data over last Dropdown - The data on the page will be shown according to the timeframe selected in the dropdown.
-
Export Buttons - The Export buttons allow the data on the page to be exported. For a full description of how each button works please see the Bottom of Page Fields and Buttons section.
-
Filter - This field allows the results of the search to be further limited by the pattern entered.
Stats
The Stats tab shows the members statistics for the group.
Clicking on the Stats tab will present the following page.
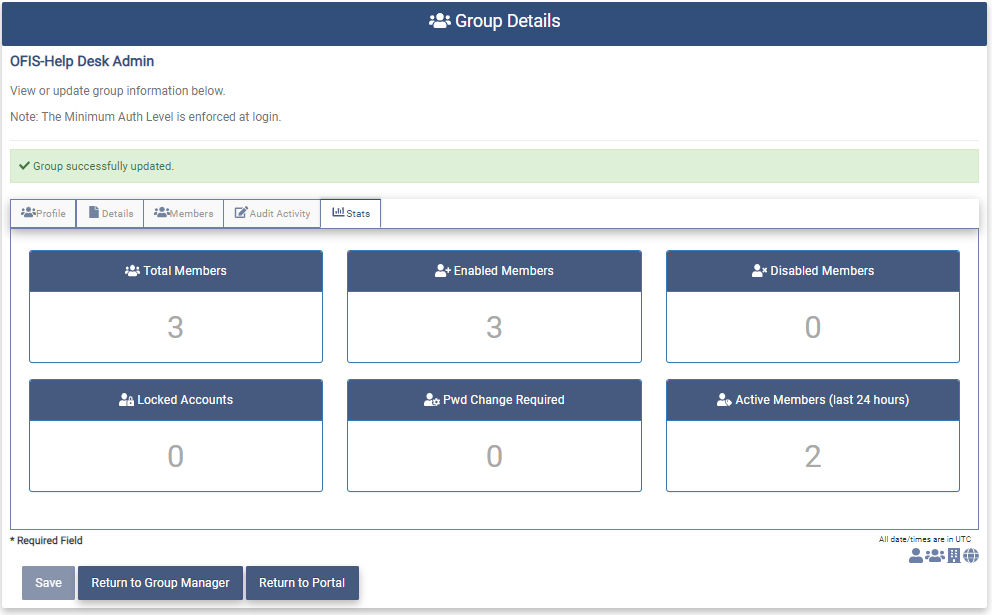
The Stats page contains the following statistics:
- Total Members - Total number of members in the group.
- Enabled Members - Total number of group members that have Enabled accounts.
- Disabled Members - Total number of group members that have Disabled accounts.
- Locked Accounts - Total number of group members that have Locked accounts.
- Pwd Change Required - Total number of group members that are required to change their password.
- Active Members - Total number of group members that have logged in within the last 24 hours.
Remove Group (Tenant Admin Only)
The Tenant Admin may remove any group in the Tenant that is not a group with type System Security Group.
To remove a group go to the Group Manager Page.
Click the Action button associated with the group to be removed. The message shown below will be presented along with the Profile of the group to be removed.

Type "YES" in the box and click on the button. Upon successful removal of the group the following message will be presented.

The group will no longer appear as an entry on the Group Manager page.
Any users that were members of the removed group will have their membership to that group removed. The user accounts will not be removed.
Dynamic Group Manager
The Dynamic Group Manager shows what dynamic groups have been created for the Tenant.
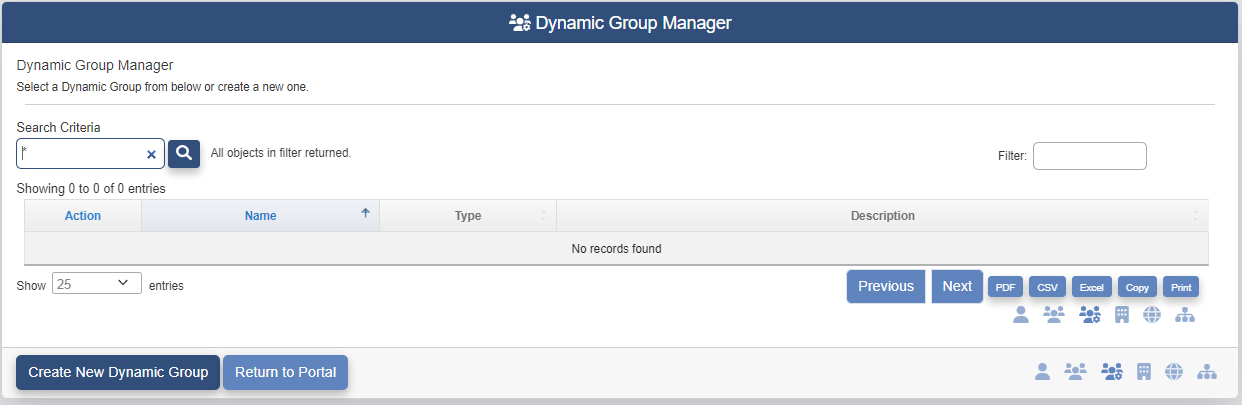
The Dynamic Group Manager page contains the following fields.
-
Action - Clicking on these buttons perform actions on the associated group
(
: Modify or View, : Remove ) -
Name - Name of the dynamic group.
-
Type - Type of
-
Description - Description of the group.
Create Dynamic Group (Tenant Admin Only)
Only Tenant Admins are allowed to create a dynamic group.
To create a dynamic group click on the  button and the Dynamic Group Details page will be presented.
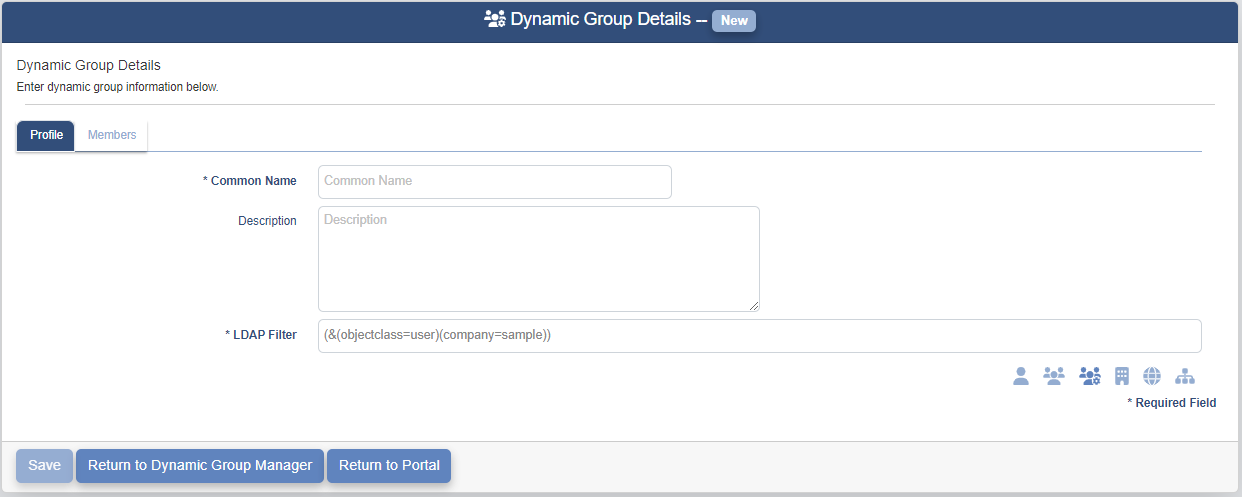
The Profile Tab contains the following fields.
- Common Name - Name of the dynamic group.
- Description - Description of the dynamic group.
- LDAP Filter - The LDAP Filter that will be used to create the dynamic group.
Fill in the fields above and click on the button to save the new group. Upon successful creation of the group, the following message will be presented.
The new group will now appear on the Dynamic Group Manager page.
View Dynamic Group
To view a dynamic group go to the Dynamic Group Manager page and click on the Action button associated with the group to be viewed or modified. The Dynamic Group Details page will be presented.
Remove Dynamic Group (Tenant Admin Only)
Only the Tenant Admin may remove a dynamic group.
To remove a dynamic group click on the Action button associated with the dynamic group to be removed. The message shown below will be presented along with the Profile of the group to be removed.
Type "YES" in the box and click on the button. Upon successful removal of the group the following message will be presented.
The group will no longer appear as an entry on the Group Manager page.
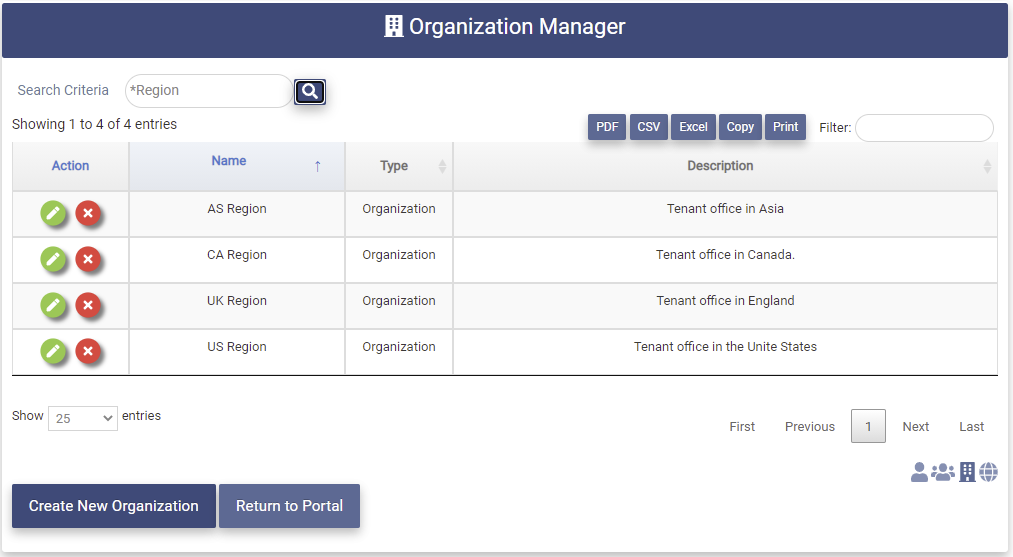
Organization Manager
This section provides the instructions to manage the organizations in the Tenant.
- Tenant Admin - create, modify, remove, add members, remove members, add Org Admins and remove Org Admins from all organizations in the Tenant.
- Org Type Admin - modify, add members, remove members, add Org Admins to and remove Org Admins from the organizations that are in the Org Type the Org Type Admin is administrator of.
- Org Admin - modify, add members, remove members, add Org Admins to and remove Org Admins from the organizations that the Org Admin is administrator of.
Clicking on the Organization Manager application will present the Organization Manager page.
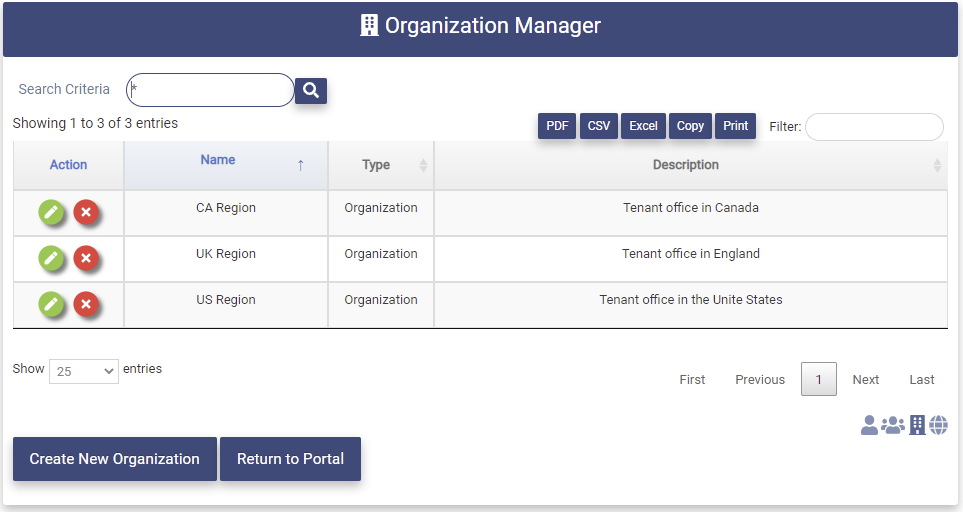
The Organization Manager page contains the following fields for each organization in the Tenant:
-
Action - Clicking on these buttons perform actions on the associated organization
(
: Modify or View, : Remove ) -
Name - Name of the organization
-
Type - Type of the organization
-
Description - Description of the organization
Search Organizations
The data displayed on the Organization Manager page can be limited to a specified set of organizations by using the Search Criteria and Filter fields. For a description of how these fields function please see the Top of the Page Fields and Buttons section above.
Create Organization (Tenant Admin only)
The Tenant Admin has the capability to create a new organization.
View the video below or follow the instructions to create a new organization.
Clicking on the  button will present the Organization Details page.
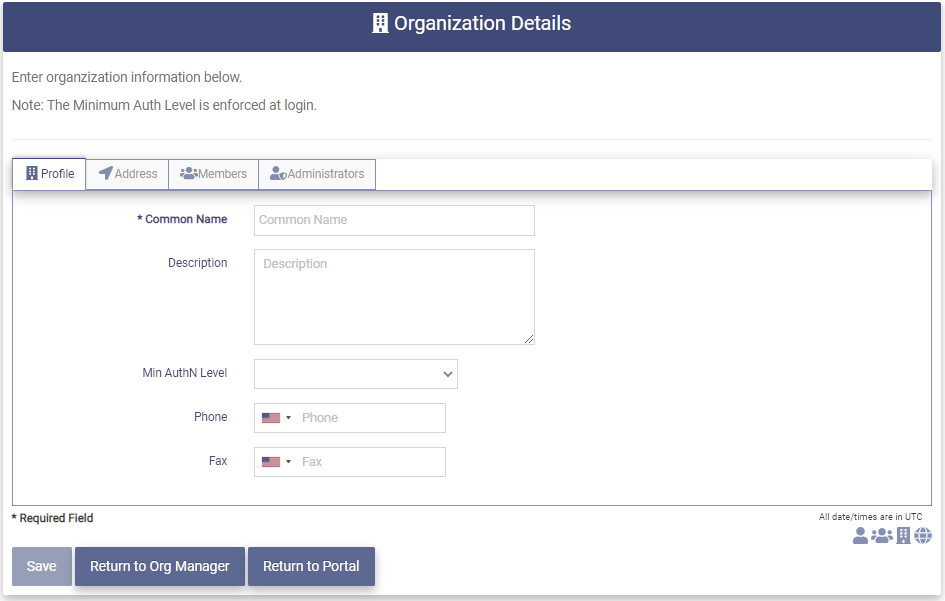
Profile
The Profile tab on the Organization Details page contains the following fields;
-
Common Name - The name of the organization used for display.
-
Description - The Description of the organization.
-
Min AuthN Level - The minimum authentication level at login required for users in this organization.
The dropdown contains the following choices:
- SOCIAL - users in the organization will be required to authenticate at least using their Social Media account
- PWD - users in the organization will be required to authenticate at least using their username and password credentials.
- CERT - users in the organization will be required to authenticate at least using a client certificate.
- MFA - users in this organization will be required to authenticate first using their credentials and then an MFA option.
- Phone - The phone number for the organization. Use the dropdown to indicate Country Code.
- Fax - The Fax number for the organization. User the dropdown to indicate the Country Code.
Fill in the fields on the page. The fields preceded by an "*" are required.
Members and Org Admins may be added to the organization during the creation process. Please see the sections below for instructions on performing those operations.
Once all information has been added for the organization click the button. Upon successful completion of the organization creation the following message will be presented.

The organization will now be displayed on the Organization Manager page.
Address
The address of the organization may be entered on the Address tab. This information is optional.

Add Members
Members can be added to the organization during the creation process. Clicking on the Members Tab will present the page below.
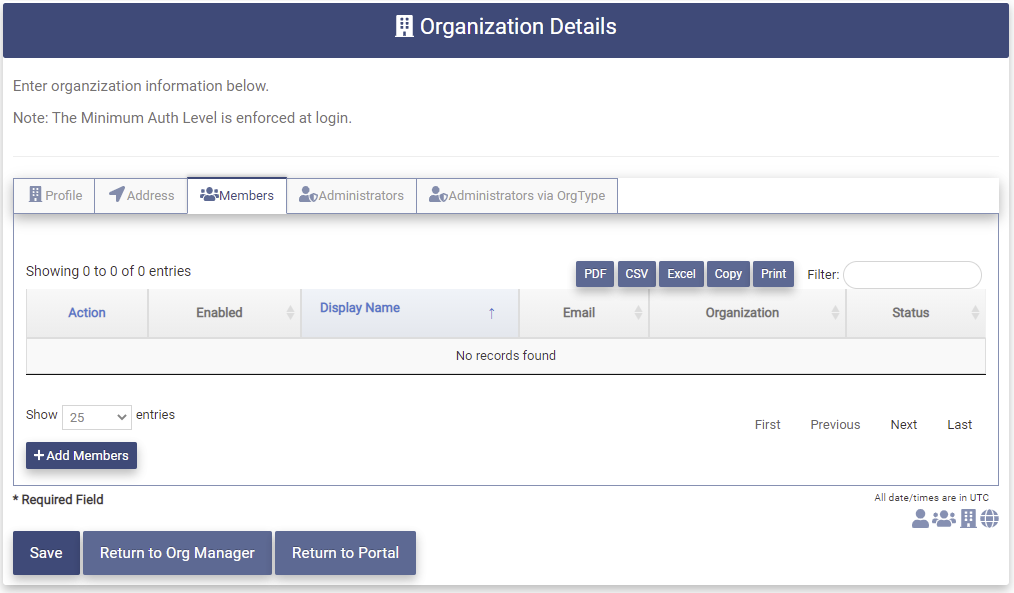
Click on the button to present the User Search page.
The User Search page will display all users in the Tenant. The entries have been limited here due to space limits.
Click on the Action box for one or more users as shown below.
Click the button to add the users as members of the organization. The Members Tab will now display the members that have been selected. They are shown as "Pending add" until the organization has been saved.

If a user has been selected incorrectly, click on the Action button associated with that user. That user will be removed from the Members tab and will not be added to the organization when the organization is saved.
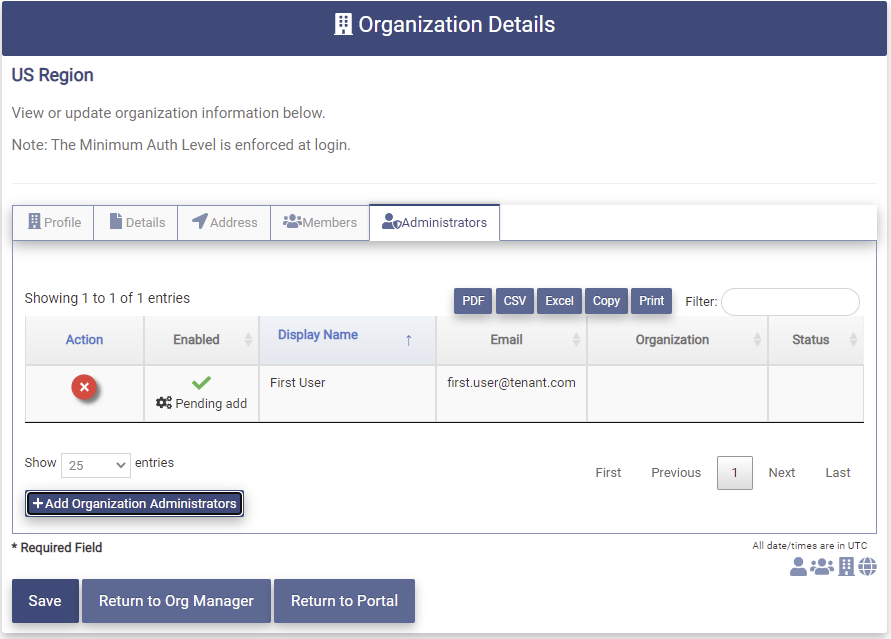
Add Administrators
Org Admins can be added to the organization during the creation process. Clicking on the Administrators Tab will present the page below. 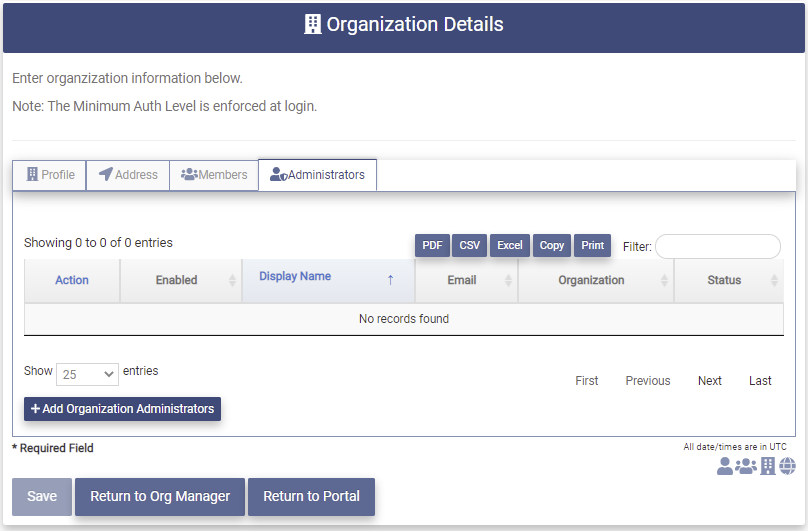
Click on the  button to present the User Search page.
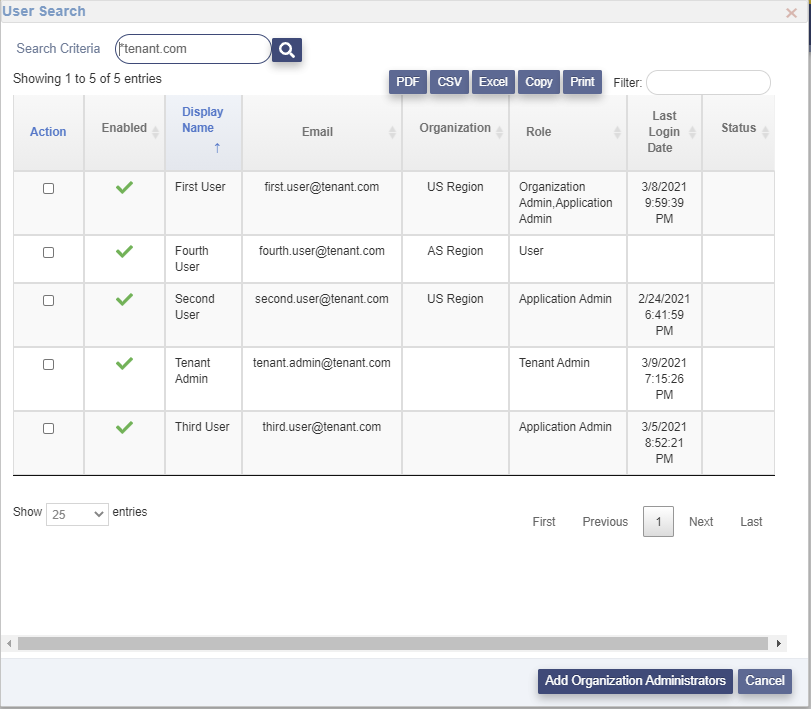
The User Search page will display all users in the Tenant. The entries have been limited here due to space limits.
Click on the Action box for one or more users as shown below.

Click on the  button to add the user as an Org Admin of the organization. The Administrators Tab will now display the Org Admins that has been selected. They are shown as "Pending add" until the organization has been saved.
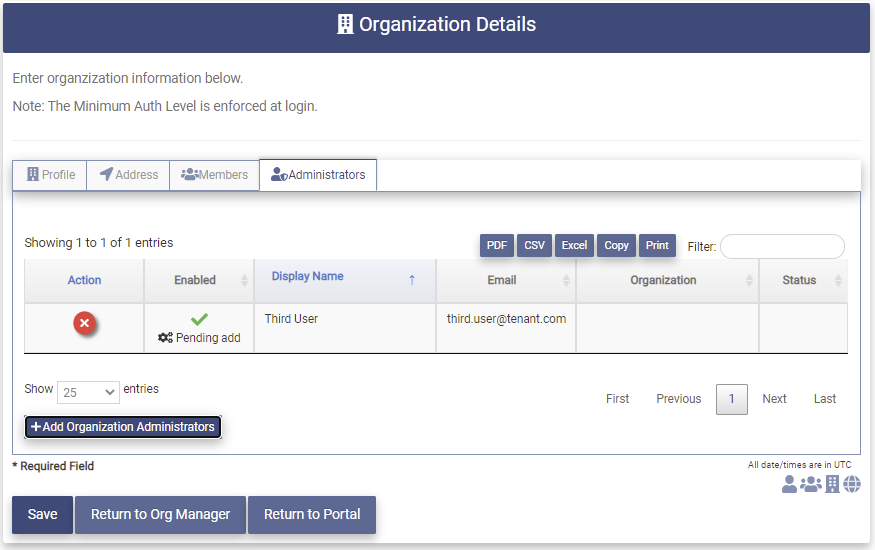
If a user has been selected incorrectly, click on the Remove Action button associated with that user. That user will be removed from the Administrators tab and will not be added as an Org Admin when the organization is saved.
View and Modify Organization
The Tenant Admin has the capability to view and modify all organizations in the Tenant.
Org Admins have the capability to view and modify all organizations that they are the administrator for.
Org Type Admins - modify the organizations that are in the Org Type the Org Type Admin is administrator of.
Clicking on the Organization Manager application will present the page below.
To view or modify an organization click on the button associated with the organization.

The Organization Details page for that organization will be presented. 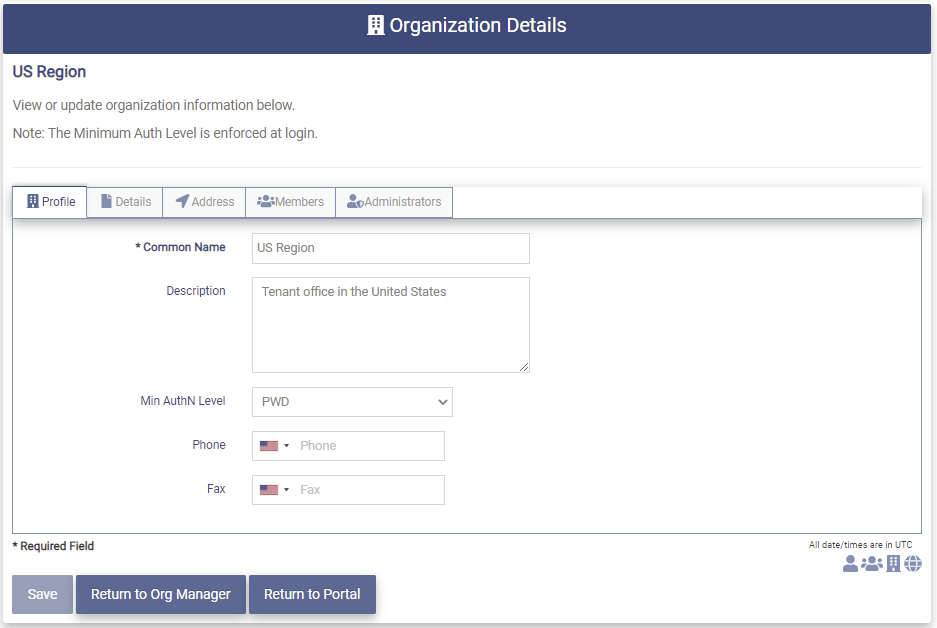
Profile
The Profile tab contains the profile fields for the organization that were filled in during the creation of this organization.
All of the fields are available to be modified.
-
Common Name - The name of the organization used for display.
-
Description - The Description of the organization.
-
Min AuthN Level - The minimum authentication level at login required for users in this organization.
The dropdown contains the following choices:
- SOCIAL - users in the organization will be required to authenticate at least using their Social Media account
- PWD - users in the organization will be required to authenticate at least using their username and password credentials.
- CERT - users in the organization will be required to authenticate at least using a client certificate.
- MFA - users in this organization will be required to authenticate first using their credentials and then an MFA option.
- Phone - The phone number for the organization. Use the dropdown to indicate Country Code.
- Fax - The Fax number for the organization. User the dropdown to indicate the Country Code.
Once a field has been modified the button will become available.
Members and Administrators may be added or removed from the selected organization. To implement that functionality please see the Add Members, Remove Members, Add Administrators and Remove Administrators sections below.
Once all modifications have been completed, click on the button to save any changes. Upon successful completion of the modification the following message will be presented.

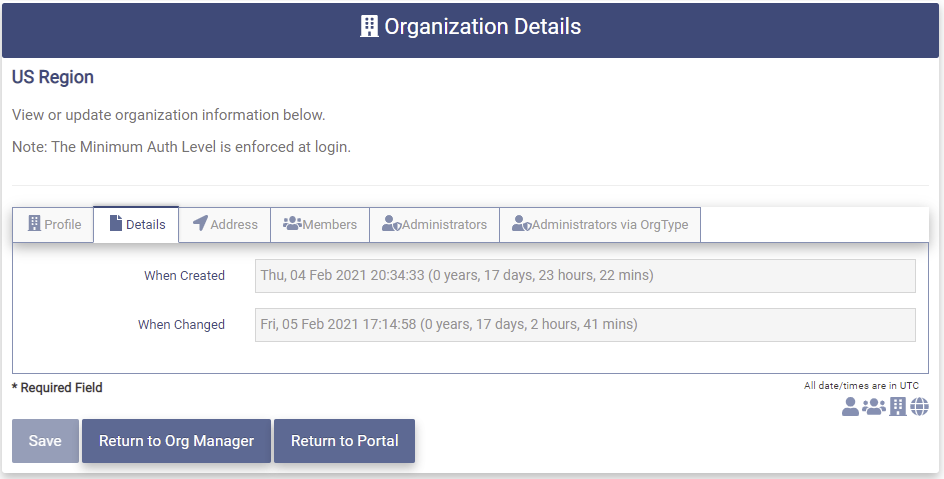
Details
The Details tab contains the following fields:
- When Created - The date and time the organization was created.
- When Changed - The date and time the organization was last modified.
The fields on this tab are display only.
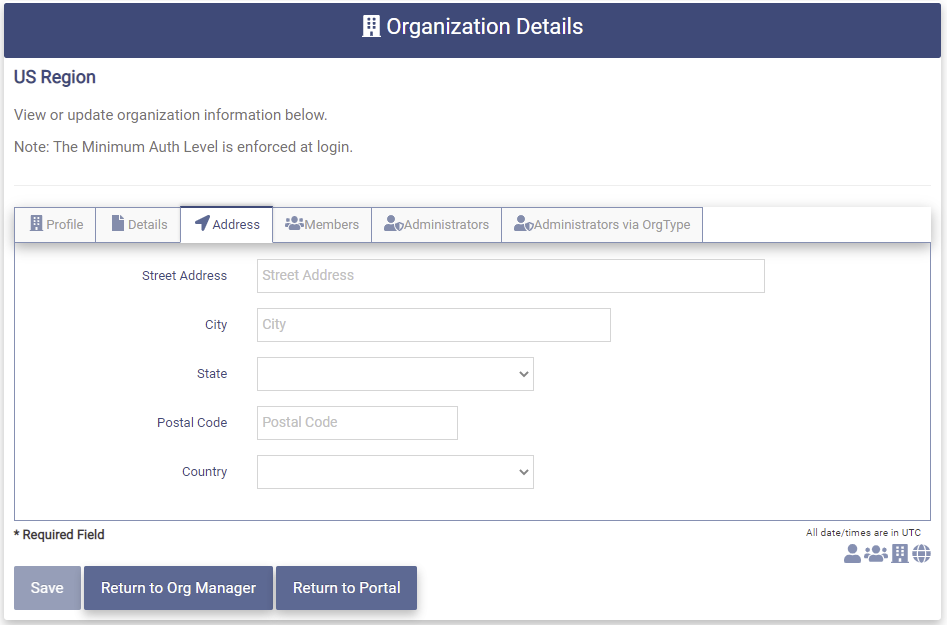
Address
The address tab contains the address of the organization. These fields are optional and may have been entered during the creation of this organization. All of these fields are available to be modified.
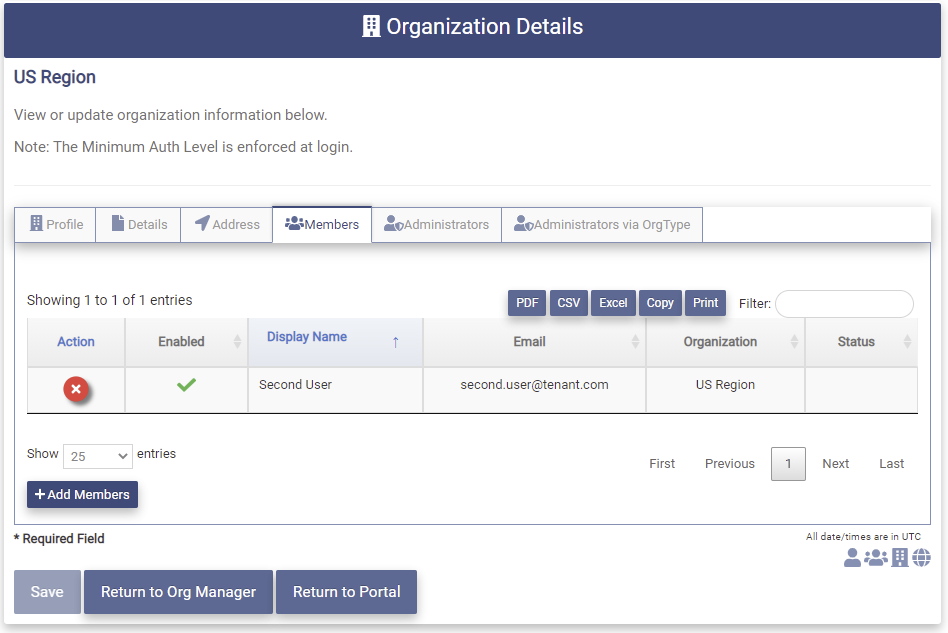
Add Members
The following functionality is supported for each administrator.
- Tenant Admin may add any user as members to all organizations in the Tenant.
- Org Type Admin may add any user as members to the organizations that are in the Org Type the Org Type Admin is administrator of.
- Org Admin may add any user as members to the organizations that the Org Admin is administrator of.
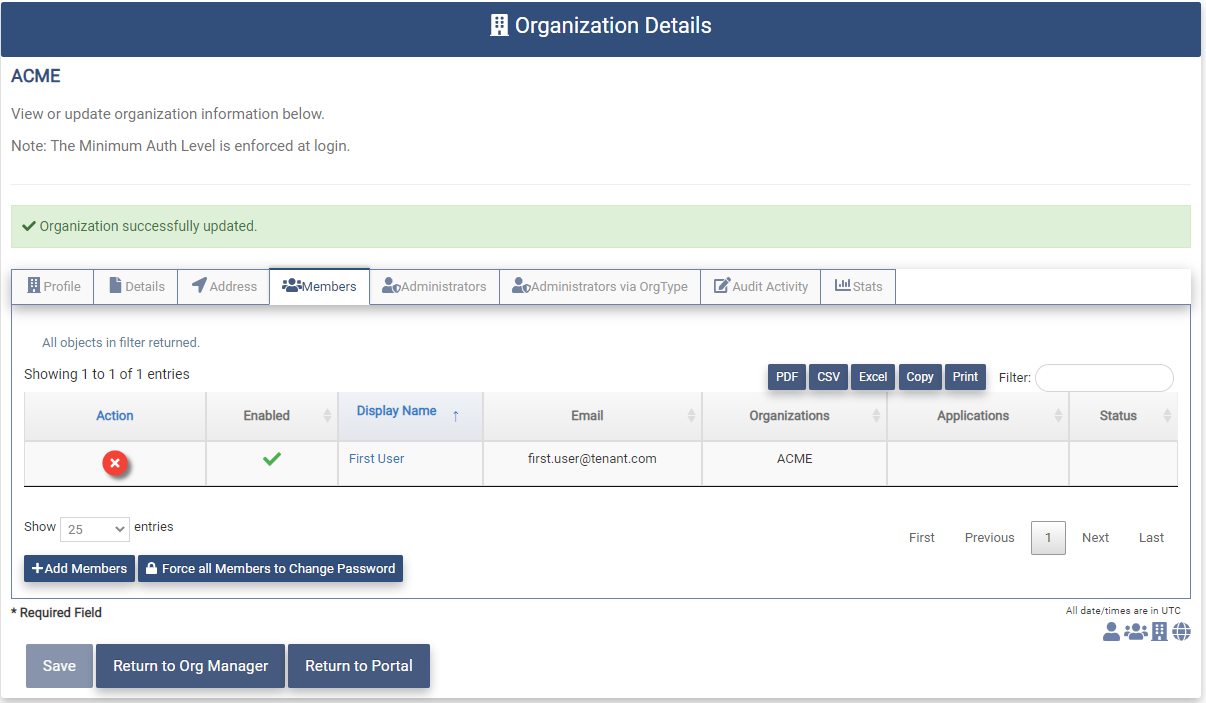
To add members to the organization click on the Members Tab and the list of members will be presented. The page shows that this organization already has one member.
Click on the button to present the User Search page.
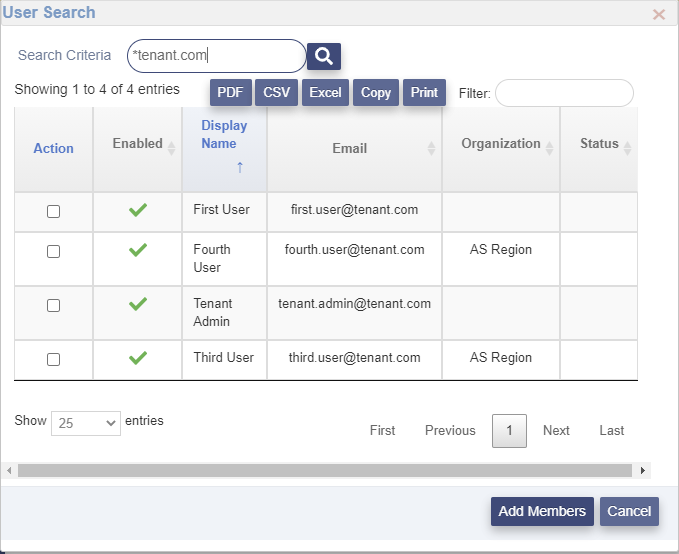
The User Search page will display all users in the Tenant. The entries have been limited here due to space limits.
Click on the Action box for one or more users as shown below.

Click the button to add the user as a member of the organization. The Members Tab will now display the members that have been selected. They are shown as "Pending add" until the organization has been saved.
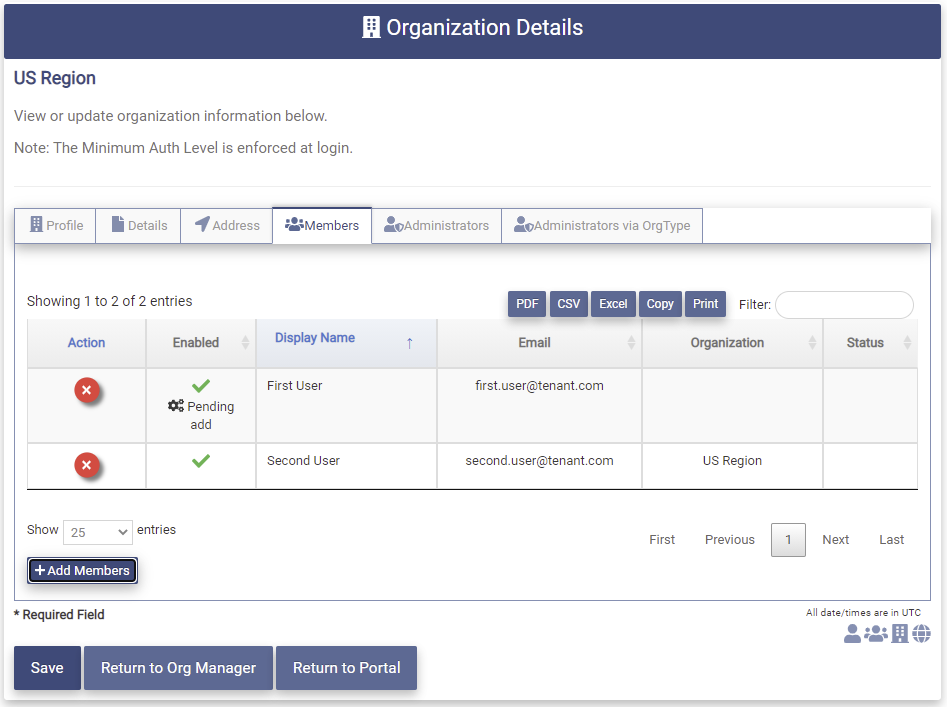
If a user has been selected incorrectly, click on the Remove Action button associated with that user. That user will be removed from the Members tab and will not be added to the organization when the organization is saved
Click the button to save any changes. Upon successful completion of the modification the following message will be presented.
Remove Members
The following functionality is supported for each administrator.
- Tenant Admin may remove members from all organizations in the Tenant.
- Org Type Admin may remove members from the organizations that are in the Org Type the Org Type Admin is administrator of.
- Org Admin may remove members from the organizations that the Org Admin is administrator of.
To remove members from the organization click on the Members Tab and the list of members will be presented.
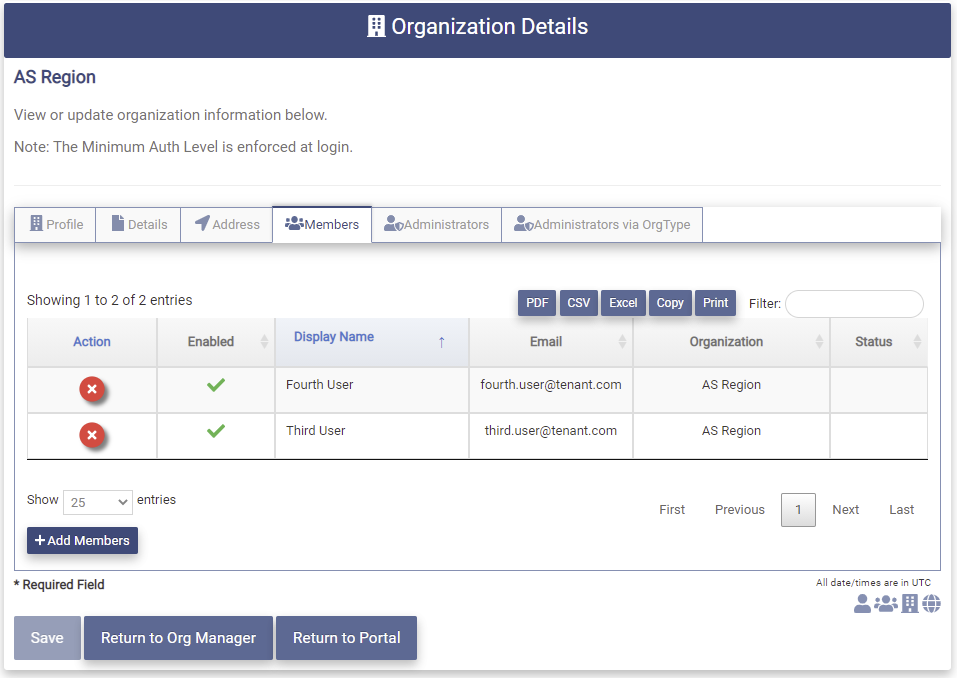
Click on the Action button associated with the member to be removed. The user will now be shown on the Members tab as "Pending Removal" until the organization is saved.

Click on the button to save any changes. Upon successful completion of the modification the following message will be presented.
The user will no longer be displayed on the Members tab.
Force Member Password Change
The on the Members tab allows the Tenant Admin to force all members of the associated organization to change their password the next time they attempt to Login.
Org Admins may perform this function for members of the organization they are admin of.
Add Administrators
The following functionality is supported for each administrator.
- Tenant Admin may add any user as Org Admins to all organizations in the Tenant.
- Org Type Admin may add users in the organizations in the Org Type that the Org Admin is administrator of as Org Admins of the organizations that are in the Org Type the Org Type Admin is administrator of.
- Org Admin may add users in the organizations that the Org Admin is administrator of as Org Admins of the organizations that the Org Admin is administrator of.
To add Org Admins to an organization click on the Administrators Tab and the list of Org Admins will be presented. The page shows that this organization does not have any Org Admins.
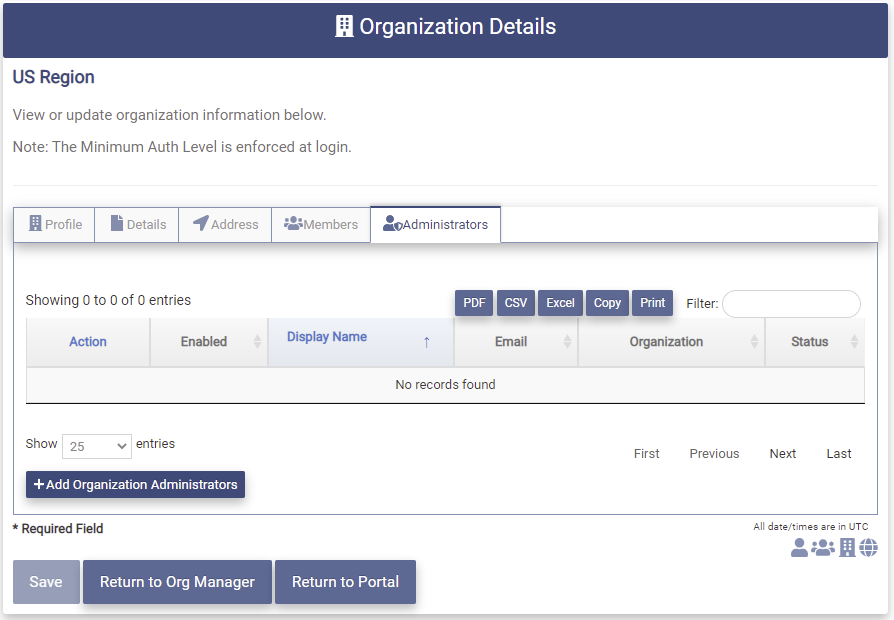
Click on the button to present the User Search page.
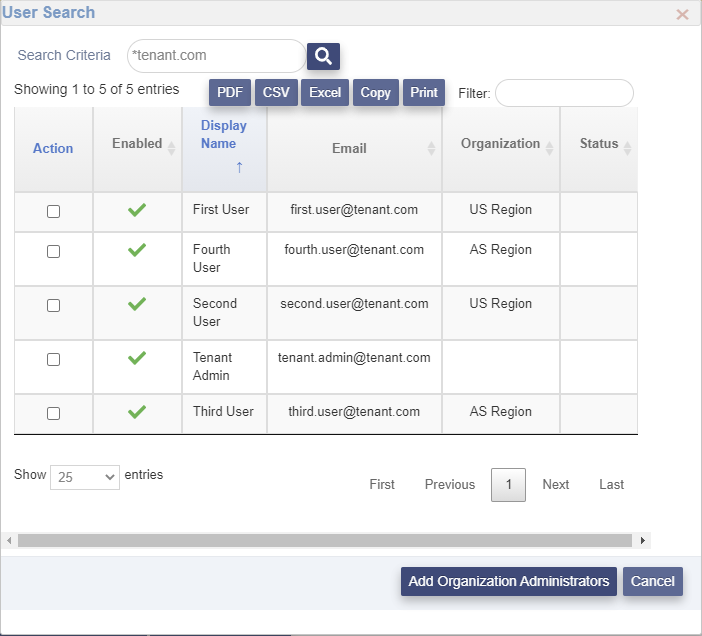
The User Search page will display all users in the Tenant. The entries have been limited here due to space limits.
Click on the Action box for one or more users as shown below.
Click the button to add the user as an Org Admin of the organization. The Administrators Tab will now display the Org Admin that has been selected. They are shown as "Pending add" until the organization has been saved.
If a user has been selected incorrectly, click on the Action button associated with that user. That user will be removed from the Administrators tab and will not be added as an Org Admin when the organization is saved.
Click on the button to save any changes. Upon successful completion of the modification the following message will be presented.
Remove Administrators
The following functionality is supported for each administrator.
- Tenant Admin may remove Org Admins from all organizations in the Tenant.
- Org Type Admin may remove Org Admins from the organizations that are in the Org Type the Org Type Admin is administrator of.
- Org Admin may remove Org Admins from the organizations that the Org Admin is administrator of.
To remove an Org Admin click on the Administrators tab and a list of the Org Admins for this organization will be presented.
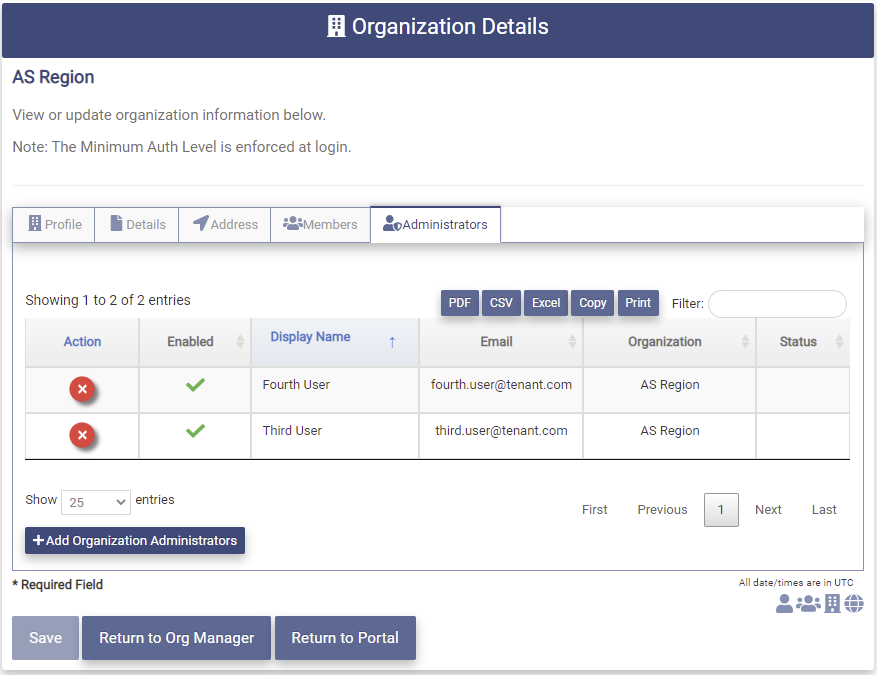
Click on the Action button associated with the Org Admin to be removed.

The Org Admin will now be shown on the Administrators tab as "Pending Removal" until the organization is saved.

Click on the button to save any changes. Upon successful completion of the modification the organization successfully updated message will be presented and the Org Admin will no longer be displayed on the Administrators tab.
Agentless Desktop SSO
The Agentless Desktop SSO tab allows the Tenant Admin to configure Agentless Desktop SSO for an Organization. If Agentless Desktop SSO has been enabled for the Tenant it may also be enabled for a specific organization. See the Agentless Desktop SSO section for more information.
Clicking on the Agentless Desktop SSO tab will present the following page.
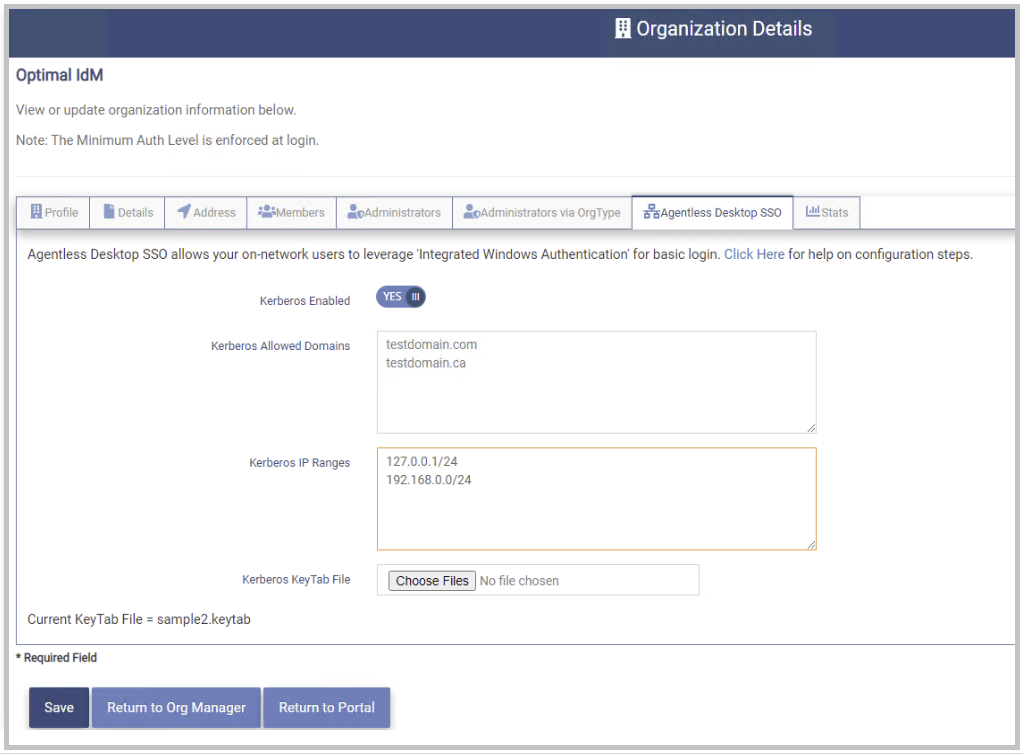
Set the following fields.
- Kerberos Enabled - Set this field to “YES” to enable Agentless Desktop SSO for this organization.
- Allowed Kerberos Domains - the list of domains in the organization's local AD Forest that the OptimalCloud will accept Kerberos Tickets from (separated by a carriage return). (ex. contoso.com)
- Internal IP Ranges (CIDR) - the OptimalCloud will perform IWA for users in this list of CIDR IP Ranges. (ex. 192.168.0.1/24)
The list of Domains and IP Ranges set for this organization MUST NOT be the same as those set for the Tenant or any other organization
Click the  button and select the TheOptimalCloud.keytab file generated from the Generate a KeyTab File section above.
Click the button to save the changes. Upon successful completion of the modification the organization successfully updated message will be presented.
Audit Activity
The Audit Activity tab shows the changes that have been made to the Organization.
Clicking on the Audit Activity tab will present the following page.
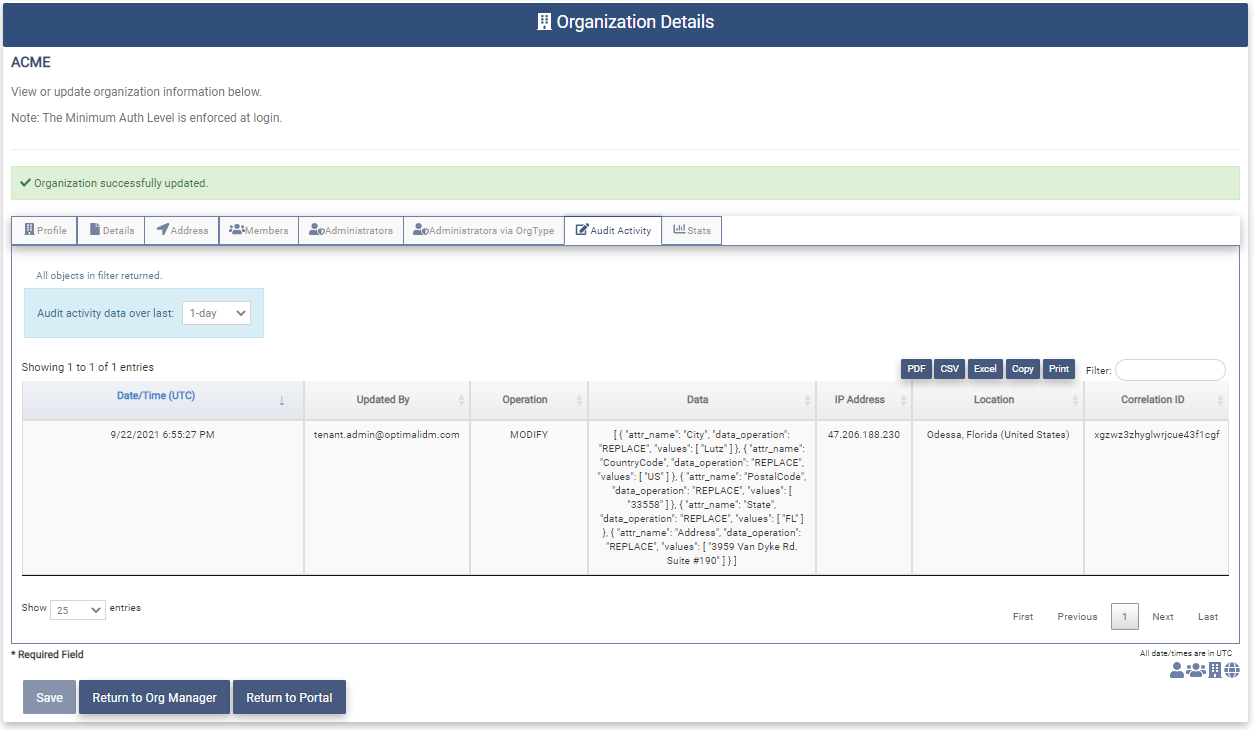
The Audit Activity page contains the following fields.
- Date/Time(UTC) - The Date and Time in UTC time that the organization was changed.
- Updated By - The user that updated the organization.
- Operation - The type of change made to the organization (ADD, DELETE, MODIFY)
- Data - The data that was added, modified or deleted.
- IP Address - The IP Address of the user making the change.
- Location - The location of the user making the change.
- Correlation ID - Unique ID used by the OptimalCloud to correlate events.
The Audit Activity Page contains the following controls.
- Audit Activity data over last Dropdown - The data on the page will be shown according to the timeframe selected in the dropdown.
-
Export Buttons - The Export buttons allow the data on the page to be exported. For a full description of how each button works please see the Bottom of Page Fields and Buttons section.
-
Filter - This field allows the results of the search to be further limited by the patten entered.
Stats
The Stats tab shows the members statistics for the organization.
Clicking on the Stats tab will present the following page.
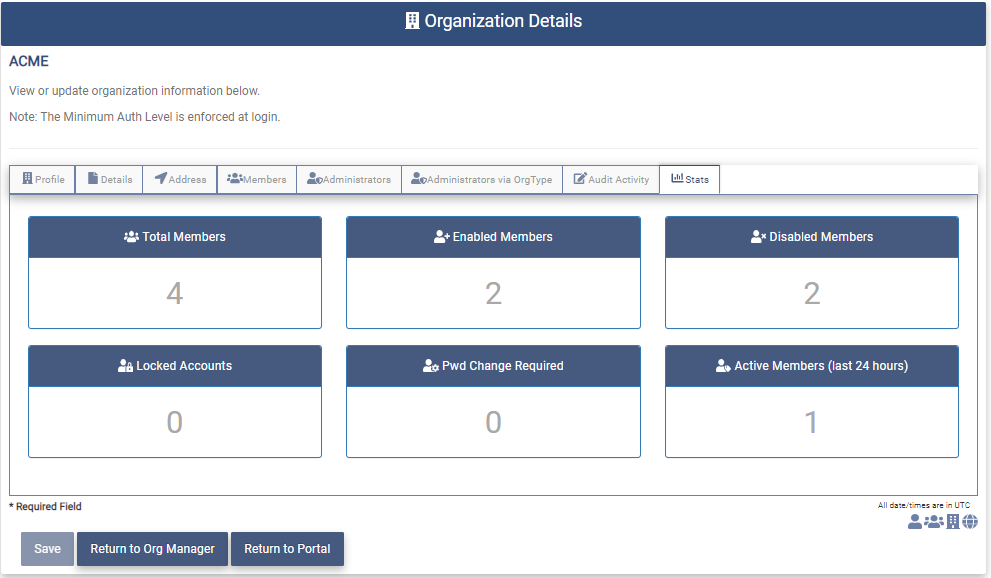
The Stats page contains the following statistics:
- Total Members - Total number of members in the organization.
- Enabled Members - Total number of organization members that have Enabled accounts.
- Disabled Members - Total number of organization members that have Disabled accounts.
- Locked Accounts - Total number of organization members that have Locked accounts.
- Pwd Change Required - Total number of organization members that are required to change their password.
- Active Members - Total number of organization members that have logged in within the last 24 hours.
Remove Organization (Tenant Admin Only)
The Tenant Admin may remove any organization in the Tenant.
To remove an organization navigate to the Organization Manager page.
Click on the Action button associated with the organization to be removed. The message shown below will be presented along with the Profile of the organization to be removed.

Type "YES" in the box and click on the button. Upon successful removal of the organization the following message will be presented.
The removed organization will no longer appear as an entry on the Organization Manager page.
Any users that were members of the removed organization will have their membership to that organization removed. The user accounts will not be removed.
Application Manager
This section provides instructions to manage the applications in the Tenant
The following functionality is supported for each administrator.
- Tenant Admin - create, modify, remove, add members, remove members, add App Admins to and remove App Admins to all applications in the Tenant.
- App Admin - modify the profile and presentation, add members, remove members, add App Admins to and remove App Admins from the applications that they are an administrator for.
- Org Type Admin - add and remove members from the applications the Org Type Admin has.
- Org Admin - add and remove members from applications the Org Admin has.
Clicking on the Application Manager application will present the Application Manager page.
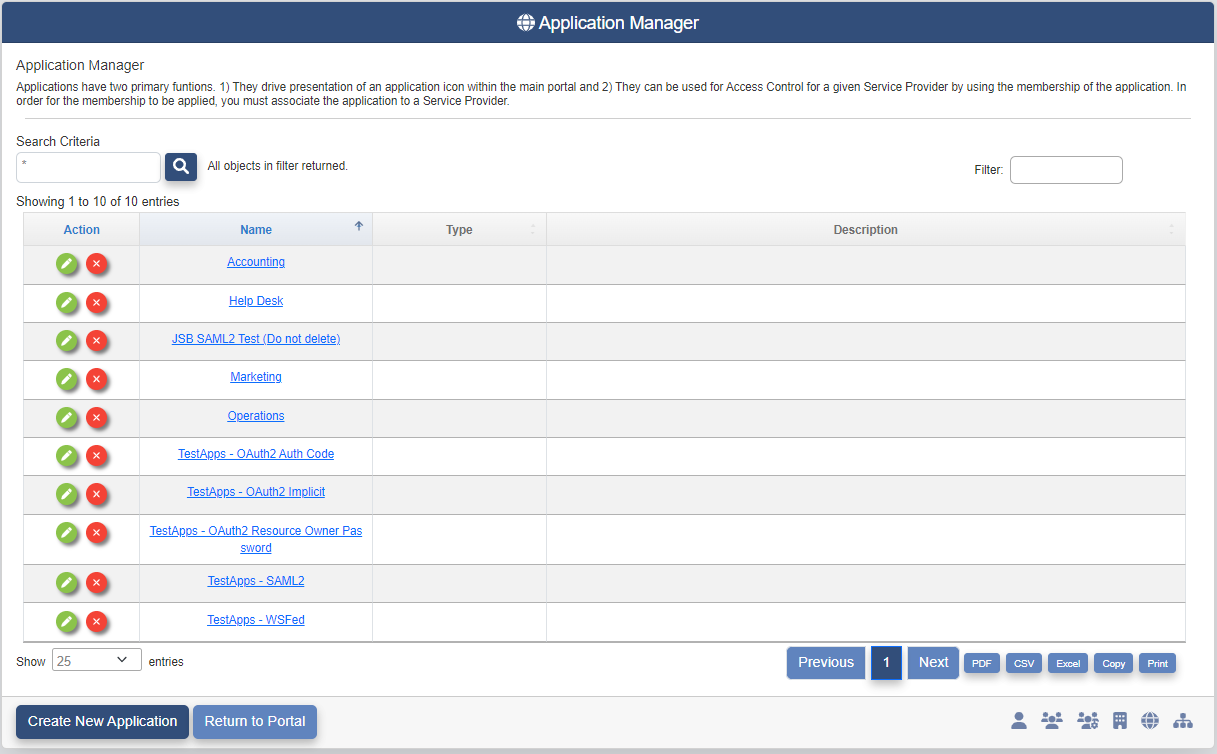
The Application Manager page contains the following fields for each application in the Tenant:
-
Action - Clicking on these buttons performs actions on the associated organization
(
: Modify or View, : Remove ) -
Name - Name of the application
-
Type - Type of the application
-
Description - Description of the application.
Search Applications
The data displayed on the Application Manager page can be limited to a specified set of applications by using the Search Criteria and Filter fields. For a description of how these fields function please see the Top of the Page Fields and Buttons section above.
Create Application (Tenant Admin only)
The Tenant Admin has the capability to create a new application.
When creating a new application you may configure the presentation and add members. You may also configure the application for Federation if needed.
View the video below or continue with the following instructions.
Clicking on the 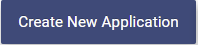 button will present the New Application Wizard.
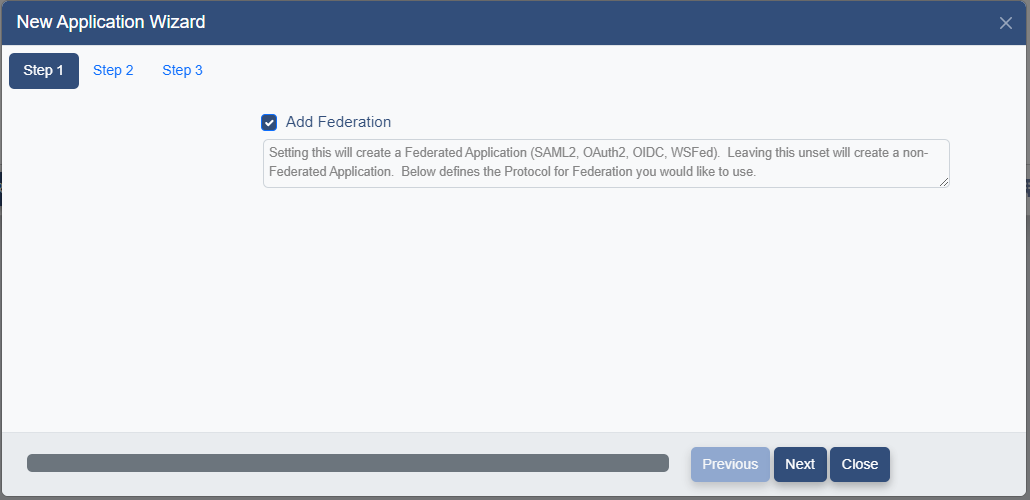
Checking the Add Federation will allow you to configure the Federation settings during this process. Leaving the box unchecked will create the application without Federation. Federation may be added to the application at a later time.
Make your Federation decision and click the  button.
If you have chosen to add Federation to this application continue to the Federation Configuration section. If you have not chosen to add Federation continue to the Profile section.
Federation Configuration
If you have chosen to add Federation, the Entry Type page will be presented. This page allows you to select the method to be used to configure the application Federation.

Fill in the fields below and select the configuration entry method for this Federated Application.
- Application Name - Name of the application.
- Application Contact - Name of the person to be contacted about this application.
The following entry options are available:
- Manual Entry - Fill in the all data fields manually.
- Create from Metadata URL - Specify a link to Metadata containing the Federation configuration.
- Create from Metadata XML File - Specify a local Metadata file containing the Federation configuration
- Create from Template - Choose from templates containing the Federation configuration data for common Applications.
Select the method you would like to use and click the button.
Continue to section on the method you have chosen.
Template
When the Create from Template selection is made the Templates page will be presented.
If you do not see the application you are looking for scroll down or use the Search Templates field to locate the application.
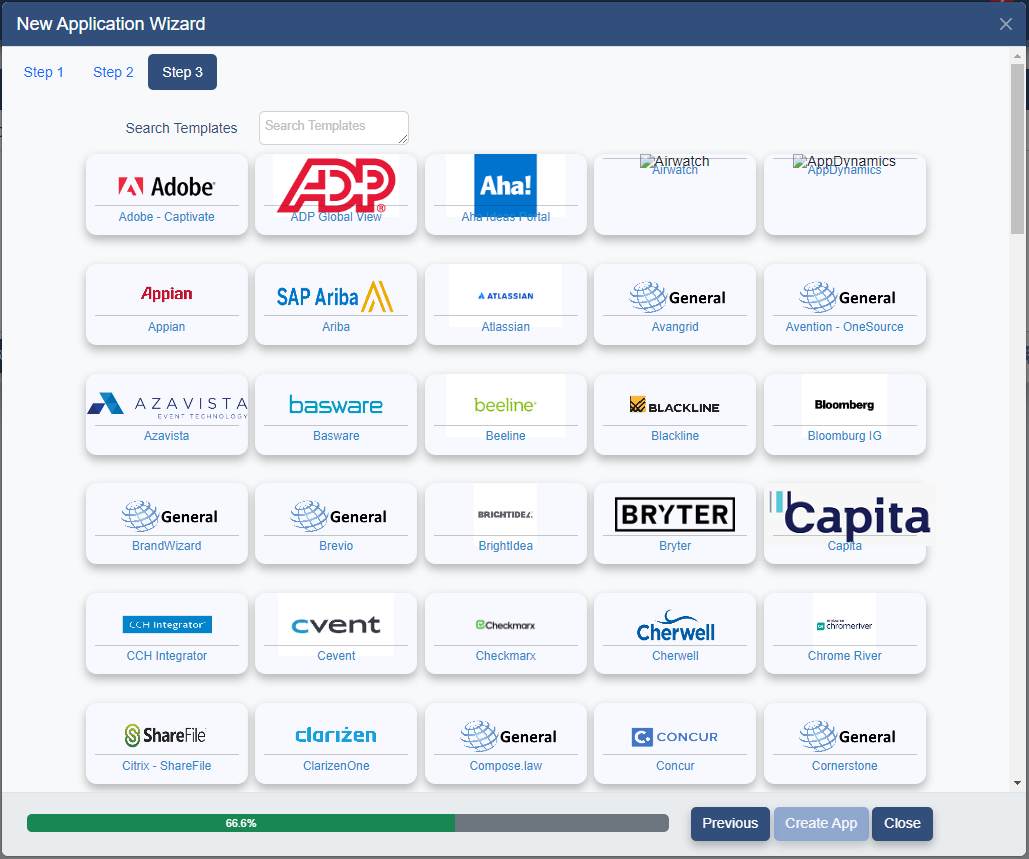
Click on the template needed and the following page will be presented.
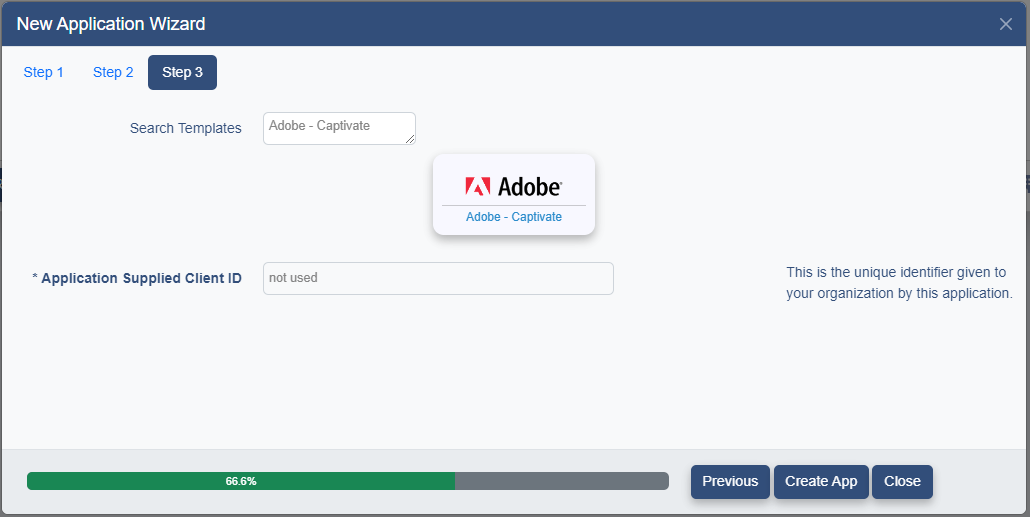
The template chosen will be displayed.
Some application templates require the entry of an Application Client ID string which should be supplied by the Application. The template above does not require that information so the field shows "not used".
This string will be added into the URN/Identifier and Endpoints of the Federation Configuration for this application.
Click the  button.
If the Federation URN specified is not unique the following error message will be presented.

Otherwise the Application Details Profile page will be presented. Continue to the Profile section.
Manual
When the Manual create option is selected the Details page will be presented to allow you to select the protocol. For this example the SAML2 protocol will be selected.
For instructions on how to create the Federation configuration with other protocols see the Create a Service Provider documentation.
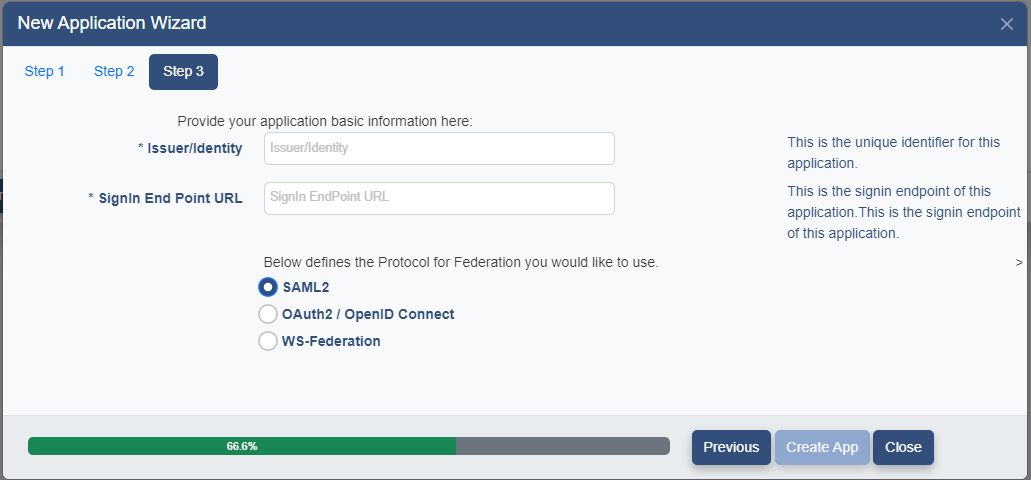
Enter the following fields:
- URN/Identifier - The unique Federation identifier for this application.
- Signin Endpoint URL - The Federation Signin Endpoint for this application
Select the Protocol to be used to create the Federation for this application and click the button.
If the Federation URN specified is not unique the following error message will be presented.
Otherwise the Application Details Profile page will be presented. Continue to the Profile section.
Metadata URL
When the create from Metadata URL option is selected the Metadata URL entry field is presented.
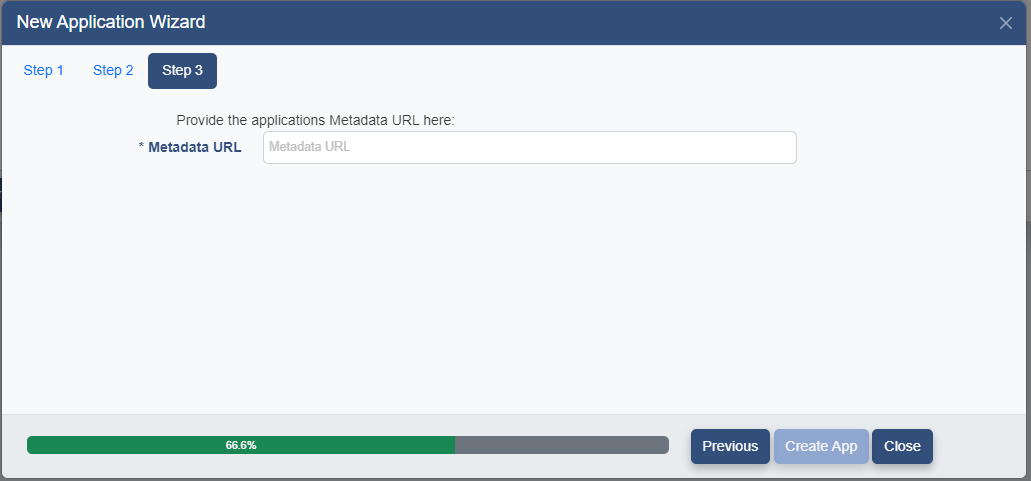
Enter the Metadata URL for this application and click the button.
If the Federation URN specified in the Metadata is not unique the following error message will be presented.
Otherwise the Application Details Profile page will be presented. Continue to the Profile section.
Metadata XML File
When the Create from Metadata XML File is selected, the metadata XML File entry field is presented.

Enter the full path to the file or use the button to browse and select the file.
Then click the button.
If the Federation URN specified in the Metadata is not unique the following error message will be presented.
Otherwise the Application Details Profile page will be presented. Continue to the Profile section.
Profile
If the Add Federation toggle was set to NO the Application Details page will be presented.

The Profile tab on the Application Details page contains the following fields;
-
Application Name - The name of the application used for display.
-
Description - The Description of the application.
-
Min AuthN Level - The minimum authentication level required for users when logging in to this application.
The dropdown contains the following choices:
- SOCIAL - users in the application will be required to authenticate at least using their Social Media account
- PWD - users in the application will be required to authenticate at least using their username and password credentials.
- CERT - users in the application will be required to authenticate at least using a client certificate.
- MFA - users in this application will be required to authenticate first using their credentials and then an MFA option.
Fill in the fields on the page. The fields preceded by an "*" are required.
Continue to the Presentation section to define how the application will be shown in the Portal.
Members and App Admins may be added to the application during the creation process. Please see the sections below for instructions on performing those operations.
Once all information has been added for the application, click on the button. Upon successful completion of the application creation the following message will be presented.

The application will now be displayed on the Application Manager page.
Presentation
The information on the Presentation tab determines whether or not the application is shown on the Portal page and how the application is presented. Clicking on the Presentation tab will present the page below. Applications may be shown for everyone in the Tenant or limited to a specified set of administrators or users.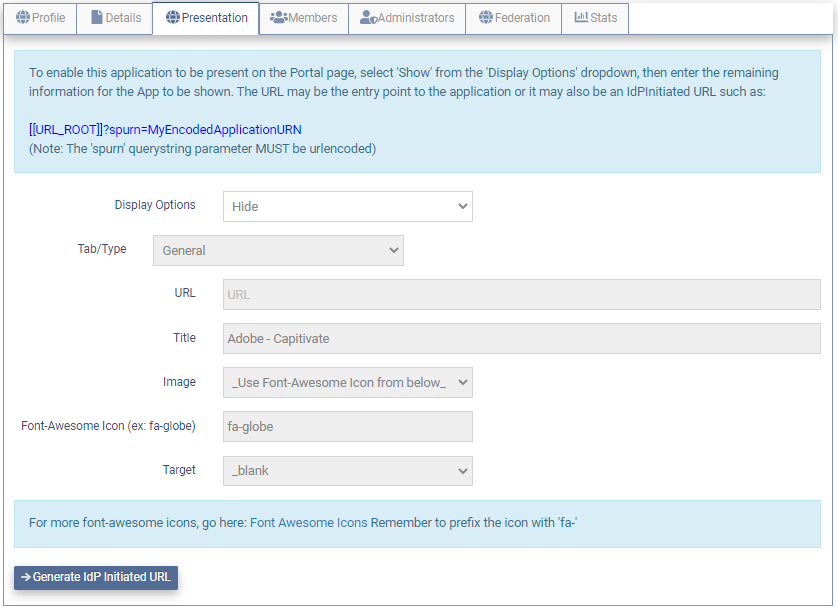
The Presentation tab contains the following fields:
- Display Options - This dropdown controls whether the application is displayed on the Portal page. The available options are:
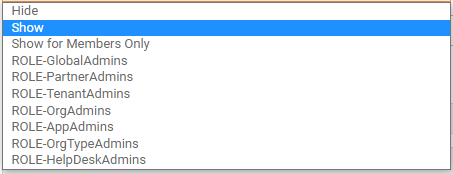
- Hide - Do not show on the Portal Page.
- Show - Show on the Portal Page for all users.
- Show for Members Only - Show on the Portal page only to members of the application.
- ROLE - These options allow for the application to be shown only to administrators that have the specified ROLE.
When the Display Options field is set to Hide no other fields are available. When the Display Options field is set to Show the remaining fields become available.
- Tab/Type - This dropdown determines which tab on the Portal page the application is displayed in.
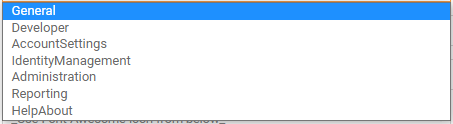
The following options are available:
- General - The application will appear on the General tab. This tab is for all users.
- Developer - The application will appear on the Developers tab. This tab is used by developers.
- AccountSettings - The application will appear on the Account Settings tab. This tab is for all users.
- IdentityManagement - The application will appear on the Identity Management tab. This tab is for administrators.
- Administration - The application will appear on the Administration tab. This tab is for administrators.
- Reporting - The application will appear on the Reporting tab. This tab will be seen by any user in the OFIS - Reporting group.
- HelpAbout - The application will appear on the HelpAbout tab. This tab is for all users.
- URL - The url that the user is directed to when they click on the application. This is a Required field if the Display option is not Hide.
- Title - The text to be displayed on the icon. Only used when Font-Awesome icons are used as the image.
- Image - The image to be displayed in the Portal. The image may be selected from the dropdown of preloaded images or specified using the "Use Font-Awesome Icon from below" option.
- Font-Awesome Icon - Name of a Font Awesome icon to be used as the image for this application if the "Use Font-Awesome Icon from below" option was chosen in the Image field above.
- Target - This field determines how the application is opened in the user's browser.
- Blank - Application is opened in new window or tab.
- Self - Current Frame is redirected to the application.
- Parent - Application is opened in the Parent Frame.
- Top - Redirects the entire Browser to the application.
If a Federated Application has been created and is set up to use IdP Initiated Federation, click on the  button and an IdP Initiated URL will be generated to populate the URL field. For more information on IdP Initiated SSO please see the IdP Initiated SSO Knowledge Based Article.
An example of the Presentation tab filled out is shown below.
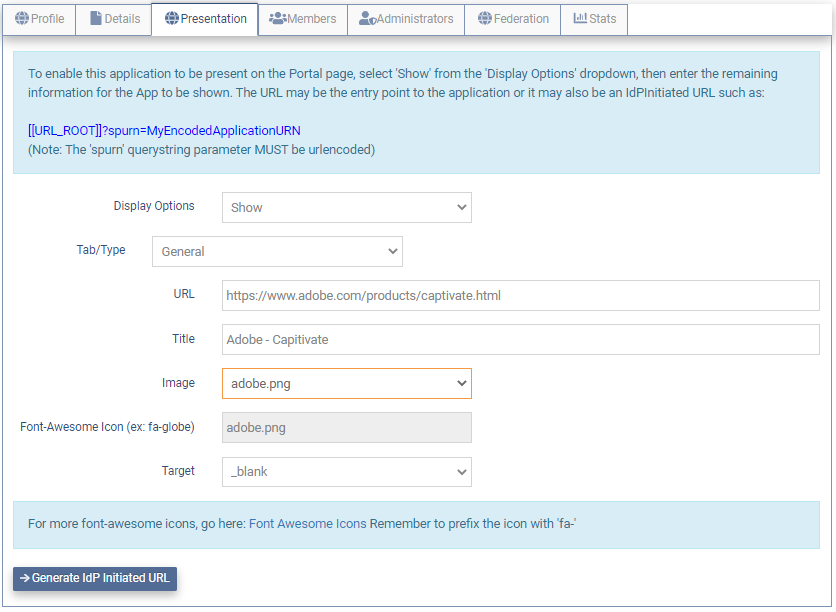
Add Members
Members can be added to the application during the creation process. Clicking on the Members Tab will present the page below.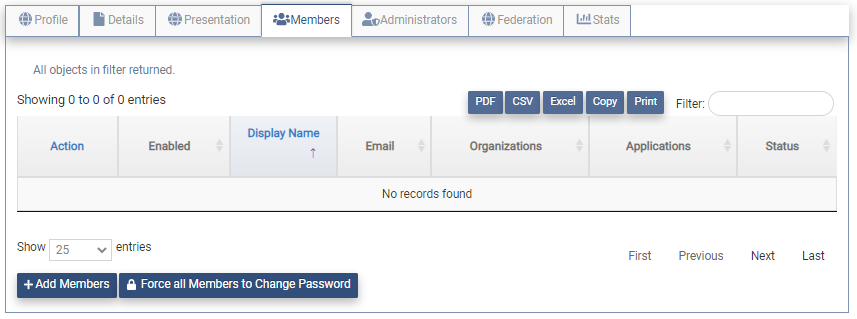
Click on the button to present the User Search page.

The User Search page will display all users in the Tenant. The entries have been limited here due to space limits.
Click on the Action box for one or more users and click on the button to add the users as members of the application. The Members Tab will now display the members that have been selected. They are shown as "Pending add" until the application has been saved.
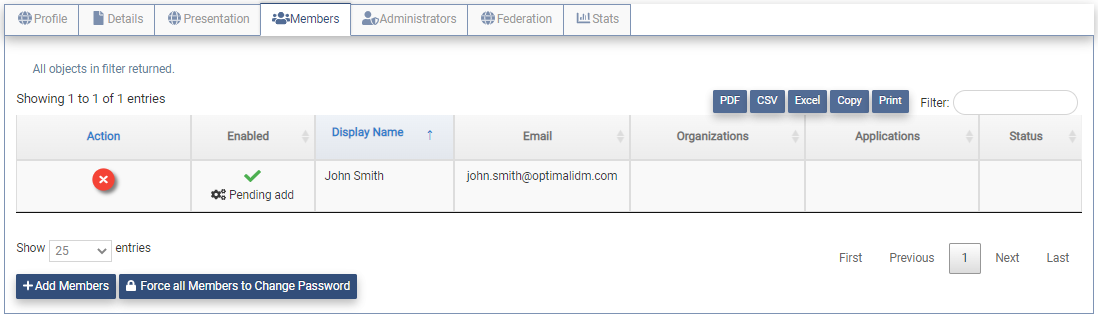
If a user has been selected incorrectly, click on the Action button associated with that user. That user will be removed from the Members tab and will not be added to the application when the application is saved.
Add Administrators
App Admins may be added to the application during the creation process. Clicking on the Administrators Tab will present the page below.
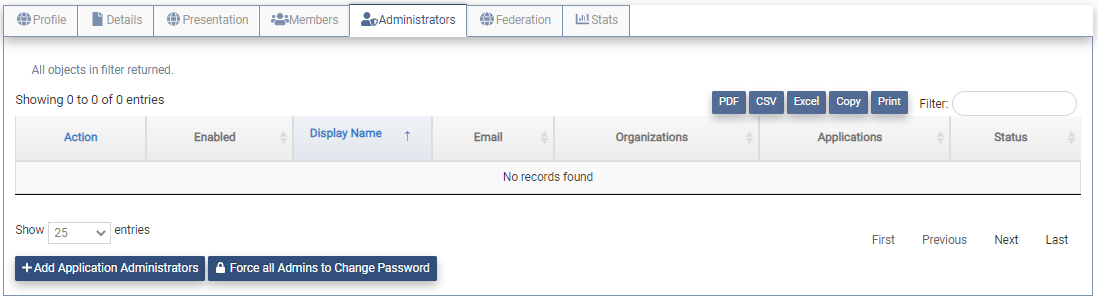
Click on the  button to present the User Search page.

The User Search page will display all users in the Tenant. The entries have been limited here due to space limits.
Click on the Action box for one or more users and click on the button to add the user as an App Admin of the application. The Administrators Tab will now display the App Admin that has been selected. They are shown as "Pending add" until the application has been saved. 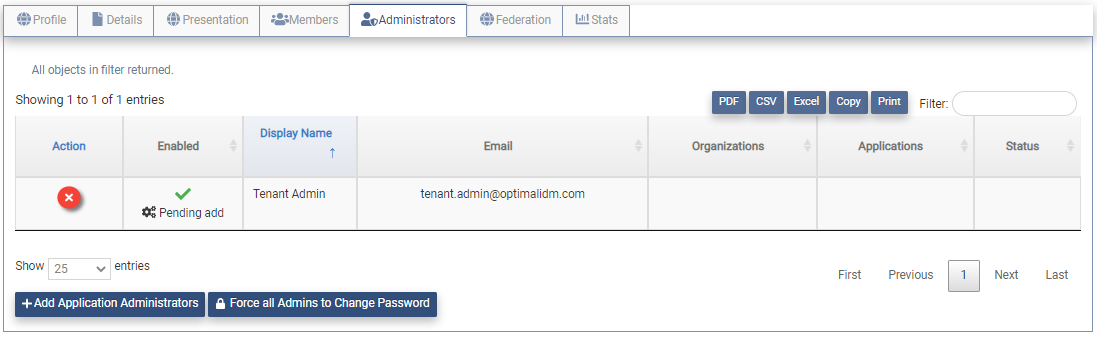
If a user has been selected incorrectly, click on the Remove Action button associated with that user. That user will be removed from the Administrators tab and will not be added as an App Admin when the application is saved.
Federation
No Federation
If the Federation configuration for an application was not added during the creation process the Federation tab will be shown below.
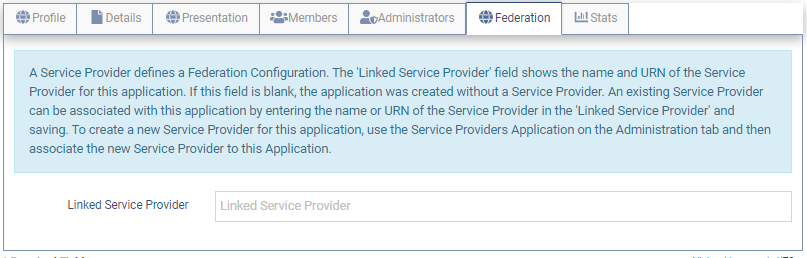
The Federation configuration for the application may be created using the Service Providers Application on the Administration tab. Once the Federation configuration has been created the name and Entity Id can be added here to associate the Federation configuration to the application.
Template
If the Federation configuration has been created via a template, the template name will be presented as shown below.
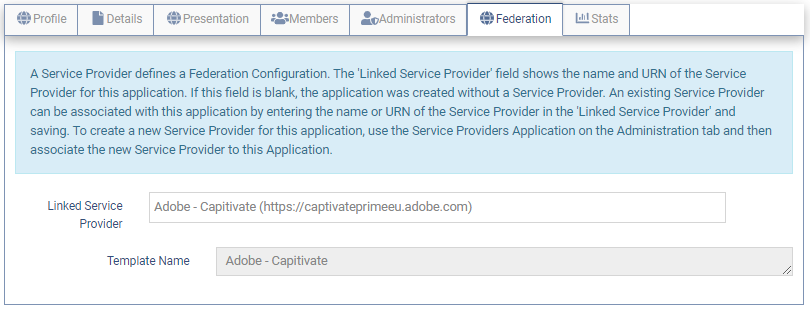
The Template name will be filled in from the Template selected.
If the Template required a Client ID string entry the Client ID field will be present. This field may be modified. The Client ID provided is added into the URN/Identifier and the Endpoints for this application. It is also added into the Linked Service Provider URL as shown in the example below.
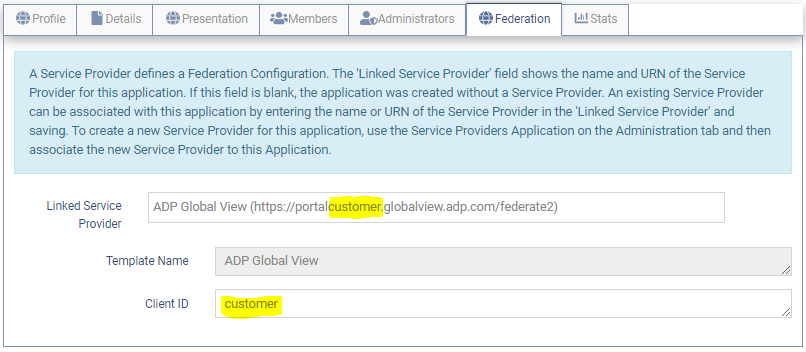
The Linked Service Provider field shows the name of the Federation configuration for this application in the Service Providers Application on the Administration tab.
Manual
If the Federation configuration was entered manually the Federation tab will contain a subset of the configuration fields as shown below. These fields may be modified.
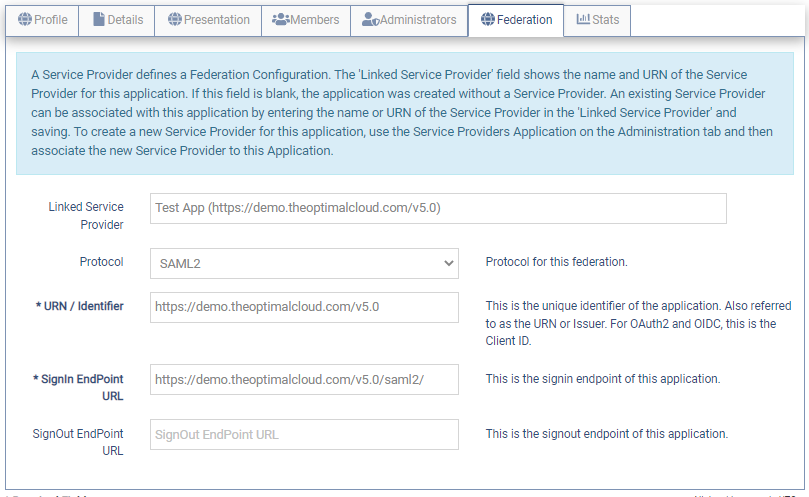
The Linked Service Provider field shows the name of the Federation configuration for this application in the Service Providers Application on the Administration tab.
The following fields are Federation configuration fields
- Protocol - The protocol used by this application.
- URN/Identifier - This is the unique identifier for the application.
- Signin Endpoint URL - This the Signin Endpoint for the application.
- SignOut Endpoint URL - This is the SignOut Endpoint for the application. The SignOut Endpoint may be added here. (optional)
Metadata URL
If the application was created using a Metadata URL the Federation tab will contain the following fields.
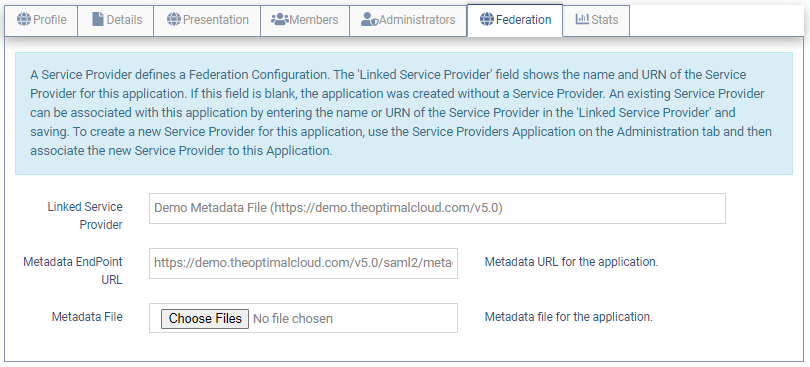
The Linked Service Provider field shows the name of the Federation configuration for this applicationin the Service Providers Application on the Administration tab.
The Metadata Endpoint URL shows the Metadata URL that was used to created the Federation for this application.
The Metadata File field can be used to in a Metadata File to update the Federation configuration.
Metadata File
If the application was created using a Metadata XML File, the Federation tab will contain the following fields.
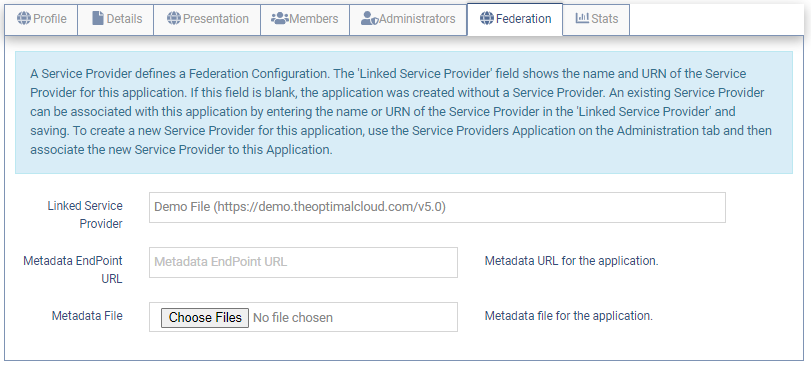
The Linked Service Provider field shows the name of the Federation configuration for this application in the Service Providers Application on the Administration tab.
The Metadata Endpoint URL field is populated when a Metadata URL was used to create the Federation configuration for this application.
The Metadata File field is not populated when a Metadata File has been used to create the Federation configuration. The file is not saved due to file access reasons. This field can be used to update the Federation configuration.
Advanced
To modify the complete Federation configuration for this application , click on the  button that will take the user to the Federation Advanced Settings page for this application. Authentication and Authorization rules for the application may be configured there.
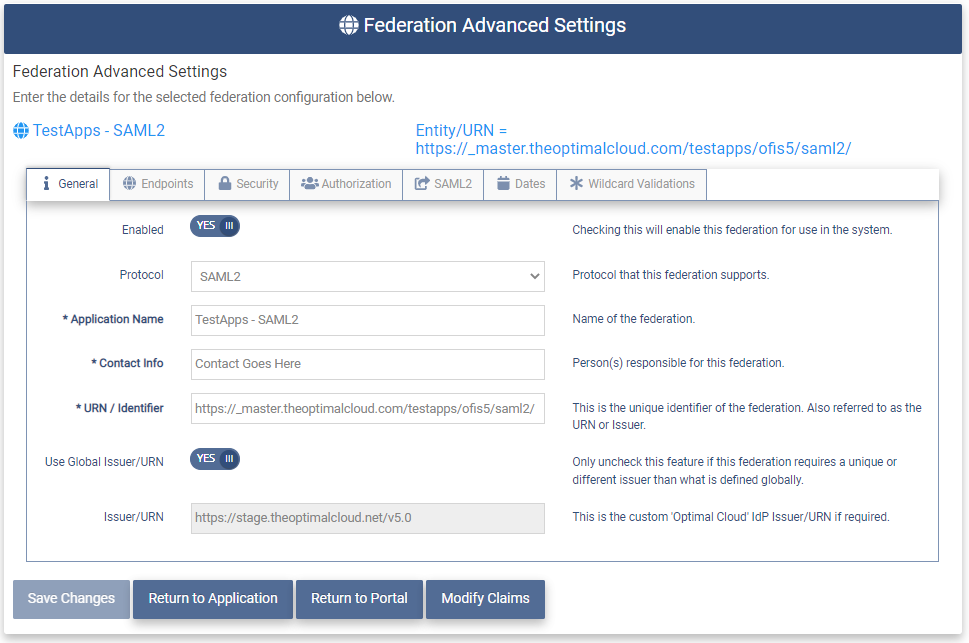
For instructions on how to modify the complete Federation configuration called a Service Provider see the Service Provider Details documentation.
View and Modify Application
The following functionality is supported by administrator.
- The Tenant Admin may view and modify all applications in the Tenant.
- App Admins may view and modify all applications that they are the administrator for.
- Org Type Admin may add and remove members from all applications that they are a member of.
- Org Admin may add and remove members from all applications that they are a member of.
Clicking on the Application Manager Application will present the page below.
To view or modify an application click on the button associated with the organization. 
The Application Details page for that application will be presented.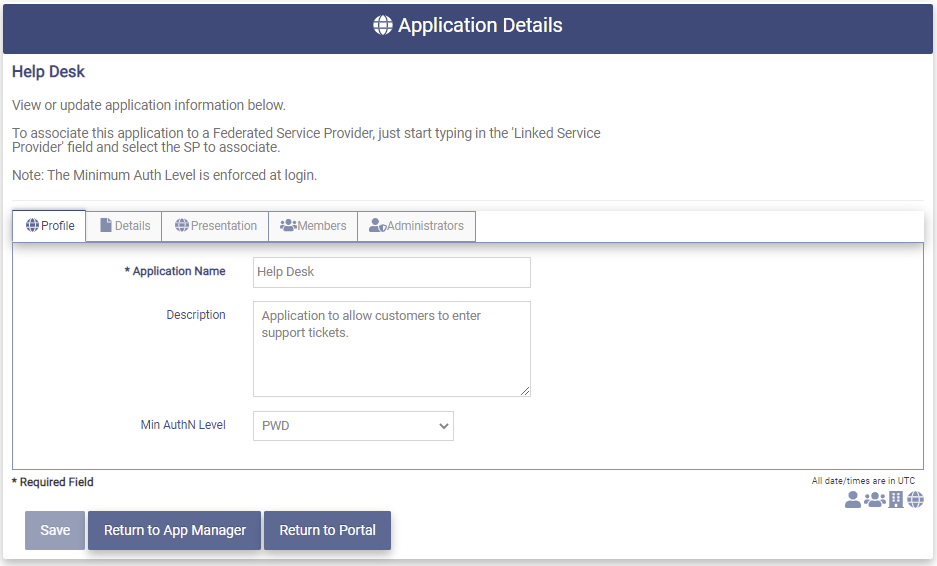
Profile
The Profile tab contains the profile fields for the application that were filled in during the creation of this application.
Fields that are grayed out cannot be modified.
- Application Name - The name of the application used for display.
- Description - The Description of the application.
- Min AuthN Level - The minimum authentication level required for users when logging in to this application. Only modifiable by the Tenant Admin.
The dropdown contains the following choices:
- SOCIAL - users in the application will be required to authenticate at least using their Social Media account.
- PWD - users in the application will be required to authenticate at least using their username and password credentials.
- CERT - users in the application will be required to authenticate at least using a client certificate.
- MFA - users in this application will be required to authenticate first using their credentials and then an MFA option.
Once a field has been modified the button will become available.
Members and Administrators may be added or removed from the selected application. To implement that functionality please see the Add Members, Remove Members, Add Administrators and Remove Administrators sections below.
Once all modifications have been completed, click on the button to save any changes. Upon successful completion of the modification the following message will be presented.

Details
The Details tab contains the following fields:
- When Created - The date and time the organization was created.
- When Changed - The date and time the organization was last modified.
The fields on this tab are display only.
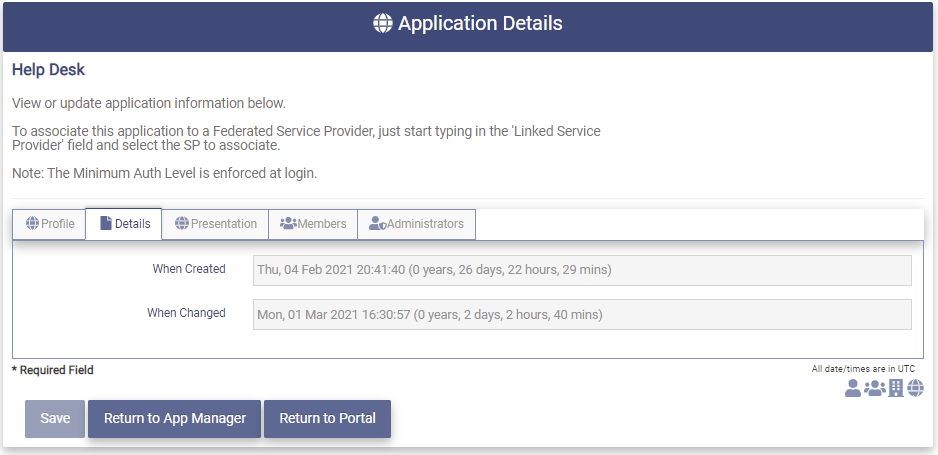
Presentation
The Presentation tab determines whether or not the application is shown on the Portal page and how the application is presented.
The page below shows the presentation tab of an application that has been configured to not be shown in the Portal page.
The following fields are able to be modified.
- Display Options - This dropdown controls whether the application is displayed on the Portal page. The available options are:
Hide - Do not show on the Portal Page.
Show - Show on the Portal Page for all users.
Show for Members Only - Show on the Portal page only to member of the application.
When the Display Options field is set to Hide the only field to be entered is the Linked Service Provider as shown above.
The page below shows the presentation tab for an application that is configured to be shown in the Portal page.
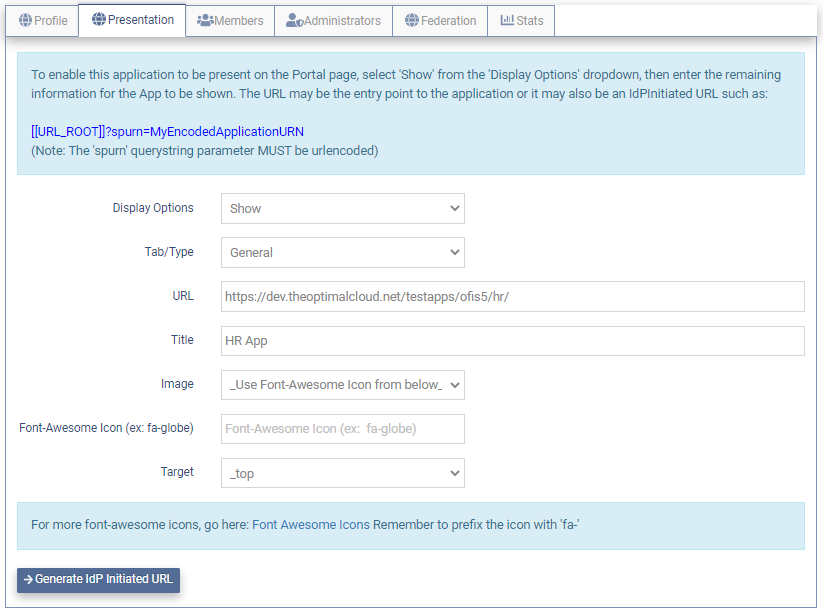
- Display Options - This dropdown controls whether the application is displayed on the Portal page.
- Hide - Do not show on the Portal Page.
- Show - Show on the Portal Page for all users.
- Show for Members Only - Show on the Portal page only to member of the application.
When the Display Options field is set to Show the other fields become available to be entered as shown above.
Tab/Type - This dropdown determines which tab on the Portal page the application is displayed in. The following options are available:
- General - The application will appear on the General tab.
- Developer - The application will appear on the Developers tab.
- URL - The url that the user is directed to when they click on the application.
-
Title - The text to be displayed on the icon.
-
Image - This dropdown determines the image to be displayed on the icon. The image may be selected from the dropdown of preloaded images or specified using the "Use Font-Awesome Icon from below" option.
- Font-Awesome Icon - Name of a Font Awesome icon to be used as the image for this application if the "Use Font-Awesome Icon from below" option was chosen in the Image field above.
- Target - This field determines how the application is opened in the user's browser.
- Blank - Application is opened in new window or tab.
- Self - Current Frame is redirected to the application.
- Parent - Application is opened in the Parent Frame.
- Top - Redirects the entire Browser to the application.
If the application is set up to use IdP Initiated Federation, click on the button and an IdP Initiated URL will be generated to populate the URL field. For more information on IdP Initiated SSO please see the IdP Initiated SSO Knowledge Based Article.
Add Members
The following functionality is supported for each administrator.
- Tenant Admin may add any user as a member to any application.
- App Admin may add any user as a member to any application they are the administrator of.
- Org Type Admin may add any user in organizations in the Org Type they are administrator of as a member to the applications that they are a member of.
- Org Admin may add any user in organizations they are the administrator of as a member to applications they are a member of.
If Org Types are being used in the Tenant, the administrator will only be allowed to assign users from organizations that have the same Org Type as the application.
To add members to the application click on the Members Tab and the list of members will be presented. The page shows that this application does not have any members.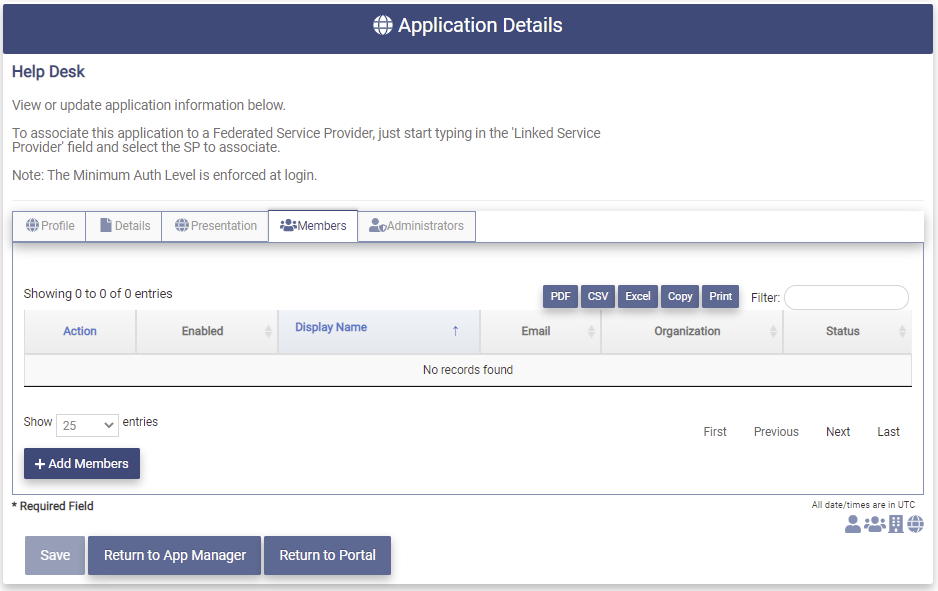
Click on the button to present the User Search page.
The User Search page will display all users in the Tenant. The entries have been limited here due to space limits.
Click on the Action box for one or more users as shown below.

Click on the button to add the user as a member of the application. The Members Tab will now display the members that have been selected. They are shown as "Pending add" until the application has been saved.

If a user has been selected incorrectly, click on the Remove Action button associated with that user. That user will be removed from the Members tab and will not be added to the application when the application is saved.
Click on the button. Upon successful completion of the application modification the following message will be presented.
Remove Members
The following functionality is supported for each administrator.
- Tenant Admin may remove any user as a member to any application.
- App Admin may remove members from any application they are the administrator of.
- Org Type Admin may remove any member that is a user in organizations in the Org Type they are administrator of from the applications that they are a member of.
- Org Admin may remove any member that is a user in organizations they are the administrator of from applications they are a member of.
To remove members from the application click on the Members Tab and the list of members will be presented. 
Click on the button associated with the member to be removed. The user will now be shown on the Members tab as "Pending Removal" until the application is saved.
Click on the button to save the application. Upon successful completion of the modification, the application successfully updated message will be displayed and the user will no longer be displayed on the Members tab.
Force Member Password Change
The on the Members tab allows the Tenant Admin to force all members of the associated application to change their password the next time they attempt to Login.
App Admins may perform this function for the members of the application they are admin of.
Add Administrators
The following functionality is supported for each administrator.
- Tenant Admin may add any user as App Admin to any application.
- App Admin may add any user that is a member of the application as App Admin of the applications that they are administrator of.
To add App Admins to an application click on the Administrators Tab and the list of App Admins will be presented. The page shows that this application does not have any App Admins.

Click on the button to present the User Search page.
The User Search page will display all users in the Tenant. The entries have been limited here due to space limits.
Click on the Action box for one or more users as shown below.

Click on the  button to add the user as an App Admin of the application. The Administrators Tab will now display the Org Admin that has been selected. They are shown as "Pending add" until the organization has been saved.
If a user has been selected incorrectly, click on the Action button associated with that user. That user will be removed from the Administrators tab and will not be added as an App Admin when the application is saved.
Click the button. Upon successful completion of the application modification the following message will be presented.
Remove Administrators
The following functionality is supported for each administrator.
- Tenant Admin may remove any user as App Admin from any application.
- App Admin may remove any App Admin of the applications that they are administrator of.
To remove an App Admin click on the Administrators tab and a list of the App Admins for this application will be presented.
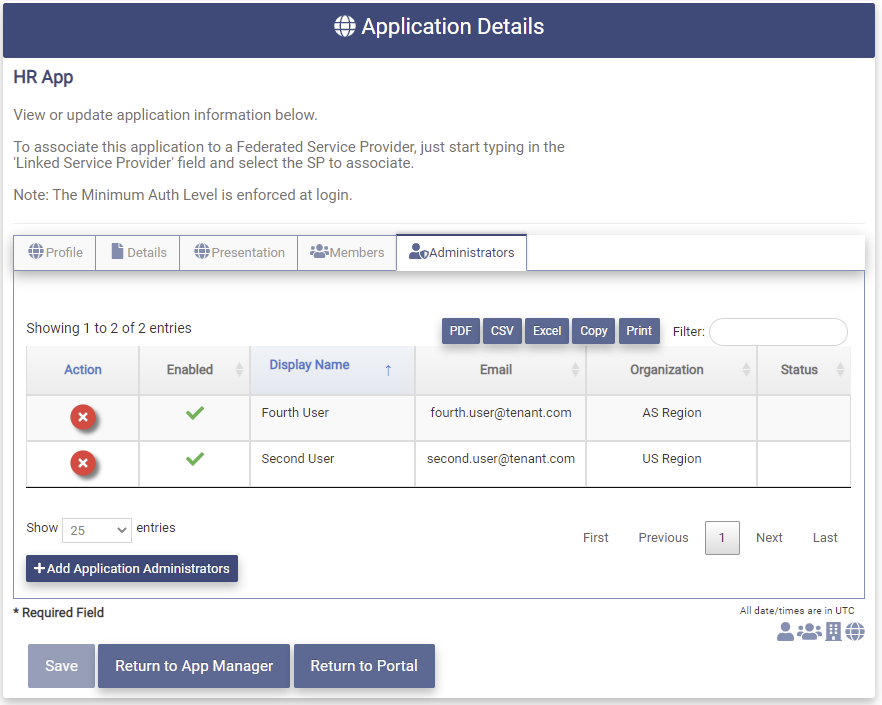
Click on thebutton associated with the App Admin to be removed.

The App Admin will now be shown on the Administrators tab as "Pending Removal" until the application is saved.

Click the button to save the application. Upon successful completion of the modification, the application successfully updated message will be displayed and the App Admin will no longer be displayed on the Administrators tab.
Audit Activity
The Audit Activity tab shows the changes that have been made to the application.
Clicking on the Audit Activity tab will present the following page.

The Audit Activity page contains the following fields.
- Date/Time(UTC) - The Date and Time in UTC time that the application was changed.
- Updated By - The user that updated the application.
- Operation - The type of change made to the application (ADD, DELETE, MODIFY)
- Data - The data that was added, modified or deleted.
- IP Address - The IP Address of the user making the change.
- Location - The location of the user making the change.
- Correlation ID - Unique ID used by the OptimalCloud to correlate events.
The Audit Activity Page contains the following controls.
- Audit Activity data over last Dropdown - The data on the page will be shown according to the timeframe selected in the dropdown.
- Export Buttons - The Export buttons allow the data on the page to be exported. For a full description of how each button works please see the Bottom of Page Fields and Buttons section.
- Filter - This field allows the results of the search to be further limited by the pattern entered.
Federation
Add Federation
If the Federation configuration for an application was not added during the creation process the Federation tab will be shown below.
The Federation configuration for the application may be created using the Service Providers Application on the Administration tab. Once the Federation configuration has been created the name and Entity Id may be added here.
For instructions on how to create the Federation configuration see the Create a Service Provider documentation.
Manual
If the Federation configuration for an application was created manually, the Federation tab will contain a small subset of configuration settings. The configuration settings may be modified.
The Linked Service Provider field shows the name of the Federation configuration for this application in the Service Providers Application on the Administration tab.
The following fields are Federation configuration fields
- Protocol - The protocol used by this application.
- URN/Identifier - This is the unique identifier for the application.
- Signin Endpoint URL - This the Signin Endpoint for the application.
- SignOut Endpoint URL - This is the Signout Endpoint for the application. (optional)
Metadata URL or File
If the application was created using a Metadata URL the Federation tab will contain the following fields.
The Linked Service Provider field shows the name of the Federation configuration for this application in the Service Providers Application on the Administration tab.
The following fields can be used to update the Federation configuration.
- Metadata Endpoint URL - Enter a new Metadata URL. The Federation configuration will be automatically updated from the values contained in the new metadata.
- Metadata File - Enter the full path or choose a new Metadata File. The Federation configuration will be automatically updated from the values contained in the new File.
Advanced
To modify the complete Federation configuration for this application , click on the button that will take the user to the Federation Advanced Settings page for this application. Authentication and Authorization rules for the application may be configured there.
For instructions on how to modify the complete Federation configuration called a Service Provider see the Service Provider Details documentation.
Stats
The Stats tab shows the members statistics for the application.
Clicking on the Stats tab will present the following page.
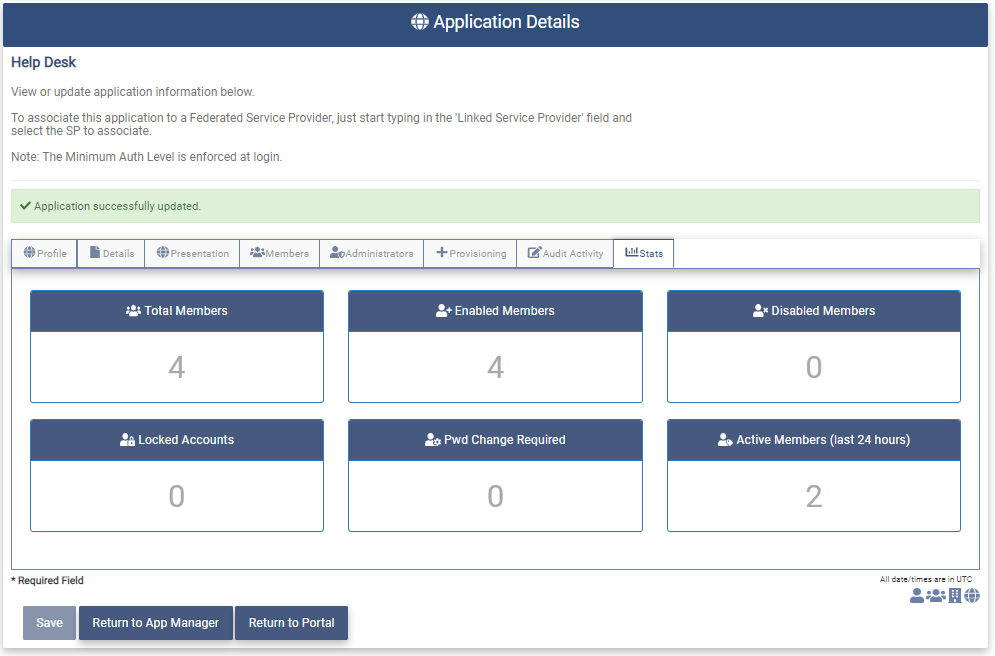
The Stats page contains the following statistics:
- Total Members - Total number of members in the application.
- Enabled Members - Total number of application members that have Enabled accounts.
- Disabled Members - Total number of application members that have Disabled accounts.
- Locked Accounts - Total number of application members that have Locked accounts.
- Pwd Change Required - Total number of application members that are required to change their password.
- Active Members - Total number of application members that have logged in within the last 24 hours.
Remove Application (Tenant Admin Only)
The Tenant Admin may remove any application in the Tenant.
To remove an application navigate to the Application Manager page. 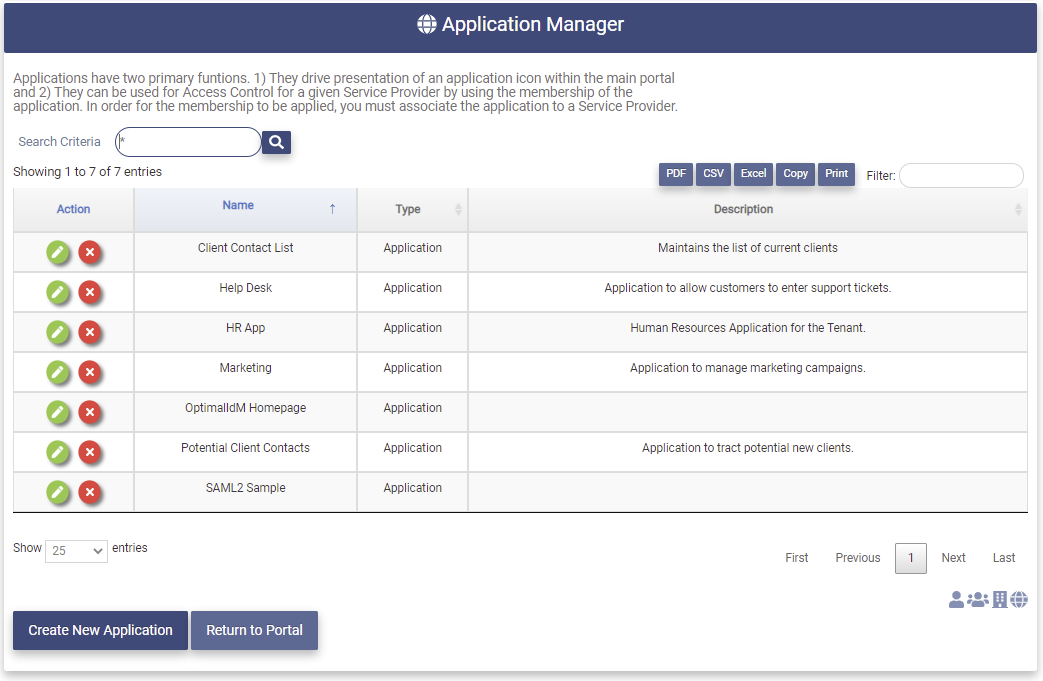
Click the button associated with the application to be removed.
The message shown below will be presented along with the Profile of the application to be removed.

Type "YES" in the box and click on the button. Upon successful removal of the application the following message will be presented.

Return to the Application Manager page. The removed application will no longer appear as an entry on the Application Manager page.
Any users that were members of the removed application will have their membership to that application removed. The user accounts will not be removed.
White Pages
The White Pages application allows the user to view all of the users in the Tenant. The Tenant Admin may view and edit the users.
Any user that has been assigned to the group OFIS - White Pages will have the White Pages application on the Identity Management tab.
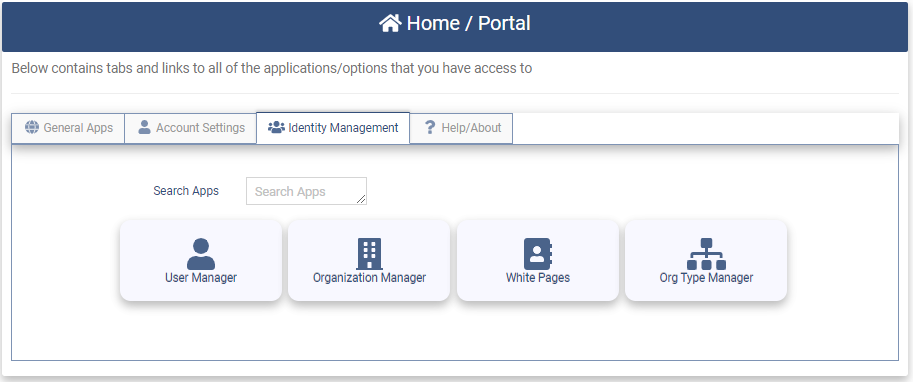
Clicking on the White Pages application will present the White Pages page.
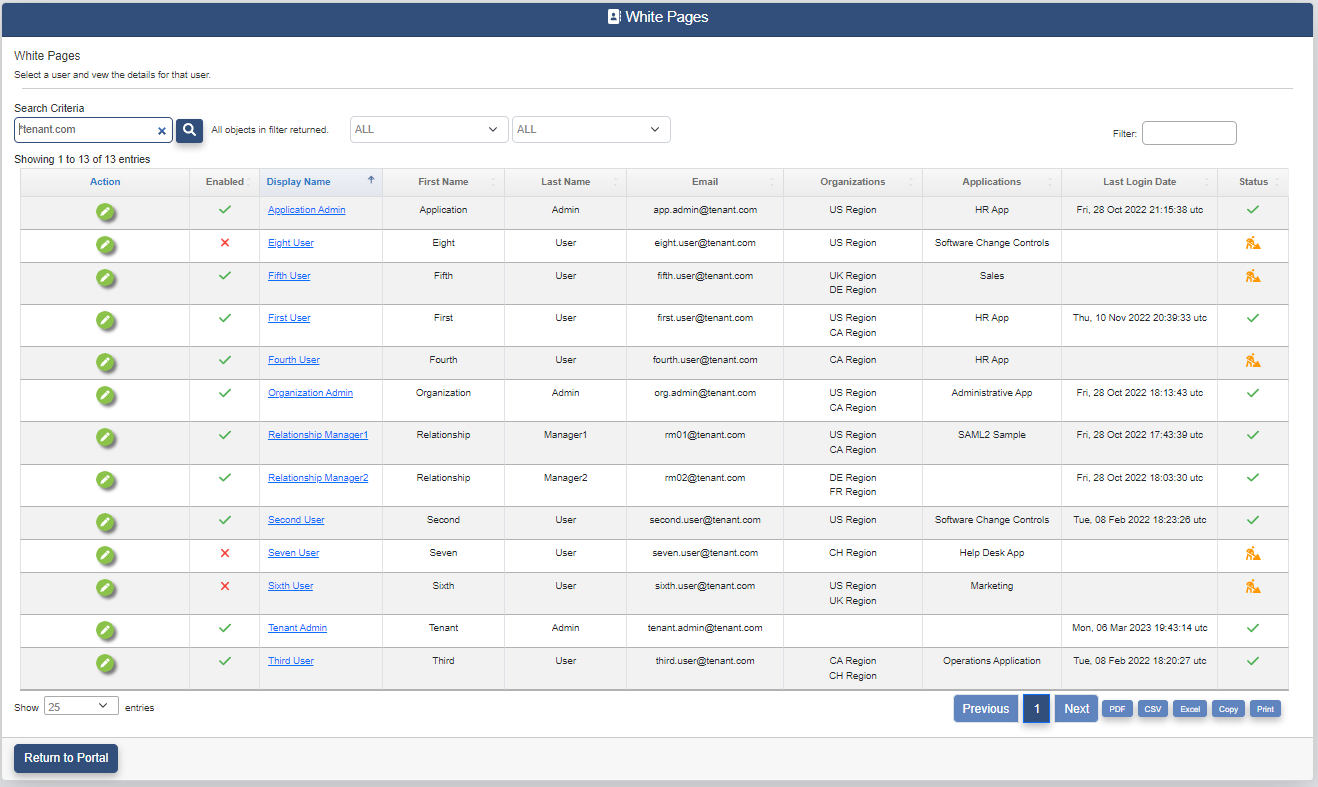
The User Manager page contains the following fields for each user in the Tenant:
-
Action
- View or Modify the user account. Only the Tenant Admin is able to modify the user account through the White Pages. -
Enabled Flag -
: enabled, : disabled. If the users account is disabled they cannot login. - Display Name - The user's full name. If this is a Shared Account the Display Name will have a sign following the name. If this is a Guest Account the Display Name will be followed by a sign.
- First Name - The user's first name.
- Last Name - The user's last name.
- Email - The user's email address (also used as the username for the account)
- Organizations - Any organizations that the user is a member of.
- Applications - Any applications that the user is a member of.
- Last Login Date - The date the user last logged in to the OptimalCloud account. This field will be blank if the user has never logged in.
- Status - This field indicates the status of the user's registration.
- - The user has completed account registration.
- - The user that has not completed the registration process.
- - The user's account is locked after a number of failed login attempts. The number of failed login attempts is configured for all the users in the Tenant. The user must wait 15 minutes before trying again.
The White Pages page has two additional search fields based on special types of users in the table.
The first drop down allows the user to choose from the Status options to limit the entries in the search results. This field is used in combination with the Search Criteria field.
The choices for this dropdown are
- ALL - All users.
- ENABLED - Users that have enabled accounts.
- PENDING - Users that have not completed the self-registration process.
- LOCKED - Users with accounts that are locked after failed login attempts.
- NEVER LOGGED IN - Users that have never logged in to their OptimalCloud account.
- DISABLED - Users that have disabled accounts.
The second dropdown allows the administrator to choose the type of user accounts they would like returned. This field is used in combination with the Search Criteria field. The choices are:
- ALL - This choice will return all user account types.
- NORMAL - This choice will return the accounts of individual users that have normal logins in The OptimalCloud.
- GUEST - This choice will return the accounts of users that are "guests" and cannot login to The OptimalCloud.
- SHARED - This choice will return accounts that are shared by multiple users. These accounts cannot login directly but are used for Federation.
Clicking on the  button will present the User Details page for the associated user. For a more detailed description of this page see the View and Modify User section.